Digital SLR cameras have a bewildering array of settings. Getting them right can make a big difference to your bird photographs and can make producing them much easier.
This tutorial describes the best settings to use, and why. If you just want to know the settings without the reasons, you can jump to the summary table at the end, but it's worth understanding the considerations and trade-offs involved.
Camera settings Get these right and you'll be free to concentrate on aesthetics rather than technicalities
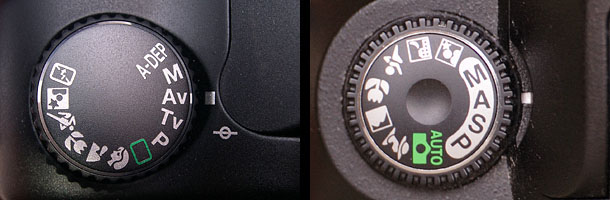
The illustrations below show the settings for a Canon 30D (left) and a Nikon D70 (right).
Your DSLR will have a choice of exposure mode including Programme (marked P), Aperture-priority (A or Av), Shutter-priority (S or Tv) and Manual (M). It may also have a set of special modes for specific types of photography, such as landscapes, but these can be ignored for our purposes.
In choosing the right mode for bird photography, what you're looking for is the best compromise between control and assistance. Manual mode gives you the maximum control, but is slower to use in the field, which means missed shots. In Programme mode, all control over the combination of aperture and shutter speed is taken away from the photographer, so this doesn't provide enough control.
In bird photography, you often feel as though you're battling against low light levels, especially in the UK! Birds are normally on the move constantly, so you need a fast shutter speed to freeze them. Also, long lenses magnify the movement ('shake') in your gear, so this also calls for a fast shutter speed. However, long lenses also tend to be 'slow', having a maximum aperture of f/4 or smaller. Adding teleconverters makes them even slower and further magnifies any movement. As a result, you always want to know that you will be using the fastest shutter speed available for the given light level, and that means you need to keep your aperture at its widest usable setting.
Aperture-priority mode is therefore the best setting for almost all bird photography, because it lets you fix a wide aperture and have the camera set the shutter speed accordingly.
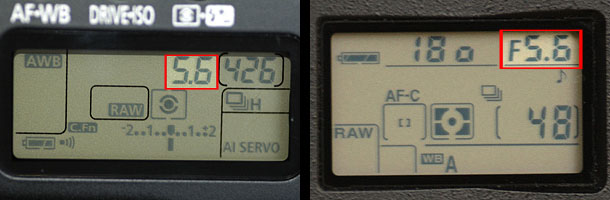
Exposure mode Set to A or Av to ensure you use the fastest possible shutter speed
Your starting point should therefore be to set the widest possible aperture (e.g. f/4). There are two reasons why you would 'stop down' from this setting (i.e. use a smaller aperture): lens quality and depth-of-field.
With the possible exception of the best 'pro' lenses, image sharpness is better in mid-range apertures (e.g. f/8 or f/11) than it is at maximum aperture, especially if teleconverters are fitted. You may therefore get a big increase in image quality by setting your aperture at, say, one f/stop smaller than maximum aperture.
With long lenses, especially at short distances, depth-of-field can be paper-thin. I have taken shots where one edge of a bird's eye is in focus but the other is blurred! If you have enough light to be able to stop down one or two f/stops and still use a fast enough shutter speed to freeze subject and camera movement, you can get more of the subject in focus. Note, though, that this will also cause more of the background to be in focus as well. You will normally want your bird image to be one of two types: an 'environmental shot', in which you see the bird in its natural habitat, or a 'portrait shot', in which the bird is isolated from any distracting background detail. Choice of aperture is important here: for environmental shots, you want to maximise depth-of-field and therefore use a smaller aperture, whereas for portrait shots you want to throw the background out of focus to make your subject stand out, which means using a wider aperture.
Aperture Set the widest usable aperture: often one stop down from full aperture, for better image quality and depth of field
Since you will normally be using Aperture-priority mode, shutter speed will normally be set automatically by the camera. It's important to be aware, though, that there are limitations on the shutter speeds you can use hand-held with long lenses. A good rule of thumb is that you can only hand-hold a lens at a shutter speed that's at least the inverse of the focal length, e.g. a 500mm lens needs a shutter speed of at least 1/500 second.
Since light levels will often not allow such fast shutter speeds, there are a few things you can do to improve the situation. The most effective approach is to use a tripod, monopod, beanbag or other support, with a remote shutter release, to reduce camera/lens movement, but this isn't always possible or desirable in the field. Practising your 'long lens technique' (which I'll cover in a later tutorial on Basic Field Techniques) can give a significant improvement over the rule of thumb limits and, as a last resort, using continuous shooting can often enable you to get, say, one sharp shot from a burst of twenty.
Using lenses with image stabilisation/vibration reduction can enable you to use shutter speeds two or three stops slower than with non-IS/VR lenses, e.g. to use 1/125 or 1/60 sec instead of 1/500 sec. This can make a huge difference in practice.
The advent of digital cameras has also brought with it an additional option: you can easily set a higher ISO sensitivity setting to enable faster shutter speeds to be used.

Shutter speed This will be set automatically in Aperture-priority mode, but you can get better results with fast, IS/VR lenses and good support
DSLRs typically enable you to dial in an ISO sensitivity from 100 or 200 up to 1600 or 3200. This seems like a dream come true! With a twist of the dial, you would be able to get action-stopping shutter speeds and huge depth-of-field. Unfortunately, things aren't that easy. With increasing ISO settings, you also get increased noise in your image.
Although you can reduce the effects of digital noise during post-processing by using noise reduction software, it's still much better not to introduce it in the first place.
If light levels allow it, you should therefore set the lowest ISO sensitivity possible on your camera. Most of my photos are taken at around ISO 200, which is a good compromise in practice. I would not normally go above a setting of ISO 400, although some of the latest cameras can give usable images at higher settings.
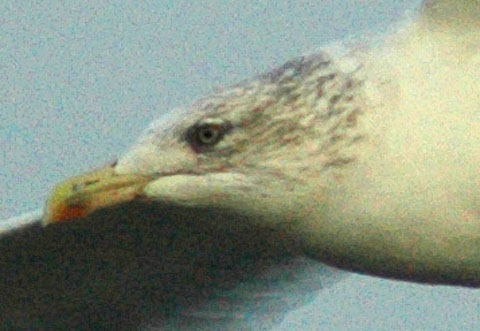
ISO sensitivity When you're just starting out, an ISO setting of 400 is a good starting point. Later you'll want to set a lower setting where light levels allow. This magnified image section shows the types of digital noise you can get at high ISO settings. Notice both the 'luminance noise' (graininess) and 'chrominance noise' (colour splodges), and the way these appear in shadow, mid-tone and highlight areas.
My Exposure tutorial goes into metering in more depth. Most DSLRs have a centre-weighted average metering mode and a spot-metering mode, both of which have been built into SLR cameras for decades. If you understand how these work, they have the advantage of predictability and so give you maximum control. However, you will probably also have an advanced metering mode known as Evaluative or Matrix metering, which will give good results under most conditions with minimal exposure compensation. I therefore recommend this setting, especially when you're starting out. I use this setting most of the time, dialling in exposure compensation as required and switching to spot metering for exceptionally difficult situations.
Just a word of warning here! One of the biggest causes of badly exposed images is where I've accidentally left my exposure compensation set or left my meter set to spot metering. You really need to get very disciplined about keeping track of what settings you have used, and returning these to your standard positions after you've used a non-standard setting.
Another thing I would strongly advise you to do is to get used to changing your aperture, ISO setting and exposure compensation without taking your camera from your eye. This is just like finding your car's clutch pedal and gearstick without having to take your eyes off the road. It's critical to being able to make the most of your photo opportunities, so you should practice it until you can do it without thinking.
Metering mode Normally the Evaluative/Matrix setting is best, with exposure compensation dialled in as needed
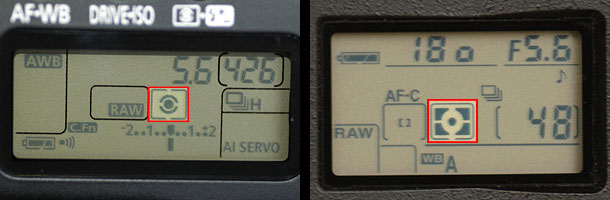
DSLRs normally let you choose between a One-shot AF mode and a Continuous or AI Servo AF mode. The first of these stops focusing as soon as it has 'locked on' to the subject, whilst the second continues to track the subject as long as the shutter is half-pressed.
Since birds are normally moving continuously, you should use the second option most of the time. Exceptionally, you may want the additional control of the first mode, e.g. to enable you to fix your focus while recomposing your shot. Personally, I never use this option: for control over composition, I normally use alternative AF points.
In addition to using the central AF point, DSLRs typically let you select one of four or eight additional AF points distributed around your viewfinder. In bird photography, 99% of the time you should be focusing on the bird's eye. By using alternative AF points, you can do this whilst positioning the bird in the frame in such a way as to give a good composition. Frustratingly, camera manufacturers place the alternative AF points in the central portion of the field, and so this technique gives limited composition options. If you wanted, for example, to place the bird's eye at the extreme top-right of the image, you would need to revert to an alternative technique such as using the AF lock button (my preferred option), using One-shot AF or using manual focusing.
An additional focusing option built into DSLRs is the ability to make all AF points active so that, for example, a flying bird could be tracked by any AF point that you could manage to get on to it. This can be useful for birds flying in a featureless sky, but can be more trouble than it's worth if a bird is flying against a background of trees or sea, because the camera tends to focus on these rather than the bird. For this reason, I don't normally use this setting. See my separate tutorial dedicated to Flight Shots for more details.
In Continuous or AI Servo mode, the camera will probably automatically select 'predictive AF', if this feature is available. This feature predicts where a moving subject will be at the exact point of exposure and focuses accordingly. If it's not set automatically, make sure you select this option.
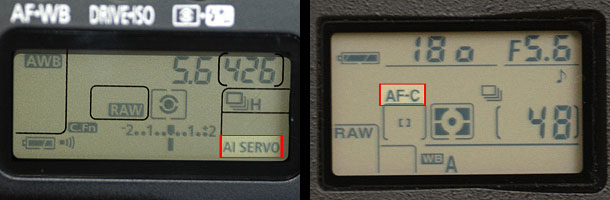
Autofocus mode Use Continuous/AI Servo mode to ensure you keep focused on a moving bird; use alternative AF points to improve composition
In addition to taking a single exposure when you fully depress the shutter release, you will almost certainly have a mode that allows you to hold down the shutter to take repeated exposures. There are people who advocate both extremes in using these modes: some will take only single exposures at the exact moment that everything is right, whilst others will blast away continuously in the hope that at least one good shot will be found in post-processing. The first of these approaches helps to develop attention and timing, fills up your memory card less quickly and cuts down on the number of images to be sifted through on the computer (a task never to be underestimated). The second approach can increase the probability of getting a good shot, especially in fast-moving, unpredictable situations, such as capturing a flight shot of a bird with its wings in an ideal position.
I use an approach in between these extremes whereby I set my camera to continuous shooting, but don't press the shutter until everything looks right and then release the shutter again fairly quickly, typically taking one to three frames at a time. Exceptionally, I will continue to hold down the shutter if the situation calls for it.
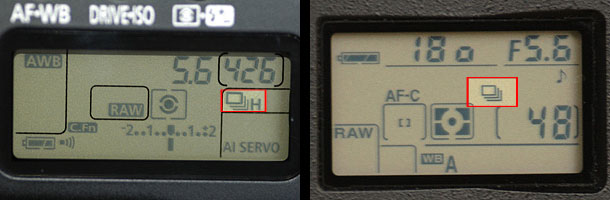
Drive mode Set this to Continuous but use carefully timed short bursts, rather than machine gun-style blasting
The choice between JPEG and RAW shooting has caused huge debates among photographers. JPEGs are smaller, enabling you to capture more images on a memory card and improving burst rates/durations for continuous shooting, as well as the ability to use the images in a variety of applications without further processing. RAW files, however, enable a number of decisions (e.g. white balance, exposure, sharpening) to be finalised atthe post-processing stage, giving much more flexibility to change these parameters in the comfort of your editing environment.
Personally, I feel I left it far too long before making the switch from JPEG to RAW, and I would urge you to shoot in RAW format from the outset. I would love to be able to re-process some of my earlier images with different shooting parameters, but can't because these are 'fixed' in the JPEG image.
As for the ability to capture images in both formats in your camera, this is pretty pointless. It just fills up memory cards quicker and reduces burst rates. If you want to produce JPEGs, you can easily generate them using your RAW image editor.
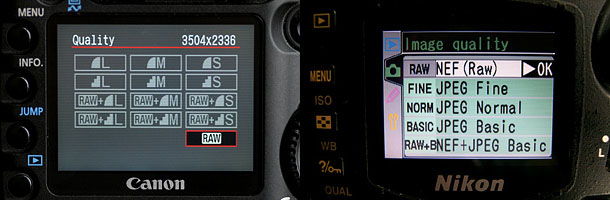
Image format Use RAW from the outset for maximum flexibility
Once you decide to shoot in RAW format, the choice of white balance setting is pretty easy: just use Automatic WB, and tweak the WB settings as needed in your RAW image editor.
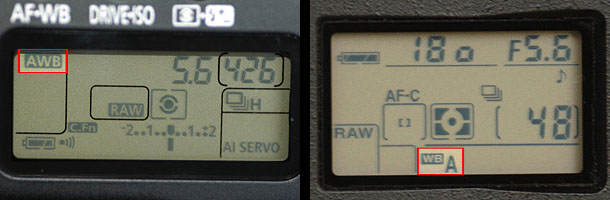
White balance With RAW shooting, white balance and other parameters can be set later on your computer
This one's also easy: set the quality to the best possible and the size to the largest possible and you can't go far wrong.
If you're running out of memory card space or need to shoot an ultra-high-speed burst sequence, you can reduce these, but I've never had to do this yet. Make sure you have enough memory cards and, if you're running out of space, you can normally delete shots you've taken rather than think about reducing quality or size. On the other hand, if you're faced with a truly unique shooting opportunity, use whatever settings are needed to get the shot.
These are all settings that can be adjusted in-camera, but are better adjusted during RAW post-processing, so I'd recommend leaving them at their 'zero' values. In particular, turn off any in-camera sharpening, because you will have much better sharpening facilities available on your computer.
If you're shooting RAW, this is less important because you can reset these values later, but once they're fixed in a JPEG, you're stuck with them.
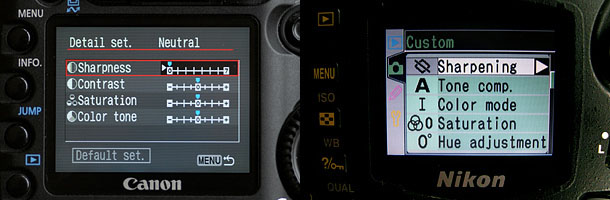
Sharpening, contrast, saturation and colour tone Set these to zero and make any required changes on your computer
This is another area that could be discussed at great length but, unless you're involved in specialised print work, it's best to stick with sRGB, which will almost certainly be the default setting.

Colour space sRGB is the best setting unless you have specialized requirements
To summarise, then, my recommendations for general bird photography are listed in the following table:
Exposure mode |
Aperture-priority automatic (A or Av) |
|
Aperture |
Normally the widest your lens quality will allow; smaller where greater depth-of-field is critical |
|
Shutter speed |
Set automatically by aperture-priority mode) |
|
ISO sensitivity |
100 if possible, but may need to be increased to get motion-stopping shutter speeds, so typically 200-400 |
|
Metering mode |
Normally Evaluative (Canon) or Matrix (Nikon), with Spot metering for extreme situations |
|
Autofocus mode |
AI Servo (Canon) or Continuous AF (Nikon) |
|
AF point selection |
Normally centre point, with alternatives selected for improved composition |
|
Drive mode |
Continuous |
|
Image format |
RAW |
|
White balance |
Automatic |
|
Image quality |
Highest |
|
Image size |
Largest |
|
Sharpening |
Off |
|
Contrast, saturation, tone |
Zero |
|
Colour space |
sRGB |
If you're interested in getting some assistance with your bird photography, contact me. I'd be happy to give advice or to sign you up for one of my Bird Photography Workshops.