I am often asked what equipment is needed for bird photography. This is a difficult question to answer because it depends on so many factors:
what birds you want to photograph (rarities, common birds, captive birds, etc.)
what you want from your photos (record shots, photos for web publishing, photos you can sell, etc.)
what you're physically able to lug around and use (some high-end gear is very heavy and unwieldy)
how much you have to spend.
For this tutorial, I'll start by describing the choices I made, the reasons for these and the lessons I learned, and then make some recommendations for anyone just starting out now. Since this has now become a long page, you can jump to the individual sections using the following links:
Firstly, though, I should say that although equipment is important, it's only one of many factors involved in producing good bird images, so don't get too hung up on this. (If you're anything like me, I'm sure you'll ignore this advice!)
Although it now seems unimaginable, when I first created this page most bird photos were still being taken on slide or print film. I tried this over many years from my early teens and failed miserably. Thankfully, the digital era now enables anyone to get great bird photos with inexpensive gear, taking as many shots as needed and learning rapidly from the immediate feedback available.
Lesson: Enjoy the fact that film is dead and we never had it so good.
I got my first decent compact digital camera (a Nikon Coolpix 4300) in 2003, mainly for taking family photos. I heard about the technique of using cameras like this to take photos through spotting scopes, i.e. digiscoping, and got very excited at the possibility of finally being able to capture images of birds.
I spent a few months fiddling with different settings and making minor improvements, but realized I'd need to invest quite a bit more to get any worthwhile results: better scope, better tripod and better camera (with adapter, cable release and other bits of kit).
At the same time, I was reading widely about bird photography and looking at the photos being posted on the Internet. This really got me hooked and I realized that I was getting more of a buzz looking at high-quality images of even common birds than distant shots of rarities. Given my limited budget, I knew I had to decide between upgrading my digiscoping kit and investing in the Digital SLR (DSLR) route.
The deciding factor for me was a day spent trying to photograph a Red-throated Diver in late 2004. On a small country park lake, this bird was surfacing anywhere from 20 to 200 feet away but, try as I might, every time I got my scope and camera set up on the bird, it submerged again. At that rate, I could have spent a week there without a single worthwhile image. I felt as though my equipment was working against me, not with me, and that taking the digiscoping route would have me battling against something that wasn't meant to be. That same evening, I ordered a DSLR with the longest lens I could afford.
Lesson: Understand the type of photos you want to take and then choose the technique and equipment accordingly.
At the time, the entry-level DSLR getting the best reviews was the Nikon D70. Having bought this (body only), my budget had virtually gone and I could only afford an £89 Nikon 70-300mm G zoom lens. It didn't matter: I was in heaven, blasting away at every bird I saw, then transferring the images to my computer and learning how to get the most out of them with an early version of Photoshop.
Over the following few months, though, I came up against three problems. I'd expected the first two: the quality of the lens was poor and, at only 300mm, I was struggling to get big enough images of the birds, especially smaller and shyer birds. The third problem was more of a surprise: the light levels through the British winter drop so much that bird photography becomes very difficult. If you open your lens to the maximum aperture, you get the poorest quality; if you turn up your ISO sensitivity, you get too much digital noise; if you choose a longer shutter speed, you get blur due to 'camera shake' and subject movement. I felt as though I would have to hang up my camera for six months of every year.
Lesson: Getting hold of any DSLR gear will help you to find out whether bird photography pushes your buttons. If it doesn't, you can either use your DSLR for general photography or sell it without much of a loss. If it does, you will learn very rapidly what works and what doesn't, and will have a lot of fun in the process.
To overcome the three limiting factors, I'd identified a solution. If I could afford Nikon's (£1000+) 80-400mm VR lens, the Vibration Reduction technology would enable me to shoot at lower shutter speeds and the improved optical quality would let me shoot at wide aperture, so I wouldn't need to raise the ISO sensitivity. Also, the longer focal length of 400mm would increase the size of the birds in my images.
By the end of the year, I'd sold some stuff and agreed with my family that I could pool the year's Christmas, Birthday and Father's Day presents and splash out on the VR lens.
Once again, I was making progress and having fun. I finally felt as though I had some photos worth sharing. I started uploading images to BirdGuides.com and set up my own website. People even started buying photos from me, which came as a great surprise. At this point, I had everything I needed to build up a perfectly good collection of bird images.
Unfortunately, my obsessive nature being what it is, I started looking at what would be the ultimate gear for bird photography. I noticed that the leading photographers seemed to be using the Image Stabilized (IS) 500mm or 600mm lenses made by Canon. Not only did these have greater magnification, but their wide (f/4) apertures and superb optics meant they could use teleconverters to gain even more 'reach', whilst still making it possible to shoot hand-held.
I'd tried using a 1.4x teleconverter with my Nikon zoom lens, but the loss of image quality and autofocus speed/accuracy was just too great.
At this point, I realized that Nikon didn't have a longer lens with VR/IS technology, even though their 500mm and 600mm lenses cost more than the Canon equivalents. At the time, I couldn't afford any of these lenses anyway but, a year or so later, I had an unexpected bonus that meant I could finally order one of the ultimate bird photography lenses.
My research suggested that a 500mm lens would be on the limit of what I could hand-hold, so my preference was to go for one of those, rather than the 600mm. Since there was no prospect of Nikon launching a VR version of their 500mm lens (I asked them), I bit the bullet and switched to Canon. In April 2006, I bought a 30D body and 500mm lens, plus 1.4x and 2x extenders, costing a total of £5500.
Lessons: If it's something you really want to do, it's surprising how you can find ways to make it happen. If you really get hooked, you could end up being prepared to spend vastly more than you planned, so don't ignore your upgrade path. Contrary to what camera magazines would have you believe, you should select your equipment based on the entire system, especially the lenses, not the camera bodies. In fact, camera bodies change every year, whereas the key lenses change only every decade or so.
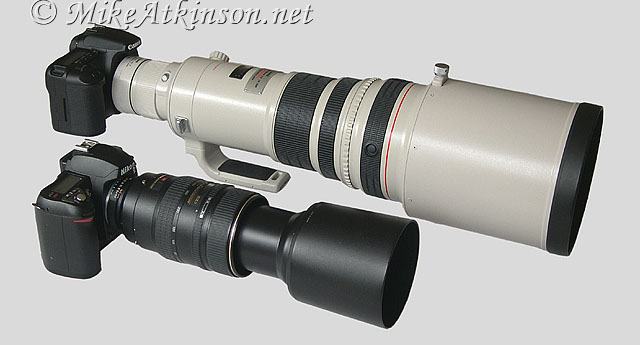
Equipment I've used for bird photography: Nikon D70 with 80-400mm zoom lens (bottom), which I upgraded to the Canon 30D with 500mm f/4 IS lens with 1.4x converter (top). I've since upgraded my camera body first to a Canon 40D then to a Canon 5D Mk II, but I still use the same lens.
Having spent such a huge amount of money on my gear, I then spent a month losing sleep wondering what I'd been thinking of. I also became aware of some of the difficulties involved in using this gear:
previously, I'd take my camera everywhere 'just in case', but with something of this size and weight, I just couldn't any more
it attracts a lot of attention, which can cause problems and can limit the places you'd want to use it
the inability to focus closer than around four metres causes lost opportunities and the diameter of the lens means it can be very difficult (and sometimes impossible) to use through a hide window
the high magnification can make it difficult to locate and track your subject, especially for flight shots, and can emphasize atmospheric conditions, such as heat haze.
Gradually, though, I realized that the results I'd been getting were greatly improved and that many of the birds I was photographing would have been beyond the range of my previous gear. Importantly, I found that the extra reach meant that I could photograph birds from outside their 'circle of fear'. Previously, a typical situation would be that I'd see a bird and start moving closer to it, but not so close that it would be disturbed by my presence. In most cases, this would be too far away to get a decent-sized image of the bird. With the new gear, though, I was able to take shots of the bird happily preening, feeding and generally behaving naturally, which makes for much better photographs.
I found that I could use the 1.4x teleconverter to turn my 500mm lens into a 700mm lens, whilst retaining good image quality and autofocus/IS operation. With the 2x converter, though, I lost autofocus operation, so have never used it. [Note that, since the beginning of 2009, I have been trying not to use teleconverters at all to make sure I'm getting the best possible image quality out of my lenses.]
Incidentally, I also found I needed a backpack to carry around my gear. The only one I could find that would take my camera body plus lens and converter was the Lowepro Lens Trekker 600AW. Although I do have to remove the lens hood to fit this in, it works very well and even makes it possible for me to go out on my mountain bike with it on my back, giving me even greater mobility. The Mark II version of this backpack currently available is taller, and so can fit the lens without removing the hood.
One of the key steps forward I took at the point when I bought my Canon gear was to start shooting in RAW format and using the bundled Canon Digital Photo Professional (DPP) software to convert images to TIFF format before final processing in Photoshop. This gives a major boost to control and flexibility during processing. I also started to use the NeatImage tool to reduce the amount of digital noise in my processed images. One of the things I didn't anticipate was the amount of time I'd spend on learning how to use image processing tools effectively.
Lessons: You don't need a pro supertelephoto lens to photograph birds but, if you can afford one, these do have major advantages that outweigh their drawbacks. You can have a lot of fun using the cheapest of DSLR gear and can take high-quality photos with mid-range gear. In the end, though, having even the best equipment will not make you a good bird photographer any more than having a good set of paintbrushes would make you a good artist!
In truth, I haven't felt any great need to buy more equipment since my big blowout in early 2006. I've bought several significant equipment items since then, but these were in no way essential and haven't really made much difference to my bird photography.
In February 2008, I upgraded my camera body from a Canon 30D to a 40D to get improvements in a number of areas (higher resolution sensor, better high-ISO noise performance, improved autofocus accuracy and a bigger LCD screen), even though I knew each of these would be only slight improvements.
In June 2008, I bought a Canon 300mm f/4 IS lens to use alongside my 500mm, for two reasons: firstly, its greater portability would mean I could take it with me more of the time and use it more easily from hides; second, with a minimum focal distance of 1.5m, it would be better for close-up work. It could also deliver pretty good results with a 1.4x teleconverter attached. In practice, I've had very little use out of this lens. There's nothing wrong with the lens at all and, in many situations, it would deliver images that few people would know weren't taken with my 500mm lens. However, I always want to know that I'm getting the best possible results in any given situation, so tend to use my best lens wherever possible.
In July 2009, I bought a Gitzo 3541LS Systematic Studex tripod and Wimberley Mk II gimbal head. I still prefer the mobility of purely hand-held shooting, but there are situations where it's better to have solid, maneuverable support for your gear, especially where it would be beneficial to keep your camera pointed at a bird for longer than your muscles will allow (e.g. waiting for a bird to take flight). In fact, I've barely used the tripod since I bought it, so I'm still not convinced about its value.
In September 2010, I upgraded my camera body from a Canon 40D to a 5D Mk II. I chose this body because my primary interest is image quality. Had I been primarily interested in reach or speed, I'd have chosen the 7D or 1D Mk IV, respectively. I've found the 5D Mk II to be very similar to the 40D, which has made the transition easy and which has re-confirmed how good the 40D was. However, my biggest issues with the 40D have all been improved upon, namely autofocus and high-ISO noise performance, plus handling of tones and colours. Also, the full-frame sensor gives benefits both when shooting in the field and when cropping on the computer. Apart from the expected shortcomings for flight shooting compared with the 7D/1D Mk IV, I've been very happy with the 5D Mk II. Once again, though, this body upgrade has confirmed to me that lens quality is more important than body quality in determining your final results.
In May 2011, I bought a used Canon 300mm f/2.8 IS lens to use alongside my 500mm, especially for use during Birds in Flight (BIF) shooting. I still prefer the bokeh and overall look of the images taken with the 500mm, but the reduced weight/bulk of the 300mm is a real advantage for BIF work. or where portability is paramount. In situations where 300mm is sufficient focal length, the sharpness and AF speed of the bare 300mm are great advantages. Normally, though, a longer focal length than 300mm is needed and so I tend to use my 1.4x converter with this lens, which effectively makes it a 420mm f/4. I normally don't use teleconverters, but the combination of this lens' sharpness, AF speed and f/2.8 maximum aperture mean it can take the 1.4x and still perform well. I never use the 2x converter with this lens because the impact of image quality and AF speed are too great. My 500mm f/4 is still my main lens, but I use my 300mm f/2.8 if I'm traveling, going on a long trek or doing a BIF-only shoot.
In September 2015, I supplemented my 5D Mk II body with a 7D Mk II, my first new body purchase for five years. The reason for the purchase was to get a higher keeper rate for BIF and other action shooting situations. The AF of the 5D Mk II is accurate and plenty fast enough for static or slow-moving birds (e.g. walking or swimming), but absolutely hopeless for fast-moving birds, causing me frustration on many occasions. The 7D Mk II promised much more capable and configurable AF, plus better ergonomics for actions shooting (e.g. the AF selection lever) and a much faster frame rate (10fps compared to 6fps for the 5D Mk II). All of these benefits have proved genuine and I've really enjoyed the greatly improved BIF capability of this body. It also gives a slight resolution improvement that's useful for shooting smaller/more distant birds. However, I still prefer the 'look' of the images from the 5D Mk II, especially colour and tone reproduction, so I plan to keep both bodies. The challenge is how to get the benefits of both in practice, especially with my roving style of bird photography: it's just not practical to lug two cameras with big lenses attached. I'm currently choosing to take one or other model depending on the type of shooting I'm planning to do. There have already been times, though, when I've wished I had the other body.
In July 2016, I finally bought my own copy of the lens I'd been recommending to new bird photographers for many years, namely the Canon 400mm f/5.6 prime lens. I'd always wanted a more portable alternative for times when my main 500mm lens was too big. As mentioned above, 8 years earlier I'd bought a Canon 300mm f/4 IS to meet this need. However, that lens has been a disappointment for bird photography and I'd always wished I'd taken my own advice and bought the 400mm f/5.6 instead. At the time, I succumbed to the temptation of image stabilisation and convinced myself that a teleconverter could give me the extra focal length if needed. As I've concluded many times, though, a teleconverter is almost never a good option. I got more use out of the 400mm lens in its first 8 weeks than I'd had out of the 300mm lens in 8 years.
Lesson: As with most product purchases in life, there are advantages to spending more than the minimum, but there comes a point at which further spending doesn't really gain you very much. Personally, I'm quite relieved about this!
Having been fortunate enough to acquire such a collection of top-quality camera gear, it's been wonderful to be able to concentrate on my photography itself, rather than equipment. At some point, the incremental improvements provided by new product releases may make an upgrade worthwhile but, at present, I don't see any of the latest products being 'must haves'.
Lesson: No matter how much equipment you get, there will always be other goodies to tempt you so, at some point, you just need to switch your attention from your equipment to your images. Once you do so, your photography will really take off!
Based on my personal experience and keeping in touch with equipment reviews, my recommendations for people just starting out are as follows. I've specified the time of writing here because products - especially camera bodies - are replaced frequently, and prices change every month.
Although there is now little to choose between the Canon and Nikon systems, I still believe the Canon system provides the best upgrade path for bird photographers, and is the system used by the majority of serious bird photographers. For this reason, I have stuck with - and am more familiar with - the Canon system. My camera body recommendations are therefore solely based on Canon gear and my lens recommendations are limited to lenses from Canon themselves, or from independent manufacturers who make Canon-fit lenses (in practice, Sigma and Tamron). I do not recommend buying into other systems (e.g. Sony, Pentax) because they simply don't have the long lenses at the top end to which you may one day wish to upgrade.
If you're interested in monthly blog-style news updates on bird photography equipment, you can jump to my Latest News section further down this page.
[A note on independence/impartiality: I have never received any form of payment from any camera equipment manufacturer or seller. I recommend mostly Canon products but that is based on my personal conclusion about which system is best for bird photography. If you read my Latest News section, you will see I am frequently critical of Canon and their products.]
Until you know that bird photography is something you'll take to, start with some reasonably priced gear that you can upgrade or sell later.
If you're determined to buy new equipment, Canon's best value entry-level DSLR at the moment is the 800D, which costs around £580 body only. If you can afford more than that, you are better putting the extra money into your lens, rather than a higher-spec body. Similarly, buy the camera in body-only form, rather than as a kit, so you can put the extra money into a better lens, and don't be tempted by any other gear at this stage. Also, don't be tempted by entry-level bodies in the xxxxD range, which lack important features for photographing birds. If you're prepared to buy used equipment, you could get a much better camera for your money, or a similar-spec camera for a lot less money (see my advice on Buying used DSLR cameras below).
If the camera body has used up most of your starter kit budget, you'll find there are a range of zoom lenses that go up to 300mm focal length from around £100. Have a look at the ones from Canon, Sigma and Tamron: they're not great lenses, but they'll give you a good taste of what's involved. Avoid anything with less than a 300mm maximum focal length.
If your budget allows, the cheapest really sharp lens is the Canon 400mm f/5.6 at around £1200. There are several zoom lenses that go up to 400mm, 500mm or 600mm at just below (or above) this price point, but these would be inferior optically. These include (in order of increasing cost):
Sigma 100-400mm f/5-6.3 OS (£690, 1160g): Good optically, but limited reach - recommended for people with limited physical ability
Tamron 100-400mm f/4.5-6.3 VC (£700, 1120g): Good optically, but limited reach
Sigma 150-600mm f/5-6.3 OS Contemporary (£780, 1930g): Good optically, but big/heavy - recommended for reach-per-£
Tamron 150-600mm f/4.5-6.3 VC (£800, 1950g): Good optically, but big/heavy - recommended for reach-per-£
Tamron 150-600mm f/5-6.3 VC G2 (£1000, 2010g): Good optically, but big/heavy
Canon 400mm f/5.6 (£1200, 1250g): Very good optically with fast AF, but no image stabilisation - recommended as the best all-rounder
Sigma 150-600mm f/5-6.3 OS Sport (£1250, 2860g): Good optically, but very big/heavy
Canon 300mm f/4 IS (£1270, 1190g): Very good optically, but very limited reach
Sigma 60-600mm f/4.5-6.3 OS (£1900, 2700g): Good optically, but big/heavy
Canon 100-400mm f/4.5-5.6 IS II (£1950, 1640g): Very good optically with fast AF, but big/heavy and relatively expensive - recommended if weight and expense are not issues
For a number of years, my advice was 'If you're spending around £1000 on a bird photography lens and you don't buy the Canon 400mm f/5.6, you will regret it!' To be fair, since 2016 the situation is less clear cut, but I still recommend this lens as the best all-round starter lens for bird photographers.
You'll see I've listed most of these lenses as 'Good optically'. In fact, for those lenses, variation between samples means some will be very good.
The prices listed above are from reputable UK-based mail order companies (I mainly use Mifsuds and Warehouse Express). Prices in high-street camera shops would normally be higher, although some will do price matching.
If these prices are too high for your budget, it is possible to buy similar equipment, either new or used, at considerably lower prices, e.g. on eBay. A used DSLR plus 300mm zoom lens can be purchased for as little as £100. See below for my guide to buying used DSLRs.
Don't be swayed into thinking that a compact or 'bridge' digital camera with a high zoom ratio and megapixel count will give you comparable results to a DSLR. These cameras have tiny sensors (typically less than a tenth the size of DSLR sensors!) that generate images with high digital noise and little latitude for effective post-processing. They also have poor autofocus and handling for bird photography. I'm not convinced that even the best non-DSLR camera can compete with the cheapest used DSLR gear, so don't waste your money.
If used DSLR gear is still above your budget (i.e. if your budget is below £100), the best thing I could recommend would be to pick up a cheap digital compact for anything from £50 upwards (£5 on eBay) and just have a go at photographing birds that you can get close to, such as wildfowl at your local lake or captive birds. As long as you accept that the results won't be great, this can still be fun and will certainly make you appreciate it if you later manage to upgrade to a DSLR outfit. If you have a spotting scope, you can, of course, use any digital compact (or even a mobile phone) to have a go at digiscoping. If you're serious about bird photography, though, you'll want to move away from digiscoping as soon as your budget allows.
If you've practiced with equipment like the ideal starter kit above and are now looking for an upgrade, you'll soon realize that there is a big gulf in the available lenses of at least 400mm focal length, stretching from the £1000 level right up to around £5000 or more. This gulf is incredibly frustrating for many bird photographers, who are forced to stick with their £1000 lenses until or unless they can afford to spend a huge amount of money on a Pro lens.
I'll go through the more expensive lenses in order of increasing cost:
Sigma 500mm f/4 (£5000): Excellent image quality with a great combination of reach and portability - recommended as an independent alternative to the Canon equivalent
Sigma 800mm f/5.6 (£5000): Good image quality, but extremely big and heavy with no IS - not bad for the price
Canon 300mm f/2.8 Series II (£5600): Excellent image quality and lightning fast AF, but limited reach - recommended for close-up/flight shots
Canon 400mm f/4 Series II (£6100): Good portability and image quality, but only modest reach - not recommended unless you need minimal size and weight
Sigma 300-800mm f/5.6 (£6500): Good image quality, but extremely big and heavy with no IS - not recommended
Canon 500mm f/4 Series II (£8200): Excellent image quality with a great combination of reach and portability - recommended if you can afford it
Canon 400mm f/2.8 Series II (£9000): Excellent image quality but big and bulky with only modest focal length - not recommended (a 500mm/600mm would be a better option)
Canon 600mm f/4 Series II (£9800): Excellent image quality with a great combination of reach and portability - recommended if you can afford it
Canon 200-400mm f/4 1.4x (£10,000): Very good image quality, but not optimised for bird photography at all - not recommended (a 500mm/600mm would be a better option)
Canon 400mm f/2.8 Series III (£11,000): Excellent image quality but big and bulky with only modest focal length - not recommended (a 500mm/600mm would be a better option)
Canon 800mm f/5.6 (£12,000): Excellent image quality, but big and bulky - not recommended unless alongside e.g. a 500mm f/4
Canon 600mm f/4 Series II (£13,000): Excellent image quality with a great combination of reach and portability - recommended if you can afford it
The Canon 500mm f/4 and 600mm f/4 Series II superteles are the ultimate bird photography lenses because of their combination of reach, quality and speed. The 500mm is a bit more portable/maneuverable, but the extra reach of the 600mm has made it popular with bird photographers, especially those who use lower-resolution bodies such as the 1D X. Although independent lenses may have issues with resale values and future compatibility (theoretically), the comparable performance and much lower price of the Sigma 500mm f/4 compared to the Canon equivalent makes it a good alternative.
The choice between a 500mm or 600mm lens will also depend on the type of shooting you do and what other lenses you have. For example, if you already have a 300mm lens, the 600mm may be preferable, whereas if you already have an 800mm lens, I would go for the 500mm. Obviously, not many people will be in such an enviable position! Make no mistake, though, supertele lenses are big, heavy pieces of kit that require commitment to use. If you're used to slinging any sub-£2000 lens over your shoulder when you go for a walk 'just in case', you will soon realise the superteles are not suitable for that purpose.
If you're lucky enough to be able to buy any of the Canon Pro lenses, a 1.4x extender (teleconverter) is a useful addition. The f/2.8 models can also take the 2x extender without loss of autofocus, although with significant loss of image quality and AF speed. If you have a high-spec. camera body, you may be able to get autofocus with the 2x extender on f/4 lenses, although this may be limited (e.g. to the centre AF point only and with reduced focusing speed). The Series III 1.4x and 2x extenders cost £410 and £400, respectively. I personally avoid any use of teleconverters, with the only exception being a 1.4x on my Canon 300mm f/2.8.
As a final thought on lens upgrades, used Series I Canon 300mm f/2.8 and 500mm f/4 can be bought for around £2300 and £3000, respectively, making these an excellent alternative to the much more expensive Series II models.
In terms of camera bodies, the £980 Canon 80D is significantly better than the xxxD models in almost all respects, including autofocus capability and continuous shooting speed, but the £1350 Canon 7D Mk II is better still and is generally regarded as being the best APS-C body Canon has ever made. Its combination of reach, image quality, AF ability and shooting speed make it ideal for bird photography.
Until recently, most bird photographers ignored the bodies with full-frame sensors because they don't have the 'apparent' (see below) magnification increase resulting from bodies with smaller sensors and were also relatively expensive. These cameras tended to be aimed at landscape or studio/commercial photographers and so didn't have the fast shooting speeds associated with action photography (e.g. sports or wildlife). However, the newer breed of FF bodies, such as the £2800 Canon 5D Mk IV and the £5000 1D X Mk II, now have the AF performance and shooting speed to rival or even exceed the best crop sensor models, albeit at a price. They also have a number of advantages over crop sensor bodies, including easier subject acquisition, improved cropping options and, for frame-filling subjects, ultimate image quality. Canon's supposed 'entry-level' FF camera, the £1350 6D Mk II, also has good image quality, but is less action-oriented.
Just an aside on the 'apparent' magnification of crop sensors. Actually, the theoretical resolution or 'reach' of a camera fitted with a given focal length lens has nothing to do with its sensor crop factor: it is determined by the spacing of the sensor's photosites (often referred to as its 'pixel pitch'). In practice, this is normally reduced by limiting factors such as lens sharpness, digital noise and - at long focal lengths - air quality.
That said, there is a big difference between the pixel pitches of the current FF bodies (5D Mk IV=5.4, 6D Mk II=5.7, 1D X=6.6 microns) and those of the current APS-C bodies (800D/77D/80D=3.7, 7D Mk II=4.1 microns). This means a 800D image will have more than three times as many pixels-per-bird as a 1D X Mk II image. Even accounting for real-world factors, a decent lens on a 7D Mk II or cheaper crop camera will definitely give significantly more subject detail than the same lens on a 1D X Mk II from the same distance.
The 50-megapixel Canon 5DS and 5DS R bodies (£2350 and £2600, respectively) have almost the same pixel pitch as the 7D Mk II, finally bringing the reach enjoyed by crop bodies to the FF range. These bodies have only a modest frame rate (5 fps), but have a great combination of AF capability, resolution and image quality that will be of interest to many bird photographers.
Along with the resolution limitation of the 1D X Mk II, it also has the disadvantages of being big, heavy and expensive. However, for those who can afford it, it has a range of plus points that make it the best DSLR available for action shooting, including BIF (birds in flight). Its combination of high-ISO noise performance, AF capability (including a more powerful battery that drives lens AF motors more quickly), ultra-fast shooting speed (14 fps) and rugged, weather-sealed construction make it the most capable bird photography camera on the market today, especially when paired with a 600mm lens to overcome its resolution limitations.
Again, for those looking for a better value-for-money alternative, a used Canon 1D X can be picked up for less than half of the cost of a new 1D X MK II and a 1D Mk IV can be bought for a fifth of the cost.
Another question I'm sometimes asked is whether flash can be used to overcome the problems of low light in bird photography. In general, I believe the answer to this is 'no'. Flash units, especially with a beam focuser, can be used to provide a 'lift' to poorly lit shots, but only at a lower intensity than the ambient light, otherwise the images have an ugly, unnatural look. It is possible, under controlled conditions, to simulate daylight through complex, multi-flash setups, but this is not something to tackle until you are able to take good photos under natural lighting conditions.
You don't need special computer equipment to process bird images. Most of my published images were processed on an ancient PC with 19" CRT monitor. Current budget desktop packages, which you can buy for around £300, are perfectly adequate for the job, as are any current models from the Apple Mac range.
I strongly recommend that you take regular backups of your work, for which I use multiple external hard drives from Seagate. For under £100, you can now buy a 4-Terabyte hard drive that just plugs into your PC's USB socket. This would probably hold all your images for the foreseeable future. I back up my images to at least two external hard drives in case one fails, plus I maintain an off-site copy in case of fire, etc.
I've found the most valuable PC component is a decent monitor with a good range of adjustments. To get accurate colours, I use a £140 Monaco monitor calibrator, but this does need you to be able to change the monitor's colour and other settings. I now use a LaCie 324 monitor, which I rate very highly.
For image editing, I use a graphics tablet. This is not essential but, if you're doing a lot of selective editing in Photoshop, the £300 Wacom Intuos Pro Medium tablet is excellent.
Eventually, you'll want to use Adobe Photoshop for image editing. This is now only available on a subscription basis, which can add up to an expensive option over time but, fortunately, a cut-down version - Photoshop Elements - is available for £80 or less to get you started. Importantly, this works the same way as the full version, so upgrading is a relatively easy process.
To start with, I recommend you use as few software tools as possible. Each one of these takes a lot of time to learn, so you need to keep things as simple as possible.
I strongly recommend that you shoot in RAW format, in which case you will need to convert your images to TIFF or JPEG format before processing them in Photoshop. For this conversion, I use the Canon Digital Photo Professional (DPP) software that comes free with Canon DSLRs, but you can alternatively do this in Photoshop itself, or in other independent RAW conversion tools.
For noise reduction, I use the NeatImage Pro+ tool (which integrates with Photoshop and costs around £50) but, again, you can alternatively do this in Photoshop itself. Once you've familiarized yourself with your image-editing software, you'll develop a 'workflow' for processing your images: cropping, resizing, adjusting brightness, sharpening, etc. This can be very basic to start with, but can be optimised later to give better results and faster operation.
I recommend getting as much help as you can to learn about image processing. I learnt this the hard way, but could have saved a huge amount of time by getting someone to teach me. Contact me if you're interested in getting some help with image processing.
If you want to print your images, you can get fantastic results from some of the current A4 or A3 inkjet printers from the likes of Canon and Epson (I now use a Canon printer because I've had print head clogging problems with Epson models). Avoid the cheapest printer models, because these are false economy in the long run: go for a photo-optimised printer with at least eight inks for best results.
Make sure you use the manufacturers' own inks and the best possible photo paper and, after a bit of experimentation, you will be getting great prints that will last for decades.
I don't currently plan to update this information every month but, on an occasional basis, I'll review the latest prices of used DSLRs and offer recommendations based on these.
DSLRs have now been around for so long that it's possible to pick up early models for very little money, e.g. on eBay. Although this may sound risky, it now seems to be accepted practice that, if you buy something on eBay that isn't what you want, you can just sell it on without losing money. In most cases, though, if you use the various eBay facilities (e.g. feedback ratings) to check out the seller and the items for sale, you shouldn't have problems.
So, what I've done is to look at eBay's UK listings of the various Canon DSLR bodies to assess their 'going rate'. I've looked at recent completed listings to see what items actually sold for, not what people are asking for or current bid prices. I've ignored cameras with lenses and other accessories, so that I can assess body-only prices. I've also ignored new and refurbished items and overseas sellers, so I can assess typical prices for used equipment. Finally, I've sorted by increasing price and then skipped over all the cheap faulty or otherwise dodgy bodies to find the main grouping of private sales that had good numbers of bids. These are exactly the kinds of items I'd be looking for myself.
My conclusions were as follows:
Camera Body |
eBay Used Price |
Change Since May 2015 |
|
|
|
|
|
Canon 300D |
£20 |
-33% |
|
Canon 350D |
£20 |
-33% |
|
Canon 20D |
£30 |
-40% |
|
Canon 400D |
£30 |
-40% |
|
Canon 30D |
£40 |
-33% |
|
Canon 450D |
£50 |
-38% |
|
Canon 40D |
£50 |
-44% |
|
Canon 500D |
£70 |
-36% |
|
Canon 550D |
£70 |
-53% |
|
Canon 50D |
£80 |
-56% |
|
Canon 600D |
£110 |
-39% |
|
Canon 7D |
£140 |
-60% |
|
Canon 5D |
£150 |
-25% |
|
Canon 650D |
£150 |
-42% |
|
Canon 60D |
£150 |
-44% |
|
Canon 700D |
£150 |
-50% |
|
Canon 1D MkIIN |
£220 |
-21% |
|
Canon 1D MkIII |
£230 |
-49% |
|
Canon 750D |
£240 |
n/a |
|
Canon 70D |
£270 |
-46% |
|
Canon 760D |
£290 |
n/a |
|
Canon 1Ds MkII |
£300 |
-48% |
|
Canon 6D |
£350 |
-56% |
|
Canon 800D |
£350 |
n/a |
|
Canon 77D |
£410 |
n/a |
|
Canon 80D |
£480 |
n/a |
|
Canon 5D MkIII |
£500 |
-62% |
|
Canon 7D MkII |
£600 |
n/a |
|
Canon 1Ds MkIII |
£700 |
-36% |
|
Canon 1D MkIV |
£700 |
-42% |
|
Canon 6D MkII |
£900 |
n/a |
|
Canon 5DS |
£1200 |
n/a |
|
Canon 1D X |
£1400 |
-53% |
|
Canon 5D MkIV |
£1400 |
n/a |
|
Canon 5DS R |
£1500 |
n/a |
|
Canon 1D X MkII |
£3200 |
n/a |
|
As you can see, I've listed the various camera bodies in order of increasing price, and have highlighted some of them in yellow. These are my recommendations at the various price points.
In general, the quality of cameras will be determined by the model ranges, i.e. 1D > 5D > xD > xxD > xxxD > xxxxD. For example, 1D X Mk II would be better than a 5D Mk IV, which would be better than a 7D Mk II, which would be better than an 80D, which would be better than an 800D. However, since these product ranges are continually improving, the picture becomes more complicated. The cameras I've recommended, though, are all good value for money.
When I get the chance, I'll add information about buying used lenses.
Well, it's been a whole year since my last 'monthly update'! As I've said before, the pace of meaningful change in the world of bird photography equipment just gets slower and slower, so I don't imagine there will ever again be a need for monthly updates.
In the last year, I would argue there have been only two new product releases of relevance to bird photographers: the Canon 600mm f/4 IS Series III supertelephoto lens and the Sigma 60-600mm f/4.5-6.7 zoom. I'll come back to those two lenses in a minute but, for now, I'll also briefly mention a few other releases.
Firstly, there has been a Canon DSLR body release in the last 12 months, but only a budget 250D model, which is below the level I would ever recommend for bird photography (specs and features are too basic and a used model from a higher model range would always be much better value for money). Second, alongside the release of the Series III Canon 600mm f/4, there was also a Series III version of the Canon 400mm f/2.8 supertele. In the past, the Series I version of this 400mm lens was regarded as pretty unusable for bird photography because it was hugely heavy and bulky, made even worse by the fact that the lens was front-heavy, making it difficult to wield. The Series II version came out in 2011 and reduced the weight from about 5.4kg to 3.9kg, but was still a lens with limited reach for its size and weight. The new Series III version knocks even more off the weight - down to 2.8kg - and finally addresses the weight distribution issue, making it apparently a good choice for bird photography. There's no doubt that if you did point this lens at a bird, it would be capable of turning in extremely high quality images. The question is why any bird photographer would choose to pay £11,000 for a lens that has only 400mm focal length, when they could pay much less (£8200) for the Canon 500mm f/4 Series II that has about the same weight? The third release I'll briefly mention is the new Canon 'mirrorless' system based on the £2350 EOS R and £1400 EOS RP bodies, plus a variety of new lenses. In fact, I'll say much more about this system in relation to bird photography, but will leave that to my next monthly update.
So, back to the Canon 600mm f/4 IS supertele. The Series I version of this lens was generally regarded as too big and heavy (5.4kg) for handheld shooting, making its smaller, lighter (and sharper) 500mm f/4 IS sibling a much more popular option among bird photographers globally. When these two lenses were superseded by their Series II versions in 2011, the weight reduction of the 600mm lens to 3.9kg was much greater than the weight reduction of the 500mm. Optical performance and image stabilisation were also greatly improved, leading to the 600mm stealing the crown as the lens of choice for pro bird photographers, especially as they mostly switched to full-frame bodies. The new Series III version of this lens achieves a further significant weight reduction to 3.1kg, which is even less than the current Series II 500mm (3.2kg), and much less than the Series I 500mm (3.9kg). The centre of gravity of the new version has also been further moved to the rear to improve handling. Although the laws of physics mean this is still a large lens (16% longer than the 500mm), the impact of the weight reduction on the usability of this lens will keep it ahead of the game for the foreseeable future, especially with the other improvements to IS performance and optical design. The lens has now started shipping at £13,000, which is obviously a pretty crazy price but, for those who can afford it, an unbeatable package in the current marketplace. In the meantime, stocks of the outgoing Series II model are still available at £9800.
Moving way down the price range, we get to the other new release, the Sigma 60-600mm f/4.5-6.7 zoom, which is already in stock at £1900, putting it in price competition with Canon's 100-400mm zoom. This lens supersedes the Sigma 50-500mm zoom - known affectionately by many as the 'Bigma' - that has been a stalwart of bird photography enthusiasts for almost two decades due to its combination of reach, image quality and £1000-ish price point. In fact, having a 500/600mm DSLR lens that can zoom out to 50/60mm is somewhat ludicrous and I'm pretty sure less than 0.01% of images ever captured on a Bigma have been at the 50mm setting. The situation is different for 10x zoom ratios on compact/bridge cameras, which can easily be carried around for general purpose photography such as travel snaps. A lens with the size and weight of the Bigma would not be lugged around on trips unless a long focal length was the dominant requirement. Anyway, the downside of the new 60-600mm lens - in addition to its doubled pricetag - is its increased weight: now 2.7kg compared with only 1.8kg for the 50-500mm. In return, prospective owners would expect very high image quality at the long end. Thankfully, the tests I've seen so far have confirmed that this lens is very sharp even at 600mm, as well as having good image stabilisation and autofocus (even if the last of these isn't as fast as a 'big white' pro lens). Importantly, it also seems to have better performance at the 600mm end than the four 150-600mm zooms from Sigma and Tamron. This lens is therefore destined to be a force to be reckoned with in bird photography circles, especially once its price drops from its launch price point.
Whilst we're mentioning superseded products, the last year has also seen the Sigma 500mm f/4.5 disappear following the release of the 500mm f/4 OS model and also the Canon 1300D, 700D and 750D models going out of stock.
Moving on to price changes since my last update, these are all the more interesting due to the time interval being exactly a year. As well as being a long enough period to establish a trend, comparing prices at the same point in the calendar avoids artifacts due to seasonal variations (e.g. Christmas discounts). Strangely, the original Tamron 150-600mm has gone up in price over the last year from £750 to £800. Other than that anomaly, though, I'm pleased to report that all other price movements in the equipment I track have been downwards.
Starting with Canon camera bodies, it was no surprise to see the launch prices of the budget 2000D and 4000D models dropping 21% and 24% over the year, but to see similar percentage drops for some of the more upmarket full frame bodies was much less expected. I've been saying for some time that the 5DS, 5DS R and 6D Mk II were all well overpriced, so drops of 24%, 22% and 22% on these bodies, respectively, were very welcome. The other top-end DSLRs - the 1D X Mk II and 5D Mk IV - also dropped by 8% and 14%, which is also good news. Things have been less rosy with the mid-range bodies, where the 7D Mk II didn't drop at all and the 80D dropped only 2%. Below that level, the 77D, 800D and 200D dropped 3%, 12% and 8%.
On the lens front, many prices remained the same, but there were some notable reductions. The Tamron 100-400mm and 150-600mm G2 zooms both dropped 11% and the Sigma 150-600mm C dropped 3%. The outgoing Canon 600mm f/4 and 400mm f/2.8 Series II superteles dropped by 10% and 5%, while the current 500mm f/4 and 800mm f/5.6 dropped by 5% and 2% (these lenses both having been tipped for upgrade in the near future).
All in all then, a quiet year, but one with a couple of interesting new products and at least a general price movement in the right direction, which is never guaranteed.
As mentioned in my February update, I'll now only post updates on an occasional basis, since little changes these days in the world of bird photography equipment. Sure enough, in the last three months, there have been no new significant product announcements in this field, and even the rumour mill is pretty silent as far as 2018 product launches are concerned.
In fact, Canon did launch two new DSLRs since my last update - the £370 2000D and £330 4000D - but, like other 'xxxxD' entry-level DSLRs, I don't regard these as significant for bird photographers, who would be much better off buying a used body from the 'xxxD' or 'xxD' range. Canon UK's website now lists no fewer than eight DSLR bodies in its 'beginner' range which, in my opinion, is ridiculous. Canon would do better to focus DSLR investment on bodies for more serious photographers, rather than trying to flog DSLRs to people who really want compact cameras or even just smartphones.
Alongside the appearance of these two budget models, a couple of stalwarts have gradually bowed out, based on the fact that stocks have now disappeared from most retailers. The first of these is the 5D Mk III body, which was the first body in the 5D series that had a pro-level autofocus system. I still have (and use) the predecessor of this model - the 5D Mk II - and, although it still turns in good quality images, it's not a camera you'd want to point at a bird in flight. Like its Mk IV successor, the 5D Mk III was a camera you could use for pretty much all photographic situations.
The other outgoing model is the original 6D, which was designed to bring full-frame photography to a much wider market. With prices that dropped to around half those of the next FF model up, Canon genuinely achieved that aim. Unfortunately, they also lost their way with its successor, the 6D Mk II, which offered very little improvement and has a huge extra cost. Even after almost a year from its launch, its street price is still over £1700, which can hardly justify it being called an 'entry level' FF model.
Ok, so let's look at what's happened in gear prices over the last three months.
Starting with camera bodies, it's no surprise that the 750D and 800D have dropped by 7% and 6%, respectively, but price increases in almost all other Canon camera bodies are certainly unexpected and unwelcome. Worst of all is the 1D X Mk II, which has gone up 13% to over £5400. This is the first time in all the years I've been monitoring equipment prices that I've seen the street price of a DSLR exceed its original launch price (in this case £5200)! Moving to the next model series down, the 5DS R, 5DS and 5D Mk IV have also increased by 6%, 5% and 4%. This is on top of 5% rises for the two 5DS models over my previous update period so, given that these two models are well through their lifecycle, they have to be regarded as relatively poor value for money at this point. Moving further down the range, the 80D, 7D Mk II, 77D and 6D Mk II have gone up by 6%, 4%, 3% and 1%, which is bad news for anyone looking to upgrade to a mid-range camera. Used equipment is looking more appealing all the time, with used 1D X bodies now costing about the same as new 6D Mk II bodies!
On the lens front, things aren't any better. To their credit, Tamron and Sigma have maintained the prices of their long lenses, with the exceptions that the Sigma 50-500mm and 150-600mm C zooms have gone up by 22% and 14%! There were a couple of drops for Canon lenses, with the latest 400mm f/4 DO and 300mm f/2.8 lenses dropping 7% and 3%. For most of their other long lenses, though, there have been significant price increases. Starting with their top-of-the-range models, the 500mm f/4 II, 200-400mm, 800mm f/5.6 and 600mm f/4 II have gone up 8%, 6%, 3% and 1%. Three of these now cost over £10,000! Lower down the price range, the 300mm f/4, 100-400mm II and 400mm f/5.6 have gone up 11%, 9% and 8%. Even the 1.4x and 2x teleconverters went up 8% and 3%. As I said, most of these rises have been significant, and many come on top of earlier rises over the past year. As an example, my long-recommended 'starter' lens - the ancient Canon 400mm f/5.6 - has gone up 35% in total over the last year!
The continuing hikes in the prices of Canon gear must surely be boosting the market for independents such as Sigma and Tamron. I just hope the independents can rise to the challenge by developing more pro-quality prime lenses, not just flooding the bottom of the market with mass-market zooms.
Apologies to regular readers of my monthly equipment updates, but a combination of personal circumstances and a lack of notable changes in the bird photography equipment market have led to there being quite a gap since my last update. In fact, from now on, I'll only publish updates if there's something significant to say (I'll flag any updates on my website's homepage for a couple of weeks each time I publish an update).
So, in the six months since my last update, there has been only one new product announcement/launch that I would consider relevant to bird photographers, namely the Tamron 100-400mm f/4.5-6.3 VC zoom. Not surprisingly, Tamron's new offering has almost the same specification as the Sigma 100-400mm launched last year. The Tamron version is now generally in stock at £790, not (yet) matching the price of the Sigma, which has now dropped to £700 from its launch price of £800. From the reviews I've seen so far, there's little to choose between these lenses, so I'd expect the Tamron to drop in price soon to close the gap with the Sigma.
I know that some people would want to see a detailed comparison of these two zooms, but I'm not going to get into that for the simple reason that the differences are relatively minor and will vary between lens samples and by the type of tests performed. Many lab tests are meaningless as indicators of how lenses will perform in the field. Often, they concentrate on resolution, whilst ignoring other important factors such as AF performance (it doesn't matter how sharp your lens is if it won't focus on your subject rapidly and maintain focus accurately). Comparisons become even less valid when lenses can be 'tuned' after purchase (e.g. by the Sigma dock).
It may be more interesting to compare, for example, the new 100-400mm zooms with the £1800 Canon equivalent to see whether it's worth spending two-and-a-half times as much on the latter (it isn't for most people), or to compare the Sigma and Tamron 100-400mm zooms with the 150-600mm zooms from the same manufacturers (the latter would get slightly more detail out of birds shot from the same distance, but not as much as the numbers would suggest, and at a big weight/size increase).
What's fascinating to me is how crowded the £1000-ish lens market is now for bird photographers. When I got into DSLR bird photography in 2004, the only real choices at this level for Canon shooters were the Canon 400mm f/5.6 prime, the Canon 100-400mm Series I and the Sigma 50-500mm 'Bigma'. Even so, each of these had their fans and critics, and people still agonised over which would be their best choice. Now, alongside the latest versions of these three lenses, Sigma and Tamron have introduced six competing lenses at the 100-400mm or 150-600mm focal lengths. The increased choice for bird photographers may seem like a good thing but, in practice, all it means is there are now nine 'adequate' bird lenses at similar prices, all but one of which suffer from the drawbacks of being zoom lenses and the one prime lens has limited reach and still has no IS.
All of this would have been fine if an upgrade path existed that allowed bird photographers to climb beyond this plateau in manageable steps but, a decade and a half later, we're further than ever from that happy situation. Back then, the jump to a 300mm f/2.8 or 500mm f/4 or 600mm f/4 seemed huge, with these 'big whites' retailing for £3000, £4000 and £5000, respectively. Now, the latest versions of these lenses retail for around £6000, £8000 and £12,000! Every year, I'm staggered that no company bridges this 'lens gulf'. If a leading independent lens manufacturer can already ship an image stabilised zoom lens with 600mm reach for £700, then there's no reason why they couldn't create a smaller, lighter, sharper, faster-focusing 600mm prime for the same price. More importantly, for three or four times that price, they should be able to ship one that leaves the £1000 zoom pack for dead. The only compromise potentially needed relative to the megabucks superteles would be on ruggedness and/or maximum aperture. That said, by dropping one f/stop in aperture (e.g. from f/4 to f/5.6), the smaller resulting lens would be easier to ruggedise to the same degree.
The most promising option we had in this area was Sigma's replacement of its aged, non-IS, £3000 500mm f/4.5 prime. Had they opted for an f/5.6 variant with IS for £2500, the gulf could have been bridged at a stroke. As it was, they went the other way and shipped an f/4 upgrade for £5000.
Ultimately, greater choice in the marketplace drives down prices, which benefits consumers, but if all we end up with is a sea of cheaper products that do an equally poor job of meeting our needs, then we're not being served by our suppliers and our suppliers are missing opportunities to sell. I hope I'll be writing an update in early 2019 reporting that at least one of them has finally seen sense.
Ok, rant over. I'll wrap up by reviewing the main price changes in the six months since my last update...
The good news is that most price changes have been downwards over that period, the exceptions being the Canon 5DS, 5DS R and 750D bodies, which all went up by around 5%. The first two of these seem to be sustained by the enduring demand for 50-megapixel cameras, which seems to have come as a surprise to Canon. The situation with the 750D is more complicated. It's sister model, the 760D, has now been withdrawn (at least on the Canon UK website) and its predecessor, the 700D, is now generally out of stock in the UK, meaning the outgoing £550 750D has no real competition below the £700 price point of the 800D and 77D. It's therefore not surprising that there is still demand for this model.
On to the good news about price cuts, then, let's start with Canon's newest DSLR, the 6D Mk II. This has dropped 15% from its launch price of £2000 to £1700, which is welcome, but this camera is not yet anywhere near cheap enough to fulfill the role of 'entry-level FF body'. Meanwhile, the outgoing original 6D has dropped 22% to £949, which actually is a bargain at present. Moving on to the 800D/77D sister models, which Canon claims are in two different classes, despite having virtually identical specs, these have dropped by 9% and 13%, giving them the same street price of £700! This further adds to the nonsense of this model split. I was hoping to see drops for the other important Canon bodies, namely the 80D, 7D Mk II, 5D Mk III, 5D Mk IV and 1D X Mk II, but these haven't materialised, with the exception of a modest (5%) drop for the 5D Mk IV.
Moving on to lenses, there have been some good reductions in the prices of the Sigma 50-500mm, 100-400mm, 150-600mm C and 150-600mm S zooms (18%, 13%, 11% and 6%), as well as the Tamron 150-600mm G2 zoom (12%). Some of the more expensive Canon lenses have also had more modest, but still welcome reductions, namely the 500mm f/4, 400mm f/2.8. 200-400mm and 600mm f/4 (4%, 4%, 3% and 2%, respectively).
As mentioned in my June post, Sigma now have a 100-400mm zoom - with image stabilisation - selling at only £800, which is less than half of the price of the £1800 Canon equivalent. The new Sigma is also smaller and lighter, which will appeal to many buyers. So does that mark the end of the strong-selling Canon 100-400mm II? Definitely not, I'd say. In the interests of bird photographers, I would really like to have seen Sigma go truly head-to-head with Canon on this one, matching the optical, AF and build quality of the Canon for 30% less cost (much as they have with their 500mm f/4 supertele). In this case, though, Sigma appear to have targeted a lower-end market, with the lens built down to a specific price. Unfortunately for bird photographers, this price point is already occupied by some decent 150-600mm zooms from Sigma and Tamron that provide much greater reach, leaving the newcomer with only its portability as a selling point. I can't, therefore, recommend this lens to bird photographers, at least at its £800 launch price, for which a good used Canon 400mm f/5.6 could easily be purchased.
Also in my June update, I mentioned that Canon had launched two new DSLRs, the 800D and 77D. Well, since then, Canon have launched a further two DSLRs, so I have more to comment on this month!
First up is the Canon 200D, which is now generally available at a launch price of £580. This model replaces the £330 100D, which you won't even see mention of in my equipment round-up above, simply because this model has no real relevance to bird photographers, being just an ultra-compact DSLR aimed at tempting people to upgrade from compact digital cameras or even smartphones. These models omit many features important to bird photographers and, by the time they're fitted to a bird lens, their ultra-compactness no longer makes sense. A used xxxD or xxD body would always be a better purchase from a bird photography viewpoint. As with the 100D, then, I will probably never mention the 200D again.
The other new body is the long-anticipated Canon 6D Mk II, which is just starting to ship at a launch price of £2000. The reason I say 'long-anticipated' is that it's now almost five years since the original 6D was launched, so a replacement could be considered overdue, and also that such a long interval has led many to have high expectations of the new model.
Before offering any comments on the new model, let's briefly take a look at the significance of the 6D model range. When it was first released, there were two very distinct populations of DSLR models: those with APS-C crop sensors costing up to around £1000 and those with Full Frame sensors costing much more (the 5D Mk III at £2700 and the 1D X at £5300). It was still possible to buy the outgoing 5D Mk II at a lower price, but there was a definite gulf that put FF bodies beyond the reach of most enthusiasts. The 6D was created to bridge that gulf, bringing the qualities of FF photography to the masses. The compromise was that it had a low frame rate and primitive autofocus, but (as I'd found shooting primarily with a similar-spec 5D Mk II), this could be a great camera for bird portrait photography, even if it couldn't cut it for action shots such as birds in flight.
On paper, the 6D Mk II offers a tempting package by improving on the two main weak areas of the 6D (giving an FPS boost from 4.5 to 6.5 and an AF point boost from 11 to 45), and also by offering a megapixel boost from 20 to 26. In practice, though, these enhancements are not huge given the five-year wait and the 60% price premium over the outgoing model. The launch price is also 60% higher than the current street price of the capable 7D Mk II, which has a shooting speed of 10 FPS and a vastly better AF system. In fact, although the new 6D model has more AF points, these are concentrated in a very small area in the centre of the frame, and therefore of limited use for either composition or BIF capture. Also, the megapixel boost in the 6D Mk II takes the pixel pitch from 6.5 to 5.7 microns, providing an improvement in resolution, but the 7D Mk II has a much smaller pixel pitch of 4.1 microns. The 7D Mk II also has other handling features, such as a rear joystick and AF area selection lever, that make it a much better option for bird photography.
You may, however, ask why I would compare the 6D Mk II with the 7D Mk II, given that these are FF and APS-C bodies, respectively. Well, the reason is that FF bodies are assumed by many to give greatly superior image quality. The problem is that it doesn't necessarily follow that all FF bodies will have better IQ than all crop bodies. In particular, an old FF model would increasingly struggle to match the IQ of the most recent crop sensor models. This means that the 6D Mk II would need to have significantly better IQ than its five year old predecessor to maintain a real edge over the cheaper and more feature-rich crop bodies. And that's where things really fall down for this new model: most reviews I've seen so far have concluded that the 6D Mk II really doesn't deliver a noticeable IQ improvement. Its dynamic range has been particularly criticized as disappointing by 2017 standards.
As regular readers of my monthly updates will know, at this point I often comment that new DSLRs are disappointing due to development efforts going into better video features, leaving little of value for still photographers. In this case, though, even this doesn't explain the lacklustre upgrade, since the lack of 4K recording and other video features has led videographers to be even more scathing than stills shooters about this new model.
At least at the £2000 launch price, I have to say I'd even prefer to buy the five year old 5D Mk III, which retails for the same price or, alternatively, a used 1D X or 5DS/R. Unless/until it drops in price by at least a third, the 6D Mk II is really not providing the bridge into FF shooting that was the intention of the 6D series, and I'm really not sure who would buy one.
Ok, in other news...
The last two months have, I'm pleased to say, seen some good news about product prices. Starting with lenses, my last update reported price increases for a number of products that have now been at least partially reversed: the Tarmron 150-600mm had gone up by 14% and has since dropped by 10%; the Canon 100-400mm II had gone up by 5% and has since dropped by 5%; the Canon 400mm f/5.6 had gone up by 9% and has since dropped by 7%; and the Canon 600mm f/4 II had gone up by 9% and has since dropped by 3%. There was also an expected 14% drop in the price of the Sigma 500mm f/4.5, since this is now an end-of-life model.
On the body front, there have been a few similar rebounds. The Canon 7D Mk II had gone up by 14% and has since dropped by 11%. The 80D had previously dropped 15% from its launch price, but then went back up to its launch price again, so it's not surprising it's now dropped 5% again (I would expect further drops shortly for this model). Also, the outgoing 6D, which had bizarrely jumped 26% a couple of months ago, dropped 13% on top of last month's 3% reduction. I'm now happy to recommend the 7D Mk II again at its sub-£1300 price point, but could not recommend the outgoing 6D, which is still selling at 10% more than it was a year and a half ago.
Finally, the new 77D has already dropped 4% from its launch price and, again, I'd expect further reductions soon for this body and its 'sister model', the 800D.
No update due to other commitments.
Well, it's been four months since my last update, so it's not surprising there have been a few changes since then...
First, let's mention the fact that Canon has released two new DSLR bodies and that these are now fully in stock at main dealers. The first of these, the £780 800D, replaces the £520 750D. So what do you get for this 50% price premium over the existing model? Well, the main improvement seems to be the introduction of Dual Pixel AF, which provides better autofocus in live view and video shooting, but is of no benefit to bird photographers. The number of AF points has increased from 19 to 45, so this may bring AF improvements (but this needs to be confirmed in practice). Shooting speed has increased from approximately 5 fps to 6 fps, which is good, but marginal. Other specs of interest to bird photographers - including megapixel count - remain the same.
The other new Canon body is the £830 77D which, bizarrely, replaces the £580 760D. To understand why this is bizarre, let's step back in time a little. When Canon came to upgrade the 700D, they decided - for the first time in the evolution of the 'xxxD' range - to split the model in two, offering the expected 750D, plus a 760D that was the same except for an extra LCD display panel on the top and an extra control dial on the back. At one point, though, the street price of the 760D ended up being 30% higher than the 750D, which is a crazy premium to pay for a couple of extra ergonomic features. Coming back to today, then, Canon have done the same thing with the next evolution of bodies that replace the 750D and 760D, namely added a top LCD and an extra control dial (plus a back AF button, actually). This time, though, they're claiming that these minor additions are so significant that they justify badging the latter as an 'xxD' range model. They've therefore given it the 77D name, to sit beneath the recently-launched 80D model. In my opinion, this is a pretty cynical marketing ploy to make it look like the 'would-be 810D' is more up-market. On the flipside, if you actually compare the 77D with the 80D, it is true that there is hardly any difference. As I've said in the past, Canon seems to be putting effort into bringing out more models, more often, and with more features that benefit only video shooters, rather than advancing the state-of-the-art in DSLR cameras for use by photographers.
Whilst I'm talking about Canon, then, let's quickly review what's happened to the prices of their gear (that's relevant to bird photographers) since my last update. Starting with camera bodies, the outgoing 5D Mk III and 750D have dropped by 13% and 7%, and the soon-to-be-replaced 6D dropped by 3%. These price drops are all to be expected, as is the 9% drop in the price of the 5D Mk IV from its inflated launch price. Less expected is the 4% increase in the prices of the 5DS and 5DS R models and, especially, the 16% rise in the price of the 7D Mk II! A year ago, the street price of the 7D Mk II was around £1150. so a 26% hike to bring it to its current £1450 level is not realistically justified. The only reason I can think of for such an increase is to make the 80D body more attractive at its £1000 price point. The 7D Mk II is a great camera body, but I struggle to recommend it at the £1450 price point.
Moving on to Canon lenses, there have been no price reductions in the period and yet further price hikes for some models: the 400mm f/2.8, 600mm f/4, 400mm f/5.6 and 100-400mm have gone up by 10%, 9%, 9% and 5%. The 1.4x and 2x extenders have also gone up by a further 11%.
To be fair, though, Canon is not alone in increasing its lens prices. Tamron's 150-600mm zoom, which had dropped to £700 just over a year ago, is now up to £830 after a further 14% rise since my last update. Thankfully, it's new 'G2 version' dropped by 4% in the same period. More significantly, the rumoured broad price increase across Sigma lenses that I reported in January did actually kick in just after my last update. Alongside Tamron's 14% increase for its 150-600mm zoom, Sigma's Contemporary and Sport zooms of the same focal length range increased by a similar 13% and 11%. For some inexplicable reason, though, the 50-500mm zoom (long favoured by bird photography novices, who knew it by its 'Bigma' nickname) has gone up by 29% to £1100! With such a hike, it surely can't compete with the range of newer zooms offering up to 600mm focal length. Finishing off with a couple of specialist, old-model Sigma lenses, the 300-800mm zoom and 800mm f/5.6 prime have gone up by 18% and 16%. What's really crazy is that these two lenses have had almost exactly the same prices for the last six years!
Once again, scrutiny of the Sterling-Yen currency fluctuations doesn't in any way explain the 30% total price rises we've seen in many products over recent months. We, as consumers, need to continue to use our 'buyer power' to ensure we continue to get value for money from our equipment purchases.
Ok, to end on a higher note, I was delighted to see that Sigma held the price of their new 500mm f/4 supertele at the £5000 mark, keeping up the pressure on Canon's £8200 equivalent. I've also seen glowing reviews of this 'new kid on the block', and even had the chance to compare one in the field against my Canon 500mm f/4 IS. I have to say, I was impressed by how indistinguishable it was in just about all important respects. It's always true that buying an independent lens can carry a risk of reduced resale values and potential compatibility issues with future Canon bodies, but the latter is unlikely and the former is not so much of a risk if you've already saved so much in the first place. I've now added a 'recommended' tag to this lens in my supertele roundup above and have included it in my Conclusions section below.
Also of interest, Sigma have now released a 100-400mm zoom lens at the £800 price point, and this lens is now generally available. I'll comment further on this new lens next month.
No updates due to other commitments, sorry.
Once again, the only thing to report on this month is price changes.
Starting with camera bodies, there has been a major across-the-board price hike, with the Canon 6D, 80D, 700D, 750D, 5DS, 5DS R, 1300D, 100D, 5D Mk IV, 5D Mk III and 1D X Mk II going up 26%, 18%, 10%, 8%, 8%, 7%, 7%, 7%, 6%, 2% and 2%, respectively.
Moving on to lenses, only the Canon 300mm f/2.8 II and 2x extender missed the recent price increases, and these too have now gone up by 9% and 13%.
The only good news of the month comes from the Sigma brand. Not only have they avoided recent price rises, but their new 500mm f/4 supertele can now be picked up for £5000, a 17% drop on its launch price. Stocks are also starting to become available. A 3% drop in the outgoing Sigma 500mm f/4.5 model to £3500 has also followed.
The new Sigma 500mm f/4 is now only 60% of the price of the Canon equivalent. I haven't yet seen enough reviews of this new lens but, at that price ratio, it would certainly be worth keeping an eye on over the next few months.
Well, I held off a while before issuing this month's update in the hope that something interesting might happen, but nothing did, so just a few comments on price movements again this month. That said, some of those movements are highly significant...
Once again, there was a big difference between the price changes for camera bodies and those for lenses. Bodies continue their price rollercoaster with a general downwards movement this month: the Canon 6D, 5D Mk III, 5D Mk IV, 80D, 1D X Mk II and 7D Mk II dropping 15%, 10%, 8%, 8%, 5% and 4%, respectively. At the entry-level end, there were 7% and 3% rises for the 100D and 700D.
On the lens front, the entry-level saw a couple of reductions, namely for the Tamron 150-600mm (12% drop to £730) and the Sigma 150-600mm Contemporary (5% drop to £700). The long-running price war between these two equivalent independent models has greatly benefited the many people who wanted to give bird photography a try without spending megabucks.
Speaking of megabucks, there was also a 4% reduction in the Canon 400mm f/4 DO to £6500, which was expected due to its relative newness, but the news for pretty much all other Canon lenses has been bad. The Canon 600mm f/4, 500mm f/4, 400mm f/2.8, 200-400mm, 300mm f/2.8 and 100-400mm went up in price by 9%, 8%, 8%, 3%, 2% and 2%, respectively. Added to recent price rises, this is pretty disastrous for those wanting to buy the classic bird photography lenses, i.e. the 500mm and 600mm 'big whites'. In May, the UK street prices of these were £6500 and £8700. They're now £8300 and £10,400! That's nearly 30% more in both cases.
If I were looking for that type of lens, I would certainly be looking for alternatives just now. One interesting possibility is the new £6000 Sigma 500mm f/4 lens. I recently predicted that this lens would struggle to sell unless it cost a third less than the equivalent Canon model. Well, guess what? The price of the Canon model just went up so much that, even without any discount on its full launch price, the Sigma is now around 70% of the Canon model cost, so I would say Sigma have just been handed market share. There were rumours that Sigma were going to increase prices across the board from the start of 2017. These haven't materialised yet. Hopefully, Sigma wouldn't be foolish enough to increase the price of their flagship telephoto, at least for now.
Even better value just now would be a used Canon 500mm f/4. The previous model of this lens - which was the ultimate bird lens until around four years ago and is still my main bird lens - can now be picked up for around £3000, which is stunning value for money. The image quality, size and weight of this lens are practically indistinguishable from the new version, so it's pretty difficult to justify paying almost three times the price for the latter.
More problematic is the 600mm option. The older version can also be picked up used for around £3000 but, unlike the 500mm option, the old version had considerably more weight and significantly lower image quality than the new model. This option still gives you a lot of lens for a great price, though.
A final price change is 24% increase for the Canon 1.4x extender, completing a dismal month for top-end lens prices.
So where will prices go from here? Well, one justification for the price rises over recent months has been the Yen-Sterling exchange rate. This increased by around a third from last January to November, so the increases could be considered reasonable on that (simplistic) basis. However, since November, half of those Yen gains against Sterling have been reversed so, although there is always a lag in the system, there are hopes that prices may fall at some point if this rate is maintained. That's a big 'if', though, so your guess is as good as mine. One thing I am sure about, though, is that I wouldn't hand over ten grand for a new lens. I'd buy overseas or used first and enjoy the huge savings.
No new product announcements this month. Small stocks of the new Sigma 500mm f/4 are now available in the UK, but still at the launch price of £6000 (80% of the current price of the Canon equivalent). I'd expect to see this lens selling at two-thirds of the price of the Canon before many people would consider purchasing one. With recent Canon lens price hikes, though, this could happen without much of a price movement by Sigma.
Last month, I warned of the prospect of increasing lens prices. Since then, there have been further big rises in Canon lens prices. The 300mm f/4 and 400mm f/5.6 have gone up 14% and 10%. The latter is now 24% more expensive than it was a few months ago. At the top end of the range, the Canon 600mm f/4 and 800mm f/5.6 have both gone up 8%. Again, the latter is 23% above its summer price. It would now cost you £2200 more to buy this lens!
This may all seem like good news for the independent lens manufacturers, but there is a rumour that Sigma will be increasing its prices across the board in January.
On the camera body front, we're used to seeing big seasonal discounts in the run up to Christmas. There have certainly been reductions on almost all Canon bodies this month: the 100D, 80D, 6D, 1300D, 7D Mk II, 5DS, 5DS R, 1D X Mk II and 750D have dropped 17%, 8%, 7%, 7%, 6%, 6%, 5%, 5% and 2%, respectively. However, there had been broad increases last month (in preparation?), so it's tricky to see the underlying trend. If you compare prices to six months ago, though, you see that the newer bodies have dropped by around 7% and the older bodies have increased by around 10%. For both of these groups, the prices are perhaps 15% above what would be expected.
As per my bottom-line recommendation last month, I would advise you not to hesitate if you're looking at an equipment upgrade. It's definitely time for a Christmas treat!
After a busy September, October was a quiet affair with no new product announcements or availability changes. The biggest changes have been in prices and, unfortunately, these have mostly been in the wrong direction.
The Canon 5DS body dropped 2% to £2650, but is still 6% more expensive than it was a few months ago. The Canon 5DS R also dropped 2% (to £2850), taking it to its lowest price so far (11% lower than its launch price). The way things are going (see below), this is probably the best value for money you'll get in a high-end DSLR, so don't hesitate if you're in the market for a high-resolution body. The only other price drop is for the Canon 100-400mm zoom, which dropped 3% to £1750. This lens was selling at £1600 a few months ago, so this is nothing special. I still regard this lens as overpriced.
Apart from these three small price cuts, the rest of the news is pretty grim. The mid-range Canon 7D Mk II and 6D bodies have gone up 17% and 16%. These had been excellent value-for-money DSLRs, but I would now be reluctant to pay this main dealer price for these bodies, and would be looking at used options or alternative retailers. The 6D was 32% cheaper earlier this year!
Almost all other Canon bodies have also gone up in price. At the lower end, the 100D and 760D went up by 9% and 5%, respectively. At the upper end, the new 1D X Mk II and 5D Mk IV have gone back up to their launch prices (up 3% and 4%). Even the outgoing 5D Mk III has gone up 9% - it's highest price in 4 years!
On the lens front, the Canon 400mm f/5.6 has gone back up to the £1000 point (a 4% rise), undoing 2 years of reductions. In some ways worse, a further 2% rise for the Canon 800mm f/5.6 takes it to an all-time-high £11000.
So why am I dwelling on all of this? Well, simply to make sure you're aware that this in an ongoing upward trend, so you know not to hesitate on any planned equipment purchases. I started warning about this in August and there's no sign of the trend slowing down. In fact, with lenses in particular, I anticipate a lot more rises to come.
September was quite a busy month. Let me start by praising Canon for the fact that stocks of the new Canon 1D Mk IV body are now generally available, a month after the announcement and in line with their promises. This is how all new releases should be!
It also appears from the many reviews already published about this body that there are some genuine improvements over its predecessor, including in sensor quality. The 50% increase in pixel count seems to have been achieved with no loss of image quality at the pixel level and, in particular, dynamic range (DR) seems to have been improved by up to 2 stops at low ISO settings (see my March 2016 update below for commentary on the meaning and importance of DR). Canon has long lagged behind its competitors on DR, so it's great to see it finally starting to close the gap. In further good news, the 5D Mk IV is already available to purchase at less than its launch price, as at least one leading UK stockist is offering it for sale at £100 (3%) less than its £3600 starting point.
Last month, when forming an initial judgment on this new body, I expressed the reservation that the 'image quality and other characteristics are not yet proven'. The large number of reviews I've read, including from bird photographers, have put that reservation to rest. However, the price of the 5D Mk IV is still almost 50% higher than the outgoing model and way more expensive than it is in, say, the US. At that price, I would still rather save £600 and have a play with the higher resolution of the 5DS R or (more likely) save myself the full £3500 and stick with my existing 7D Mk II and 5D Mk II combo and concentrate on other aspects of bird photography. I'll be keeping an eye on the prices of both of these (decent) bodies, though, and may be tempted if they drop by a large amount.
Speaking of prices, this month has also seen (expected) reductions for a couple of other high-end products: the Canon 1D X Mk II body (4%) and the Canon 400mm f/4 DO IS II (3%). However, there have been major hikes for some older high-end lenses: the 800mm f/5.6 (9%), the 200-400mm (10%) and the 500mm f/4 II (13%!). The last of these is particularly depressing, because it took 5 years to drop from its £9000 launch price to the £6500 point a few months ago, only to go up again to around £7600 at most UK retailers. One or two places still have the lens at under £7000, so if you've been thinking of getting one of these lenses, you may wish to act quickly. As I say in my Conclusions section below, I regard this lens and its 600mm big brother as 'the best all-round current lenses for bird photography'.
So much for Canon gear, but there have also been interesting developments this month from third-party lens makers Sigma and Tamron.
I've long been perplexed about why independent lens manufacturers don't go head-to-head with Canon and Nikon in their most popular supertele segment: the 500/600mm f/4 prime. This is such a perfect lens type for so many applications and yet so frustratingly expensive to purchase from the big brands that it must surely be possible to undercut them with an 'almost as good' version that would still make a healthy profit. It's true that Sigma has had a 500mm f/4.5 lens for many years retailing at £3600, but many people have avoided this lens due to the lack of image stabilisation and the mediocre image quality. This month, Sigma has announced a new 500mm f/4 OS Sport with a 4-stop IS system (OS in Sigma terminology), with a shipping date from November. General specs look very similar to the Canon equivalent, so you'd expect Canon to be pretty worried, right? Well, not just yet, I'd say. The launch price of the Sigma version is £6000, which is pretty close to the recent £6500 street price of the tried-and-tested Canon version, for which resale values would be much higher. However, as noted above, the street price of the Canon version has just taken a big hike, and the Sigma version may well drop from its launch price quite quickly.
I would say the Sigma needs to prove itself to be 90% as good as the Canon for 60% of the cost (currently around £4500) and then it could be a real winner. I applaud Sigma for taking the fight to the big boys with this lens!
Moving on to Tamron... Having really put the cat amongst the pigeons with their launch of a sub-£1000 150-600mm zoom a couple of years ago, they've now announced a new 'G2' version of this lens with a pre-order price of £1350. Sigma responded to the popular 'Tammy' a year later with the 'Contemporary' version of a 150-600mm, and went one better by offering an alternative 'Sport' version at a higher price-point. The Tamron and Sigma Contemporary zooms have been locked in a price battle ever since that, up to last month, saw them both pegged at the £740 level. This has been great news for bird photographers, who have been able to get some real reach for relatively little money, with good image stabilisation thrown in. Most have found that, in practice, using these lenses at the 500mm focal length gave better all-round results, but that's still a lot of pixels-per-bird-per-pound!
The Sport version of the Sigma launched at £1600 and now has a street price of £1200. It looks as though the upgraded Tamron G2 version will, at least initially, be more of a competitor to the Sigma Sport version. To me, this is where things become a bit weird. The problem is not so much the specs of the lenses, but the economics. What would have worked well, in my opinion, would be for Tamron to introduce a second, uprated lens to compete clearly with the Sigma Sport on both quality and price. However, what they seem to have done is to stick with a single lens that, at a stroke, gives up the market share they had with their existing product. Bizarrely, even their original outgoing product has had a 12% price increase this month, at which point surely any sane purchaser would opt instead for the Sigma Contemporary version. The only way I can see this working out for Tamron is if they show the G2 version to be significantly better than the Sigma Contemporary zoom and reduce the price to (at most) £900. This would involve knocking a third off the launch price, which would be quite unusual for an independent manufacturer. In the meantime, if I was in Tamron's position, I'd be continuing to sell the original 150-600mm at just less than the Sigma Contemporary to wring out the last returns and avoid handing market share to my top competitor.
With both the new Sigma 500mm f/4 and the Tamron 150-500mm G2, then, the products seem attractive, but the launch prices don't. If they persist with these prices, they will surely have difficulty shifting stock. However, if they've (finally) learnt from Canon the trick of hugely inflating their launch prices, they could have some real winners on their hands. I hope so, because competition is the only thing that keeps the prices of Canon and Nikon gear from going even more stratospheric.
As a final note this month, stocks of the capable £700 Canon 70D body are now running out, leaving the £1000 80D as the cheapest new body above the 'xxxD' budget range. Generally, I regard the 'xxD' range as ideal starter cameras for bird photography but, at present, the new model in this range is way overpriced, so my advice would be to haggle for one of the last 70Ds before they're all gone. If you miss the boat on that, I would consider a used body such as a 7D Mk II before parting with £1000 for an 80D body that will probably be selling for closer to £700 in a few months' time.
Last month, I concentrated on the price increases hitting Canon equipment as the value of the UK Pound dropped against the Japanese Yen. Through August, thankfully, Sterling has been relatively stable, and so there is a chance that further increases may be smaller than expected, or even non-existent. That said, the Canon 300mm f/2.8 II and 400mm f/2.8 II went up by 10% and 9% this month and the Canon 750D body went up by 10%, so there's still a possibility of some big increases around.
On the flip side, the (older) Canon 100D, 70D and 6D bodies dropped by 9%, 4% and 4%, respectively, reducing last month's 14%, 5% and 16% increases in these items. My advice would be that, if there's an item you want and you can afford it, get on and buy it now because there's as much chance that it will go up further as there is that it will drop. This is especially true of lenses, which hold their value much better than camera bodies.
Last month, I mentioned I'd made such a purchase myself. I'll come back to providing more information about this next month, because there's bigger news to talk about this month (see below).
On stock levels, it's now (finally) possible to get hold of the Canon 1D X Mk II from most major dealers.
Ok, on to this month's big news...
As mentioned at the end of my last update, Canon finally launched their long-awaited Canon 5D Mk IV body in late August, replacing the Mk III model launched in March 2012. Canon claims shipping will start from early September, i.e. almost immediately. There seems to be no rhyme or reason as to the gaps between launch and shipping dates for Canon cameras: the gaps range from a few days to many months. On this occasion, the good news is that anyone wanting to get their hands on this new model shouldn't have too long to wait.
On a more negative note, whilst US-based reviewers are all pointing out that the launch price of the 5D Mk IV is exactly the same as it was for the 5D Mk III, this is not the case in the UK, where the launch price of £3599 is 20% higher than the £2999 launch price of the previous model. I don't like descending into whining about 'rip-off Britain', but I'd love to hear Canon justify such a big discrepancy (hint: currency fluctuations don't remotely cover such a discrepancy).
Ok, let's look at the camera itself and see what four-and-a-half years of development have added to the 5D model series from a bird photographer's perspective. Looking at the 'headline specs' (and, as always, ignoring video-related features), we see a significant megapixel increase from 22 to 30 MP, a small shooting speed increase from 6 to 7 FPS, and the ability to use all AF points at f/8 (for teleconverter shooting), rather than just the centre point. I also avoid being drawn into repeating all the marketing features that have no bearing on a photographer's ability to get better actual results. However, the 5D Mk IV does have one noteworthy innovation called 'Dual Pixel RAW', in which - provided you're happy to manage 70-megabyte image files - you can have the ability to make small AF adjustments during post-processing. Strictly speaking, this is not adjusting the actual focus of the image, but it can allow microadjustment to sharpen, for example, a slightly out-of-focus eye in a bird photo. This is a really clever extension of Canon's use of dual pixels for live view AF, but only time will tell how useful it is in practice. One thing's for sure: anyone who thinks they don't have to worry about critical focus in the field because they can 'fix it in post' will certainly be disappointed.
Another feature I've been mentioning for years now is 'stills from video'. With the advent of 4K video shooting, cameras like the 1D X Mk II and now 5D Mk IV can grab 8-megapixel stills from video shot at 30 FPS or faster. For applications where 8MP images are sufficient, this is like being able to shoot action at three times the frame rate of fast DSLRs such as the 7D Mk II, allowing the leisurely selection of the 'defining moment' during post-processing. There are still technology limitations here, such as the fact that the stills are JPEG and not RAW images, but I now regard this technology as being usable for bird photography in the right conditions, including where the bird is reasonably large in the frame. The obvious 'use case' of such a feature is stopping action at the most spectacular instant, but there are several other applications for bird photographers. Imagine, for example, that your AF is having difficulty locking on to even a static bird, e.g. because it's being distracted by higher-contrast foreground or background elements: you could afford to 'hose around' the area - ensuring focus goes across the plane of the bird - and be sure that at least one frame would be in focus. Alternatively, imagine having to contend with heat haze and being able to see through your viewfinder that there are only occasional, unpredictable instants of air clarity: extended shooting at 30 FPS could allow these to be picked out afterwards. Finally, imagine being able to combine or stack batches of near-identical images to enable the creation of a composite image with greater resolution and depth-of-field, plus reduced noise. This may all sound like cutting-edge stuff at the minute, but it will be standard technique for the next generation of bird photographers. Many of today's photographers will moan about how easy people have it but, to me, if it means more people can capture great bird images, that's a good thing.
Finally, as with all new camera releases, I have to say that some of the most important image quality aspects, such as noise handling and tonal reproduction (including dynamic range), can never be properly assessed from specification sheets. Early lab tests suggest the 5D Mk IV has made significant advances over its predecessor, but I've yet to see any proof that this would translate into a noticeable difference in real-world results. The lab tests also show, as you'd expect, that resolution of this 30MP body is significantly lower than for the 50MP 5DS and 5DS R models.
So, the question is, who would buy the 5D Mk IV? Someone who is primarily interested in high-quality action shooting, where speed is critical, would surely go for the 1D X Mk II or 7D Mk II, depending on their budget. Similarly, someone for whom resolution is critical would go straight to the 5DS/R. Someone looking for full-frame image quality without extreme speed or resolution could get great value-for-money from the 6D or a new/used 5D Mk III at a fraction of the price of a 5D Mk IV. So an obvious conclusion could be that it would not be the 'best' camera for anyone. However, although some would criticise the 5D Mk IV as a 'jack of all trades, master of none', the appeal of a body that can 'do everything well enough' should not be underestimated. I've previously mentioned how I use a combination of a 5D Mk II body to get high-quality bird portraits and a 7D Mk II for action shooting or where reach is more important than quality. In practice, I almost always take only a single body-and-lens combo on any one outing, depending on whether the emphasis of the session is portraits or action/rarities. Unfortunately, almost all my sessions actually have a combination of these shooting styles, so I always find myself wishing I had the other body for at least some of the time. And I'm someone whose DSLR images are 99% birds! If I also did a range of other types of photography, the appeal of a competent all-rounder would be much greater and, in that case, I'd probably regard the 5D Mk IV as the ultimate do-it-all camera.
Would I buy one? At this moment, definitely not: £3599 is way overpriced from my perspective and image quality and other characteristics are not yet proven. If image quality and AF capability prove excellent and the price drops by at least a third, then maybe. At that price, though, I'd probably be more tempted to see what I could do with the resolution of the 5DS R. For now, given the rate of depreciation of camera bodies, I think I'll be sticking with my current bodies.
And yes, that does mean my latest purchase is not a camera body, but more of that next month. ;)
Since my last update, the Brexit vote has caused major upheavals in world markets and so it should come as no surprise if camera equipment prices are affected in the short term and if even the manufacturers themselves are affected in the longer term. Canon have already forecast lower profits as a result and there are rumours that they will raise prices by as much as 20% from as early as this month.
Already, there have been increases in the street price of all but the newest Canon bodies and lenses averaging around 5%, but ranging from 2% up to 16%! The details are shown in the table below:
Equipment |
Price rise |
|
Bodies: |
|
|
Canon 100D |
14% |
|
Canon 700D |
3% |
|
Canon 750D |
6% |
|
Canon 760D |
2% |
|
Canon 70D |
5% |
|
Canon 7D Mk II |
3% |
|
Canon 6D |
16% |
|
Canon 5D Mk III |
7% |
|
Lenses: |
||
Canon 400mm f/5.6 |
8% |
|
Canon 300mm f/4 |
4% |
|
Canon 100-400mm II |
3% |
|
Canon 300mm f/2.8 II |
7% |
|
Canon 500mm f/4 II |
3% |
|
Canon 400mm f/4 II DO |
3% |
|
Canon 400mm f/2.8 II |
2% |
|
Canon 200-400mm |
2% |
|
Canon 600mm f/4 II |
2% |
|
Canon 800mm f/5.6 |
2% |
|
Canon 1.4x TC III |
4% |
|
Canon 2x TC III |
6% |
So, the conclusion of this has to be that, if you were considering a new equipment purchase around this time, get on and buy it quickly!!
I'm in this position myself and have just bought an item I've been thinking about purchasing for a long time. Initial testing looks good and I'll reveal more next month.
In other news, the launch of the eagerly-awaited Canon 5D Mk IV body is expected to finally take place later this month, so watch out for that.
No update this month due to other commitments (first missed month since I started my monthly updates over five years ago).
A quiet month, with no new announcements. Canon 1D X Mk II bodies are starting to ship to people who placed pre-orders, but there are no general stocks available yet.
Pricewise, 2% drops for the Canon 7D Mk II body and 100-400mm zoom were not unexpected, but a £100 drop in the prices of most Canon supertele lenses (the 300mm f/2.8, 400mm f/4 and f/2.8, the 600mm f/4 and the 200-400mm) certainly were and, even more so, the £300 drop for the 500mm f/4. In percentage terms, these are all small (1-4%) drops but, at a time when some people are getting nervous about a possible general price hike due to currency exchange rates, etc., this is a welcome move.
Looking forward, the next major announcement is likely to be the Canon 1D Mk IV. Many expect this will happen as early as August, with stocks shipping shortly afterwards, but I wouldn't bank on it.
I've held off on doing my monthly update this month in the hope of some late news to report, but basically it's just been a quiet month.
Price movements have been generally upwards, which is most unwelcome, but some of the increases have coincided with cashback offers in the UK. I don't factor these offers into the prices I record because they change too frequently and they tend to mask the underlying price trends. They're always worth looking out for as they can add up to quite significant savings, but you do have to be careful. For pretty much the whole of this year so far, the Canon 5DS body has been selling at £2500 at the retailers I track. This month, Canon are offering £250 cashback on this model but, guess what, the retailers' price has gone up by £200 this month to £2700! The 70D body, which also has a cashback offer, has also had a (3%) price increase this month. In this case, this is an outgoing model that's just been replaced by the 80D, which is now generally in stock. So why else would the 70D go up in price at this point? I'll leave you to draw your own conclusions.
Other price movements this month have been 21% and 12% increases for the Sigma 50-500mm and Canon 100-400mm II zooms (both of which have been yoyo-ing in price over recent months for some reason), a 3% increase for the 400mm f/2.8 II and a 2% decrease for the 800mm f/5.6. A 7% increase for the Canon 1.4x and 2x extenders is the first price change for these items for a year and a half. All in all, a strange set of price changes with no apparent logic this month.
The only other update this month is that 1D X Mk II bodies are still on pre-order only at all UK distributors I checked. Hopefully there'll be more to report on next month.
Well, amazingly, Canon has released a third new DSLR this month in the form of the budget-level 1300D. At £290, this model is a third more expensive than the street price of the outgoing model. As with past DSLR releases, this budget-level model is already generally in stock only days after the announcement, whilst the mid-range 80D is starting to come into stock a few weeks after its announcement and the top-level 1D X Mk II is still several weeks away from being generally in stock despite being announced two months ago. I assume Canon believe that announcing high-end products months before their launch creates a sense of anticipation. In practice, though, I'm sure most potential buyers feel more frustration than anticipation.
Anyway, back to the 1300D. Normally I completely ignore the 'xxxxD' models because they lack important usability features for bird photographers and lag way behind the xxxD and xxD models in key areas such as AF capability and shooting speed. A used model from a higher series can always be purchased that will give much better performance for less money than a new xxxxD body. I'm always open-minded, though, that a new budget body will change this situation. That certainly hasn't been the case with the 1300D, which is pretty much identical to the 1200D, despite coming out over two years after that model. The only 'significant' changes seem to be the addition of WiFi and NFC, plus more dots in its LCD display which, to be clear, have no impact whatsoever on the ability to take better images. A definite zero out of ten for effort on this one!
Price-wise, there have been 6% and 2% increases for the Tamron 150-600mm zoom and the Canon 6D body, essentially just undoing the most recent reductions in the prices of these two products. As expected, there has also been the first end-of-life drop for the 1D X body, a 5% reduction taking its price down to £4000 for the first time at the retailers I track. I expect further reductions over the coming weeks. Given the incremental upgrade to the Mk II model's specs, this will make the 'clearance 1D X's relatively good value for money. If I could get a brand new UK-stock 1D X at £3000, I might even be tempted. On second thoughts, though, a used one for half that price in a few months sounds even more tempting!
The final reduction of note this week is a 10% reduction for the Canon 100-400mm II zoom, taking the price down to £1600. A move in the right direction, but the launch price of this particular lens was so high (double the street price of its predecessor) that I still regard it as greatly overpriced and would be looking for a plateau price closer to £1200.
As a glimmer of hope in an otherwise downbeat article (sorry!), there are rumours that Canon is looking to launch a low-cost 200-600mm image stabilised zoom later this year. I don't normally comment on such rumours because they are so often unfounded and, even if true, can prove to be years ahead of an actual product release. It's true that Canon has recently filed a patent for an optical design for such a lens, but even that doesn't mean they'll develop it as a product (they file many more patents than they develop products). What makes me think they may go ahead with this one is the fact that their arch-rivals Nikon launched a sub-£1200 200-500mm VR zoom several months ago that's proving very popular with bird photographers (as have the 150-600mm zooms produced by Tamron and Sigma). Having lost at least a year to Nikon on this one, I would expect Canon to try to leapfrog them in some way, and a long-end focal length of 600mm would certainly achieve this. It would also help differentiate the product from Canon's 100-400mm II zoom.
Both the existing Nikon lens and the rumoured Canon lens have a maximum aperture of f/5.6 at the long end. This allows lenses to be much smaller, lighter and cheaper than the professional superteles, hugely boosting their popularity at the 'enthusiast' level. f/5.6 is also a wide enough aperture to maintain good AF performance, which is an area that can be problematic for zooms that max out at f/6.3 at the long end. That said, there have been mixed reviews about the AF performance of the Nikon 200-500mm, so Canon need to pay attention to this aspect. It's a fine line to tread, though, because if they do too good a job, sales of their more expensive telephotos could be impacted. I would personally rather see a fixed focal length 600mm f/5.6, which could be better in every way than a similarly-priced zoom at 600mm, but I'm not holding my breath on that one.
As long as people don't have excessive expectations in the areas of build quality, weather-sealing, image quality and AF performance, a lens like the one rumoured could be an exciting proposition in an innovation-starved market.
Like London buses, you wait ages for one and then two arrive at once! After a year without relevant new product announcements, we've had two new DSLR launches from Canon in as many months. Last month it was the 1D X Mk II; this month it's the 80D.
Compared to the 70D, the main 80D upgrades are a megapixel increase from 20 to 24MP and an increase in the number of AF points from 19 to 45, 27 of which can now be used at f/8. This level of upgrade is therefore similar to that of the 1D X Mk II relative to its predecessor, i.e. significant but not in any way exciting. The move to enabling more AF points to focus at f/8 will be seized upon by many amateurs as an opportunity to use teleconverters with cheaper lenses. In practice, though, this is almost always a bad idea, since only the best lenses can take teleconverters without a major impact on image quality and AF speed. This new feature is much more useful to users of full-frame bodies such as the 1D series with supertele lenses such as the 500mm and 600mm f/4 II and 2x III extenders.
For both new bodies, there may be improvements in image quality that can't be ascertained from spec lists. Camera manufacturers seem incapable of releasing upgrades without increasing the maximum ISO sensitivity setting, but that doesn't mean there is any associated improvement in high-ISO image quality. One of the biggest criticisms levelled at Canon in recent years is that its cameras don't have the Dynamic Range (DR) of their main competitors. DR is the difference (in f/stops) between the lowest and highest light intensities that can be captured by the camera whilst still retaining tonal detail (i.e. without getting blown highlights and blocked shadows). This is more important in some types of photography than others and, in bird photography, is only moderately important. In my experience, the quality with which camera bodies capture colour and tonal detail across the 'normal range' is more important than whether they can capture detail at the extremes. That's why I still use my 5D Mk II alongside my 7D Mk II, even though on paper the 7D Mk II seems to win in all possible spec areas. Early reports suggest the 1D X Mk II may have made a significant improvement in the DR area, but I wouldn't expect the 80D to bring significant DR improvements. I could be proved wrong, though.
The 80D can now be pre-ordered for £1000, making it almost 50% more expensive than the 70D. If I had to say what would be the biggest improvement you'd get for your money, I'd guess that some of the AF improvements in the latest higher-level Canon DSLRs may have trickled down to the xxD series. I'd still be surprised, though, if the AF is on a par with the 7D Mk II and, since the latter can now be picked up for less than £200 over the 80D pre-order price, I'd definitely be recommending this existing body for now.
On the price front, this month has seen a 2% drop for the 5DS R body, but it is still (outrageously) 16% more expensive than the near-identical 5DS.
More significantly, the Tamron 150-600mm has dropped yet a further 6% to £700, whilst the Sigma 50-500mm has dropped 18% to match it at £700. I would definitely favour the first of these if I was looking to buy at this price point.
On the downside, there have been price increases for some of the most important bird photography superteles: the Canon 500mm f/4 II, 300mm f/2.8 II and 400mm f/4 DO II have gone up 5%, 5% and 7%, respectively, taking the prices of these lenses back up to their pre-Christmas-discount levels.
Regular readers will know that I eagerly await new product announcements relevant to bird photographers in the hope that new technology may bring a significant change to this challenging activity, as it does in many areas of human endeavour. The last decade brought spectacular change in this area, with the emergence of DSLRs and image stabilised lenses. The current decade, however, has been much slower and has now practically ground to a halt. The last time I had a new product announcement to talk about was almost a full year ago.
So, this month, Canon has announced a new top-of-the-range DSLR - the 1D X Mk II - that can push the boundaries of bird photography even further. That must make me pretty excited, right?
Well, no. Not at all, actually. The announcement only confirms that bird photography technology is in a plateau phase, with only tiny incremental advances likely for the foreseeable future. Almost all photographers look to flagship models for advances that later trickle down to more affordable products, so there is always a great deal of anticipation and speculation in advance of a new top model. Frenzied rumours have been circulating on the Internet for over a year about what goodies may be incorporated into the 1D X's successor, especially since it's four years since the announcement of the 1D X.
The 1D X Mk II can now be pre-ordered for £5200 (£1000 more than the current model) and should be available from around three months' time. So, if you're lucky enough to be able to afford one, what can you look forward to?
The sensor now has 20 megapixels instead of 18; shooting rate is up from 12 to 14fps (ignoring 16fps in Live View, which bird photographers don't normally use); maximum ISO is one stop higher; image noise levels and dynamic range have probably improved fractionally, but that's to be confirmed). Canon have not even increased the number of AF points, which remain at 61 (even the £1180 7D Mk II has 65 and the new Nikon D5 has 153). Autofocus is now possible at f/8 using all AF points instead of just the centre point which is good for people using 2x extenders on supertele lenses. There are some other minor improvements that make no real difference in practice so - as you can see - there's really not much to say. Perhaps the only exciting thing about the 1D X Mk II release will be the availability of cheaper 1D X's on the used equipment market.
On a more positive note, this month has seen even more reductions in body and lens prices: the Canon 5D S, 6D, 70D, 760D and 750D have dropped 7%, 2%, 2%, 2% and 2%, respectively. (We still have the ludicrous situation of the 5DS R and 760D both costing 20% more than their near-identical counterparts, the 5DS and 750D.)
The lens battle has seen the Sigma 150-600mm C and S versions drop 8% and 4%, respectively, whilst the Tamron 150-600mm dropped another 4%. The Sigma C and the Tamron can both now be picked up for around the £740 level, making them very good value-for-money for people looking to buy a first bird photography lens. (The Sigma 50-500mm and 500mm f/4.5 have actually gone up by 12% and 3%, but they're not lenses I'd recommend anyway.)
Finally, at the more expensive end, the Canon 400mm f/4 DO II has dropped 5% to £6400, as to be expected, and the excellent 300mm f/2.8 II has seen a 2% drop to £4400.
As I've said several times in the past, the good thing about a plateau phase is that people are forced to concentrate more on their vision and technique, rather than obsessing about equipment. Now that we know we're definitely in such a phase, I strongly encourage you to make the most of the opportunity to concentrate on what really matters.
After last month's pre-Christmas price reductions, this month sees some decent post-Christmas reductions as well.
The Canon 1D X, 5DS, 750D, 760D, 700D and 7D Mk II had 5%, 4%, 4%, 4%, 3% and 2% reductions, respectively. Most of these were reduced last month, so the combined reductions are very significant (e.g. 16% for the 760D, 11% for the 5DS and 9% for the 7D Mk II). The last of these is now 26% below its launch price and is now excellent value for money.
On the lens front, a 6% drop for the Sigma 150-600mm Contemporary zoom (now £800) brings it to within £20 of its Tamron rival, whilst a further 4% drop for the Sport version (now £1250) brings it closer to the £1000 mark, which has long been a 'cluster point' for enthusiast bird lenses.
A 3% reduction for the Canon 100-400mm II zoom (now just under £1800) is a move in the right direction, but this lens is still - in my opinion - at least 25% over its target price.
So this raises the question of what is the 'target price' for a camera or lens? Well, I track products relevant to bird photographers who shoot with Canon bodies and either Canon, Sigma or Tamron lenses. For the last seven years, this has involved checking prices on a monthly basis for all current Canon DSLRs and all lenses I consider relevant to bird photographers, i.e. those with a maximum focal length of 400mm and over, plus the Canon 300mm prime lenses.
Over the years, I've seen a similar pattern of products being launched with an inflated initial price, which drops quite sharply in the first few months to a plateau that is then maintained until just before the product is withdrawn, at which point final 'clearance' reductions occur. I've provided strong advice in the past about avoiding buying equipment at the inflated pre-order/launch prices, but it can also - sometimes - be a bad idea to buy at the final clearance prices. It depends on whether the product really is obsolete at the point of its replacement. For example, the Canon 700D came out only 9 months after the 650D and was almost identical to the outgoing model, whereas the 7D Mk II came out 5 years after the original 7D and was a huge upgrade.
On balance, I believe the best time to buy new equipment is during the plateau phase. In fact, during that phase, there still tends to be a gradual price reduction, but this is often not worth waiting for, especially if you want to maximise your use of the product before it becomes obsolete. For used equipment, the optimum time to purchase may well be a couple of months after the product has been replaced, at which point depreciation can be very steep.
Although the above pattern holds for all cameras and lenses, the timescales over which the price drops occur vary hugely, roughly in line with the lifespans of the relevant products (around 10 years for lenses, 3 years for a pro body or 1 year for a budget body). The initial inflated phase tends to last maybe 10-20% of the lifespan, but this can vary. A more useful guide is that, for Canon products, the plateau is at around 60% of the launch price, i.e. after a 40% reduction. This percentage has been remarkably consistent across lenses and bodies, with the exception that top-end pro equipment such as the 1D-series bodies and the 800mm supertelephoto drop to a lesser extent. In general, third party lenses from Sigma and Tamron also see smaller reductions - maybe 25% or so - since they don't tend to inflate their launch prices to the same extent as Canon.
So, given this information, you can form your own judgment about whether now is a good time to buy any of the products I track, as listed in the following table (all figures are approximate; Highest Price is the pre-order/launch price, or a subsequent increase at the retailers I track; Timescale is the time since my first price record):
Equipment |
Highest price |
Current price |
Percentage drop |
Timescale (months) |
|
Bodies: |
|
|
|
|
|
Canon 1200D |
£350 |
£220 |
37% |
22 |
|
Canon 100D |
£570 |
£280 |
51% |
33 |
|
Canon 700D |
£620 |
£380 |
39% |
33 |
|
Canon 750D |
£600 |
£460 |
23% |
10 |
|
Canon 760D |
£650 |
£550 |
15% |
10 |
|
Canon 70D |
£1080 |
£690 |
36% |
30 |
|
Canon 7D Mk II |
£1600 |
£1180 |
26% |
15 |
|
Canon 6D |
£1800 |
£1120 |
38% |
39 |
|
Canon 5D Mk III |
£3000 |
£2180 |
27% |
45 |
|
Canon 5DS |
£3000 |
£2700 |
10% |
10 |
|
Canon 5DS R |
£3200 |
£2950 |
8% |
10 |
|
Canon 1D X |
£5300 |
£4200 |
21% |
50 |
|
Canon Lenses: |
|||||
Canon 400mm f/5.6 |
£1130 |
£880 |
22% |
>84 |
|
Canon 300mm f/4 |
£1180 |
£960 |
19% |
>84 |
|
Canon 100-400mm II |
£2000 |
£1800 |
10% |
13 |
|
Canon 300mm f/2.8 II |
£7500 |
£4500 |
40% |
63 |
|
Canon 500mm f/4 II |
£9000 |
£6500 |
28% |
58 |
|
Canon 400mm f/4 II DO |
£7000 |
£6800 |
3% |
15 |
|
Canon 400mm f/2.8 II |
£11500 |
£7400 |
36% |
63 |
|
Canon 200-400mm |
£12000 |
£8500 |
29% |
31 |
|
Canon 600mm f/4 II |
£11300 |
£8900 |
21% |
58 |
|
Canon 800mm f/5.6 |
£10200 |
£9900 |
3% |
>84 |
|
Canon 1.4x TC III |
£550 |
£300 |
45% |
63 |
|
Canon 2x TC III |
£550 |
£300 |
45% |
63 |
|
Other Lenses: |
|||||
Sigma 50-500mm |
£1270 |
£760 |
40% |
>84 |
|
Tamron 150-600mm |
£950 |
£780 |
18% |
23 |
|
Sigma 150-600mm C |
£900 |
£800 |
11% |
9 |
|
Sigma 150-600mm S |
£1600 |
£1250 |
22% |
15 |
|
Sigma 500mm f/4.5 |
£3850 |
£3500 |
9% |
>84 |
|
Sigma 800mm f/5.6 |
£5250 |
£4300 |
18% |
>84 |
|
Sigma 300-800mm |
£7300 |
£5500 |
25% |
>84 |
I've colour-coded these with my assessment of whether it's worth waiting for a further price drop (Green = no point waiting; Amber = price may drop slightly; Red = wait). I hope you find this a useful input to your purchasing decisions.
As is often the case in the run up to Christmas, there have been lots of price reductions this month.
Starting with camera bodies, the Canon 5DS and 5DS R have had 7% and 8% price reductions at one of the retailers I track, but it's not clear whether these will be temporary yet. A similar (7%) reduction for the 7D Mk II looks more generally established, cementing its position as the preferred bird photography camera for all but the most specialist pro photographers.
At the lower end of the market, the Canon 1200D, 750D and 760D bodies have dropped 6%, 3% and 12% respectively. It's still possible to pick up the outgoing 700D at under £400, but the 750D has now dropped to within £90 of the 700D price, so I've now changed my entry-level body recommendation to the 750D. It's good to see the 760D price premium over the 750D drop from >30% to <20%, but it's still not worth paying so much extra for a couple of minor ergonomic extras.
Looking at lenses, there have again been some small but significant drops of 2%, 3% and 4% in the Canon 300mm f/2.8 II, 400mm f/4 DO II and 500mm f/4 II superteles. The first and last of these now sit at the £4500 and £6500 price points, down from their 2010/11 launch prices of £7500 and £9000. The middle of these is the first reduction since the 400mm f/4 DO II was launched at £7000 a year ago.
Again at the lower end, a 3% drop for the popular Tamron 150-600mm zoom keeps it almost 10% cheaper than its Sigma Contemporary rival. The Sport version of the Sigma 150-600mm zoom meanwhile dropped 7% to £1300 this month. This lens was launched at £1600, which took it well above the pack of sub-£1000 lenses. This latest reduction, though, brings it into consideration for bird photographers with a budget around the £1000 mark. The Sport version is more ruggedly built than the Contemporary version, but is also bigger and heavier and doesn't bring a huge improvement in performance. It also carries a 50% premium over the Contemporary version and the Canon 400mm f/5.6. I continue to recommend the latter for its unbeatable combination of sharpness, speed, compactness and price. Coupled with a 7D Mk II, this prime is a killer combination for all-round bird photography.
On the new developments front, there have once again been no significant announcements for bird photographers. In fact, even the rumoured specifications for the camera bodies due to be upgraded over the next year or so (including the 1D X Mk II and 5D Mk IV) aren't in any way exciting, so this is definitely a time to make the most of today's capable gear and concentrate on your photography, rather than focusing on potential innovation in bird photography equipment.
Well, last month's 7% reduction in the price of the Canon 5DS body was short lived, with prices at most leading retailers having gone back up to the launch price of £3000 this month. Don't buy at this price unless you'll be happy seeing it selling for hundreds of pounds cheaper in a few weeks' time.
Most other prices have stayed the same this month, with the notable exception of the Sigma zoom lenses: the 150-600mm Contemporary, 150-600mm Sport and 50-500mm zooms have dropped 3%, 4% and 5%, respectively. This brings the 150-600mm C to within £50 of its £800 Tamron competitor and brings the 50-500mm to £40 below the Tamron. The 50-500mm will therefore appeal to the price-conscious, but would be a poor choice for bird photographers, relative to the other zooms mentioned.
The Sigma 150-600mm Sport reduction to £1400 (£200 less than its launch price) finally sees it enter sensible territory and keeps it well below the price of the Canon 100-400mm II.
Other than price changes, there are no new announcements this month of interest to bird photographers. Also, other commitments have prevented me from spending more time with my newly-purchased 7D Mk II body, so I have no new findings to report on that front either.
Hopefully there will be more to report on next month.
The first reduction (7%) in the price of the Canon 5DS body, plus a further reduction (3%) in the price of the Canon 100-400mm II lens this month were both due, but welcome nonetheless. The 5DS R body is now in stock at around half of UK Canon dealers and is, unsurprisingly, still at its launch price.
After last month's comments about the fiercely competitive £1000-ish price point, this month has seen a 2% drop for the Sigma 150-600mm C and a 3% drop for the Canon 400mm f/5.6. The first of these was predicted and will probably be followed by further reductions to compete with the Tamron equivalent. The second was more of a surprise, because this lens was stable at around £1100 from six years ago until one year ago, since when it has steadily fallen to its current price of £890. This lens is still an ideal starter lens and is the one I've been recommending to beginners for many years. Launched in 1993, this lens is now an old design, and rumours of its replacement have floated around for a long time. Some will see the recent price drops as an indicator that a replacement is now imminent. Personally, I would say it's just a response to the competition from Sigma and Tamron (both of whom have similarly-priced zooms with 200mm greater reach) and also Nikon (who now have the new 200-500mm zoom). All of these competing products have image stabilisation, which the venerable 400mm f/5.6 lacks but, despite its weakness on paper, the image quality, AF speed and maneuverability of the Canon still give bird photographers a great tool for the job, especially for flight shooting.
The final noteworthy reduction this month is a 5% drop for the Canon 2x extender III. This takes it down to £300, which is almost half the launch price of £550 from five years ago.
Ok, so last month I kept you guessing about what DSLR I'd just bought as my first new camera purchase in five years. Well, let me first give you a few of the considerations I took into account.
Unlike lenses, which are only replaced every ten years or so and hold their value really well, camera bodies have much shorter lifecycles and very poor resale values. I'm therefore very reluctant to upgrade cameras unless newer models give me something revolutionary. I've therefore stuck with my 5D Mk II, because the 'only' relevant improvement from the 5D Mk III was a better autofocus system. That said, the AF on the 5D Mk II is a 'dog' by modern standards and I've been getting increasingly frustrated at the difficulty of getting flight shots. So, when the 5DS/R bodies came out, they also added extra resolution as well as better AF, but still around the £3000 mark, which is a lot of money to watch disappearing down the drain from the minute of purchase.
Also, as I've ranted recently about people who buy new camera bodies at inflated launch prices, I'd be a hypocrite to do the same thing myself. In my August update, I noted that the Canon 7D Mk II had finally hit a sensible price and added that I could now recommend it to others and may even get one myself. Well, I took my own advice and, so far, I'm pleased I did!
My research showed the 7D Mk II would have the same image quality as the 5DS/R, for only 40% of the price and would actually deliver more than the 5DS/R in the areas of autofocus (better AF performance, plus easier switching between AF modes) and shooting speed (10fps compared to 5fps, which makes a huge difference for action photography).
I've loved using the 5D Mk II for bird photography because of its gorgeous image quality (especially its reproduction of colours and tones), but it has been severely restrictive when it comes to BIF or other action shots. The crunch came when photographing a Sabine's Gull - a local rarity - which flew back and forth in front of me for hours, during which I managed only a very small number of sharp flight shots. A fellow bird photographer kindly let me borrow his 7D Mk II, which I could instantly see was tracking the bird infinitely better than my 5D Mk II. Since buying my own 7D Mk II, my experience has been the same: capturing birds in flight now seems positively easy! Just a warning, though: my countless hours trying to capture BIF with a camera that really doesn't want to do so may have helped here. If you're a novice photographer, don't expect reliable results without practice!
A further advantage of the 7D Mk II over the 5D Mk II is that it has greater resolution due to its 20 million pixels being packed into an APS-C crop sensor, compared to 21 million pixels spread over the 2.5 times greater area of a full frame sensor. My side-by-side testing confirms that finer details can indeed be resolved by the 7D Mk II, which means greater 'reach' in the field or, alternatively, the ability to use my 300mm lens instead of my 500mm for larger/closer subjects. The latter is particularly useful when tracking birds in flight.
I mentioned above the ease of switching between AF modes using the 7D Mk II. On the 5D Mk II, this has driven me crazy and has caused many lost shots. Basically, you want a single AF point for shooting portraits to enable accurate, reliable focusing on the eye, but you want multiple points for flight shots to increase your keeper rate (I use AF point expansion around the centre AF point, because activating all AF points is too unpredictable on this camera). To switch between these two settings means going into the custom functions menu on the 5D Mk II, which takes way too long when, for example, your subject takes flight. It also means taking the camera from your eye, which I never need to do to adjust other shooting settings. I tried using the (C1-C3) custom modes to achieve this more rapidly, but this isn't a solution because those modes store all shooting settings, so you lose any tweaks to ISO, exposure compensation, etc., that you've made since you last switched. On the 7D Mk II, a novel and truly inspired design allows the mode to be changed using a spring-loaded rotating lever. Best of all, this lever surrounds the joystick control that I use to move the selected AF point. This means my thumb can make every important change to AF settings without moving more than 5mm. To me, this completes a great handling experience that allows me to change all in-the-moment AF and exposure settings (in either Av or M mode) plus ISO sensitivity with tiny movements of my thumb and index finger, without taking my camera from my eye. Great job on the ergonomics, Canon!
So, will I be getting rid of my old 5D Mk II? At present, the answer is no. Its AF may be poor for action shooting, but it is at least accurate for less mobile subjects. More importantly, I still prefer the 'look' of 5D Mk II images, which have richer colours and fewer artifacts. The pixel-level quality is also so good that images are more 'croppable' than those of the 7D Mk II, reducing the real-world resolution difference to a surprisingly small amount. My challenge now is to work out how to get the advantages of both cameras in practice. I'll let you know how it goes.
Limited stocks of the Canon 5DS R are finally trickling into the UK but, not surprisingly, both these and the 5DS models are still selling at their launch prices. As I've mentioned in past months, I'm very interested in the combination of reach and performance promised by these models, especially the R version. This month, Canon seems to have done a complete U-turn on its previous stance that high megapixel sensors/bodies were unnecessary. First, they announced that they had developed a 250-megapixel APS-H sized CMOS sensor for specialist applications, then they announced that they were developing a 120MP DSLR! Prototypes of both products were shown at the Canon Expo exhibition in New York, but I wouldn't expect to see a launched version of the DSLR for at least two or three years (although we may see an intermediate model in the meantime).
Also at the Canon Expo exhibition, Canon showed a prototype of a 600mm f/4L IS DO BR lens, which would bring the reach and performance of the current 600mm f/4 supertele in a much smaller and lighter package. Canon is very committed to DO (Diffractive Optics) technology, despite the poor reputation of its first production model, the 400mm f/4 DO. The recently-released successor to this lens is getting consistently good reviews and will almost certainly greatly outsell the old version, despite its £7000 price tag. There is also talk of a DO version of the 800mm f/5.6 being developed in the near future. All of this is good news for any bird photographers who are more concerned about compactness than cost. It brings benefits for BIF shooting, hiking, travel, etc., and could open up top quality bird photography to people who are physically unable to wield the huge and heavy superteles.
After last month's rant about the sustained launch price of Canon's 100-400mm II lens, I'm pleased to see the first reduction in the price of this lens this month. The modest 5% reduction from £2000 to £1900 is a welcome start towards a reasonable price for this lens.
There have also been good reductions on Canon's old 700D and new 750D bodies (6% and 5%, respectively), although the 760D price has remained the same, making it now a bizarre 30% more expensive than the near-identical 750D.
The biggest reduction of the month in the gear I track, though, has been an 8% reduction for the Tamron 150-600mm zoom. This lens was only slightly cheaper than the £900 Sigma equivalent, but is now £100 less, which is significant enough to sway many buyers in this highly competitive price range. Almost all long lenses around the £1000 level have been steadily dropping in price over the past year or two, which is great news for bird photographers. The only one still at its launch price is the Sigma 150-600mm C, so a price drop for that lens is likely in the near future.
Finally, I'm pleased to report that, this month, I've bought my first new DSLR for five full years. If you want to know what I bought and why, plus the results of my initial testing, check back here in early October. :)
The Canon 5DS body is now generally in stock in the UK, unlike the 5DS R variant. Canon appear either to have underestimated the demand for the R version, or to be playing games by keeping it higher-priced and harder to get hold of. Technically, there is nothing about the R version that means it should be scarcer or more expensive than the other 5DS model.
Also on the body front, the Canon 7D Mk II has finally dropped in price to the £1300 point. From its £1600 launch price, I would expect it to eventually drop to around £1100 or lower. I feel strongly that new camera models should not carry ridiculous price premiums (60% in this case) and I get equally annoyed by the manufacturers for charging these and the photographers who buy at inflated prices for propagating them. If we, as consumers, waited to buy new models until they reached sensible prices, then they would either be launched at sensible prices or would drop to such prices within days of their release. Anyway, the 7D Mk II is a great bird photography camera that I've always said I would happily recommend once it hit the £1300 level. I'm pleased to say that, nine months after its release, we're now finally at that point. I may even buy one myself.
As well as the 9% reduction in the 7D Mk II body price, there have been a few good price reductions on lenses this month, namely a 4% reduction for the Canon 300mm f/4, a 3% reduction for the Sigma 150-600mm Sport zoom and an incredible 20% reduction for the Sigma 50-500mm ('Bigma') zoom. The last of these has held steady at £1000 for almost three years, so a sudden reduction is unexpected. If this is not a temporary blip, then perhaps sales of this model have plummeted since the launch of the Tamron and Sigma 150-600mm zooms around the £900 point. I certainly wouldn't pay more for a 50-500mm zoom than for an equal-or-better 150-600mm zoom.
The 3% reduction in the price of the Sport version of the Sigma 150-600mm formula, although much smaller, is also interesting. This lens has sat alone at the £1500 price point, mid-way between the raft of £1000-ish lenses and the £2000 Canon 100-400mm Series II zoom. Its drop to £1450 may signal its convergence with the pack, leaving the new Canon zoom in an overpriced category of its own.
So much for what's been happening in the Canon shooters' world. This month, the most interesting development, I have to say, has been in the Nikon world!
For a long time now, I've made no secret of my view that Canon has a better overall 'system' for bird photography than Nikon, mainly because of their range of high-quality, lightweight, long focal length lenses. Well, Nikon has been busy and now has new 'E' versions of most of its long lenses, including 300mm, 400mm, 500mm, 600mm and 800mm lenses ranging from £1600 for a 300mm f/4E to £13000 for an 800mm f/5.6E. The 500mm and 600mm f/4E lenses currently cost slightly more than their Canon equivalents, but are slightly lighter and focus slightly closer, giving them higher reproduction ratios for close subjects. All these lenses come with Nikon's latest Vibration Reduction technology offering up to 4.5 stops of image stabilisation.
This month, Nikon has added a very interesting new lens to its range in the form of a 200-500mm f/5.6 zoom. This lens also has 4.5-stop VR and works with Full Frame or crop cameras. Although bigger and heavier than the Canon 100-400mm zoom (which is also f/5.6 at the long end), it has a clear focal length advantage that will be of obvious interest to bird photographers. But an even more significant difference is that its pre-order price is only £1180! That's not much more than half the cost of the Canon 100-400mm, and is definitely in 'the pack' of £1000-ish lenses from the outset. Obviously we will have to await the verdict on image quality, AF speed, etc., but I applaud Nikon for offering 500mm reach at an affordable price. I hope Canon will now be shamed into following suit, ideally with a prime 500mm f/5.6 IS lens at a similar price point. At the very least, it's time they dropped the price of their 100-400mm Series II zoom in the UK. Remember, this product was launched in the US at 30% more than the street price of the outgoing model. That was bad enough but, in the UK, the hike was 60% and the price has not yet dropped after seven months.
Almost all commentators assess camera systems based on top-end gear, but my view is that, when photographers are starting out, they buy into a system based on price-performance of entry-level models and an upgrade path to mid-range models. By the time they give their first thought to buying megabucks lenses, they're already so invested in their system that very few jump ship. For that reason, a lens like the new Nikon 200-500mm at around £1000 can be disproportionately influential, in the same way the Canon 400mm f/5.6 has been for many years. This is definitely a product to watch!
No new announcements this month and only two price changes: the Canon 750D and 70D bodies dropped by 11% and 6%, respectively. It was interesting to note that the 760D price didn't drop with the 750D, meaning the 760D is now 20% more expensive than the near-identical 750D. Both models are now generally in stock.
In contrast, the new Canon 5DS and 5DS R models are not yet generally in stock in the UK, but no doubt this will change over the coming weeks once pre-orders have been fulfilled. As I previously mentioned, I'm very interested to see how these models pan out as bird photography cameras because, on paper, they promise a great combination of reach and performance. The 50MP sensors in these models have sent many people into a frenzy of nonsense reminiscent of the early days of the motor car, when people were stating that the human body would disintegrate at the 40mph+ speeds. With the 5DS, people have been saying that only certain (megabucks) lenses could be used, that handholding would be impossible and that even normal heavy-duty tripods would not be sufficient, not to mention that current PC models would be unable to handle the huge image files.
Let's get this into perspective: the 50 million pixels of the 5DS sensor have the same spacing (pitch) as those of the 7D Mk II and are more spaced out than those of the latest consumer DSLRs from Canon and Nikon, most of which have 24MP APS-C sensors equivalent to around 60MP at full-frame size. The 5DS sensor is therefore expecting less of a lens, tripod or, for that matter, photographer than that of a budget DSLR such as the 750D. Sure, it may expect a bit more of a PC, but memory/storage upgrades are cheap and file sizes are only increasing by a factor of two, not an order of magnitude.
The big question is whether the extra pixels would really translate into increased resolution in the real world. One independent review has just compared actual resolution of the 5D Mk III, 5DS and 5DS R models fitted with a variety of lenses. The most relevant lens for bird photographers was the Canon 300mm f/2.8 IS II and, with this lens, the measured centre-frame resolutions were 1050, 1375 and 1545, respectively. This is a huge difference!
These are linear (MTF-50) resolution figures, so can be compared with the linear sensor count increase. 5D Mk III files are 5760x3840 pixels in size; 5DS/R files are 8688x5792 pixels in size, so linearly the 5DS/R models have a 51% increase in pixels in a sensor that is physically the same size. Amazingly, that translates into 47% increase in measured resolution with the 300mm lens. This is further clear evidence that resolution-critical photography applications such as bird photography can benefit from much higher megapixel counts than the biggest available in today's DSLRs.
Admittedly, these resolution measures were taken under optimum conditions and with an extremely sharp lens. However, they were also performed with a basic 50mm f/1.4 standard lens, giving resolution figures of 660, 790 and 800, respectively. Even with such a basic lens, the 5DS R had 21% greater linear resolution than the 5D Mk III, dispelling the myth that sensors and lenses can 'out-resolve' each other.
Finally, one of the biggest surprises for me was the difference between the 5DS and 5DS R models. The self-canceling low-pass filters of the 5DS R model enabled the full 47% resolution increase, but the standard low-pass filter arrangement of the 5DS achieved only a 31% resolution increase. For certain types of photography (i.e. those where repeating fine patterns cause Moire interference effects), the 5DS may turn in improved images but, for the vast majority of bird photographs, throwing away detail by deliberate in-camera blurring makes no sense. I therefore remain very interested in the 5DS R and am keen to hear how it performs as an all-round bird photography camera, taking account of AF capability and, most importantly, image quality.
This month, especially since I delayed my May update, there is little to report. The entry-level Canon 1200D and 100D bodies dropped in price by 6% and 8% respectively and the Sigma 150-500mm zoom and 500mm prime lenses dropped by 11% and 7% (big drops, but then such drops for Sigma lenses are often reversed in the following month or two) and no new announcements were made in the bird photography equipment world.
The original Canon 100-400mm lens finally disappeared from stock at the retailers I follow as its Series II lens now supersedes it (a good lens, but at twice the price it should be). The three current 150-600mm zooms from Sigma and Tamron continue to get decent reviews, with some reservations about their performance at the long end. As a bird photographer, I continue to be frustrated by the total dominance of zoom lenses, which always have poorer image quality and AF speed than their fixed focal length counterparts, as well as being bigger, heavier and less rugged. An new IS version of the current Canon 400mm f/5.6 would be a great product release, even with a 50% price hike, as would a 500mm f/5.6 IS. In addition, crop-only (EF-S) versions of these lenses could be made very small, light and cheap and would make a killer combination with a 70D or 7D Mk II. (Are you listening, Canon?)
So, in the absence of much to report, I've done a thorough review of my Ideal Starter Kit and Upgraded Kit sections above and brought these up-to-date. I update prices and tweak words every month but, this month, I've rewritten the bulk of these sections to reflect the current state of the equipment market.
Hopefully, there will be more to report next month, including an update on when the new Canon 5DS and 5DS R bodies will be available.
I've delayed my equipment update this month to see if anything new happens, but nothing has, so I've taken the opportunity to update my guide to buying used DSLR cameras (see above).
Before I comment on the used cameras, I'll cover this month's price movements. The Canon 100D, 6D and 5D Mk III have all seen 2% price reductions, as has the Canon 500mm f/4 II lens. There have been 3% reductions for the Canon 300mm f/4, 400mm f/5.6 and 400mm f/2.8 II lenses, as well as for the Tamron 150-600mm (no doubt in response to the fact that the Contemporary version of the Sigma 150-600mm zoom is now in stock in the UK).
Ok, as I've mentioned before, there is now an excellent market in used camera gear that you should seriously consider whenever you're looking for bird photography equipment. New DSLR prices are typically hiked by 50% and often offer very little extra over the models they replace. To take an example, the entry-level 100D body was launched at $570, for which price you could buy, pre-owned, almost any camera body Canon has ever made, including excellent bodies from the xxD, 7D, 5D and even 1D series. My pick would be a used 5D Mk II, a top-notch full-frame pro body that's infinitely better than the 100D.
For the first time, I've added percentage changes to the used DSLR prices, comparing them to their June 2014 equivalents. The average percentage change was a 13% reduction, but some bodies even went up in value by around 10%. These were clustered around the £180 level, which suggests an increased demand for good used bodies in the xxxD and xxD ranges that are no longer current but still have competitive specs. At the other extreme, nine bodies dropped by 25% or more, creating some real bargains. For example, the 1D Mk IV dropped 25% to £1200 and the 5D Mk III dropped 28% to £1300. These are hugely capable pro bodies at a third the cost at which they were launched. The first of these was Canon's flagship less than three years ago and the other is still a current model: this is not obsolete technology!
I've explained my methodology for assessing these used prices in the buying guide and it should reflect a sound approach to buying good quality used equipment. Remember, though, that items that don't meet your expectations can be returned or sold on via eBay, so there's very little risk in this type of buying. Unlike buying used cars, where major faults can be disguised, camera bodies will either be working or not working when you take delivery of them and will either meet their advertised condition/photos or not. If they're ok at that point, they should give you good service, especially if you buy a body with low shutter actuations and no major physical damage. Sure, they could fail after a while, but the same is also true if you buy new equipment (typically the day after the warranty expires if you're unlucky).
There's another good reason why used equipment is now a smarter choice than ever before: advances in camera technology have reached a plateau, so you can get almost identical results from older gear. This fact will be strongly denied by camera marketing people and 'gearhead' photographers, but it's true. When you look through the spec sheet of a DSLR, you will see a hundred spec items, but almost none of those have any bearing on what images you can actually capture with the camera. The things that really matter had already been developed a decade ago!
Let me give you an example. I still use a Canon 5D Mk II body that I purchased in 2010. I looked at the 5D Mk III when it was released and found that, although it had better AF than the Mk II, the image quality was almost identical at low ISO settings. I almost never use ISO settings above 400, so there would be no IQ benefit to upgrading. Sure, I would get a higher keeper rate from the improved AF, but my technique means my keeper rate is fine anyway. The megapixel rate increased from 21 to 22, but anyone who thinks that would make a difference to real-world resolution is a marketing department's dream buyer. But that's not the most interesting bit. Recently, my wife and I were taking side-by-side shots and she was using my old 40D body - a 10 megapixel DSLR that was launched in 2007. When reviewing our images, they were virtually indistinguishable in any respect. How could this be? Well, firstly, although my full-frame 5D Mk II has 21 MP, it has almost exactly the same pixel pitch as the APS-C sensor of the 40D: nice, widely-spaced pixels that don't push the boundaries of either the camera technology or lens quality. The current trend towards full-frame bodies is fine, but the number of times a bird will fill the frame of a crop DSLR is minimal, so the extra 'surround' of a full frame sensor is wasted on the vast majority of shots. So, for £90, you can buy a camera that will get the same results as the 5D Mk III that was launched at £3000 and now sells for £2200. What are you waiting for?
Perhaps not surprisingly, there were no further product announcements this month in the type of equipment I track.
As anticipated last month, a UK price is now available - £900 - for the Contemporary version of the Sigma 150-600mm lens, although stocks do not yet appear to have reached the UK. This pitches the lens at exactly the same price point as the Tamron equivalent, which is pretty much what everyone expected. Since the Sigma product will arrive into the market well over a year behind the Tamron, it will be interesting to see if it can catch up. A lot will depend on how well it does in the head-to-head reviews that will inevitably flood on to the web in the coming weeks. I will be surprised if it is significantly better than the Tamron model, although I would expect the £1500 Sport version to be better.
Stocks of the Series II Canon 100-400mm zoom are still sparse and prices have not yet fallen, but the price of the outgoing Series I version has dropped by 13% this month. Independent reviews confirm the new version has better IS and faster AF, but is no sharper (except perhaps at the edges, which are not of much interest for bird photographers). It's therefore hard to recommend the new version at twice the price of the old version, and it's also hard to recommend the old version when the cheaper Canon 400mm f/5.6 prime is sharper and faster-focusing. For now, I'll continue to recommend the prime lens.
Several prices have fallen this month, especially on Canon DSLR bodies: 11% for the 7D Mk II, 10% for the 70D, 8% for the 1D X and 4% for the 6D, 100D and 1200D. The 1D X price drop is the first for over two years, so this suggests it may not be too many months before we get a successor announcement. The 7D Mk II price drop is also significant, since this is the first month there has been a significant movement downwards from the launch price.
Unfortunately, last month's 2% drop in the 500mm f/4 II price has been reversed, but the lens is still £1000 cheaper than it was a year ago and will surely fall again soon.
Well, the rumours were spot on! In early February, Canon launched four new DSLRs: the 5DS, 5DS R, 750D and 760D, with specs as reported. The 5DS and 5DS R are scheduled to ship from June and preorder prices are £3000 and £3200, respectively. The 750D and 760D are scheduled to ship from late April and preorder prices are £600 and £650. These launch prices are aligned with their predecessors: £3000 for the 5D Mk III and £620 for the 700D, so I think they are fair launch prices given the spec boosts they include. The 5D Mk III and 700D have now dropped to £2300 and £470, which in both cases is a 25% drop from their launch prices. I would expect the new models to drop to similar levels by late this year.
Semi-pro or serious enthusiast bird photographers now have some great choices available: 7D Mk II for action shooting (highest frame rate, best AF system) and reach (highest pixel density), 5D Mk III for highest quality images (especially in low light) and 5DS/5DS R for a great combination of performance, reach and image quality (albeit not yet proven).
With the 5DS/R, Canon finally has the body to get the most out of the superb image quality of its latest supertelephoto lenses. I look forward to seeing the results of field tests!
Full details of the new Canon bodies can be found here.
In other (minor) news this month, the Contemporary version of the Sigma 150-600mm zoom is now available to pre-order in the US for $1089, compared with the pre-order price of the Sport version of $1999. If the same ratio is applied in UK pricing, that would put the price of the Contemporary version at around £820, which would make it interesting for the majority of budding bird photographers. So why did I say this was minor news? Well, firstly, there are no independent tests that I'm aware of to indicate how good this lens is and, second, it's been possible to pre-order the Sport version since last September and yet I'm not aware of any of these lenses being distributed to the UK yet. Sigma seem to be going into competition with Canon on the ridiculous lead-time front.
Pricewise this month, there has been a 15% drop for the Canon 100D DSLR (not an interesting camera for bird photographers) and a 2% drop for the 5D Mk III (a very interesting camera for bird photographers). In the latter case, this could signify the start of the phase-out stage as the three new 5D models come out over the next few months. The final reductions on the 5D Mk II and 7D Mk I bodies made them an absolute steal, so if you're not afflicted with the need to have the latest model, you may be able to pick up a brand new 5D Mk III later this year for less than the current cost of a 7D Mk II.
Also this month, there have been further reductions in the prices of some of the Canon superteles: 3% for the 300mm f/2.8 II, 1% for the 400mm f/2.8 II and 2% for the 500mm f/4 II. This takes these three lenses down to 62%, 67% and 75% of their launch prices, respectively. For comparison, the 600mm f/4 II is at 79% of its launch price. On that basis, I would expect further reductions in the prices of the 500mm and 600mm lenses, but anyone waiting for the price of the 300mm or 400mm lens to 'bottom out' may well now be in the 'diminishing returns' stage.
After last month's mention of a high-megapixel DSLR from Canon, the rumour mill is strongly suggesting this may indeed be imminent, with a launch announcement any time from 6 February for multiple bodies to start shipping in March/April.
I don't like to report rumours unless they have sufficient credibility, but I'll share them with you in this case. The most significant is that there will be two variants of a new Canon 5DS body with full-frame sensors having just over 50 megapixels. The two variants will differ only in the presence or absence of a low pass (anti-aliasing) filter over the sensor. They will be called the 5DS and 5DS R, respectively. This follows Nikon's strategy of offering an AA-filter-less version at a price premium, which people will pay due to the slight increase in resolution. It is also rumoured that these bodies will have 1.3x and 1.6x crop modes, allowing the camera to behave as if it had a 30MP APS-H or 20MP APS-C crop sensor. This would be useful for reducing image file sizes and may enable a higher frame rate, or at least buffer depth. At 50MP, the Canon 5DS would leapfrog Nikon's highest-megapixel sensor (36MP) but, as experience suggests, not for long. The final part of the 5D series rumour is that the existing 5D Mk III will continue alongside the 5DS and will be replaced by a 5D Mk IV later this year, with only a modest megapixel increase to preserve the high image quality of the existing model.
The other rumour is that there will be new Canon 750D and 760D bodies, to replace the 700D. The difference between the two models is said to be minor and related to movie modes and a rear quick control dial. The AF system looks set to get a 19-point system compared to the 700D's 9-point system and the megapixel count will supposedly increase from 18 to 24, bringing it into line with Nikon's competing models. In fact, a 24-megapixel APS-C sized crop sensor is equivalent to a 60-megapixel full frame sensor in terms of pixel pitch, and hence resolution.
It therefore appears that Canon has finally responded to market demands (and competition) for high megapixel cameras. Many photographers will maintain that no-one needs such high MP counts, but I believe there is a clear need for bird photographers who don't want to be limited to large/close birds and/or don't have huge lenses (such as a 600mm f/4 with teleconverters). If the 5DS rumours are true, they will therefore be hugely significant for bird photography.
On the price front this month, the Canon 6D and 1200D bodies have dropped 5% and 2%, respectively. The Canon 6D is now just over £1200, which was the level I predicted it would fall to when it was launched at £1800 in late 2012. At this price, its full-frame image quality makes it good value, but it's not surprising it had a lukewarm response when it was launched at £1800 (£300 more than the superior 5D Mk II, rather than £300 below it).
The outgoing Canon 100-400mm zoom lens has seen a price drop of 4% this month. Further reductions are to be expected before stocks have all gone, especially if there's an early drop in the price of the new Series II version of this lens.
The price reductions on the Sigma 150-500mm zoom over the last couple of months were short lived as a 15% hike takes it back to its previous price. Sigma lens prices do see-saw more than the other lenses I monitor.
Finally, a 2% reduction in the price of the Canon 500mm f/4 Series II supertele takes it under £7000 for the first time (to £6900). This was the new version of my main lens and I hope to upgrade to either this 500mm or a 600mm Series II if the price ever falls low enough, so even small drops are encouraging. I hear from many other bird photographers who are in the same position.
If there are any announcements this month, including specs, shipping dates and prices for the rumoured new models, I will update this page straight away, so keep an eye out for that.
Limited stocks of the new £2000 Canon 100-400mm II lens are now available. Early reviews are quite positive, although sharpness at the 400mm end doesn't seem significantly better than the old version. My recommendation is still to wait for further field testing and price reductions. The £950 Canon 400mm f/5.6 provides a good alternative in the meantime.
There have been several welcome price reductions this month. The Canon 6D, 700D and 70D bodies have dropped by 2%, 3% and 6%, respectively, whilst the outgoing 7D has dropped a further 14% to only £600, making it an absolute bargain while stocks last. The Tamron 150-600mm zoom has dropped 5% and the Sigma 50-500mm and 150-500mm zooms have dropped by 2% and 13%. Again, an all-time-low price of £600 for the Sigma 150-500mm zoom makes this lens more appealing as a starter lens. The Canon 300mm f/2.8 II, 200-400mm, 400mm f/5.6 and 300mm f/4 lenses have dropped by 2%, 2%, 4% and 5%.
Unfortunately, there has not yet been any movement on the 7D Mk II body price. Early field testing seems to suggest this camera is capable of very good results, but numerous people have reported AF issues. The AF setup on this body is far more complex and customisable than entry-level models, so I would expect to see many issues due to suboptimal settings. However, the jury is still out on this one.
A final piece of news is Canon's announcement that it will finally develop a high-megapixel DSLR. About time. Don't hold your breath, though.
After a very long wait, Canon have finally announced a replacement for their 100-400mm zoom lens, which they say will be available before the end of this year. The details are as follows:
the full name of the new lens is Canon EF 100-400 f/4.5-5.6L IS II
slight increases in the size and weight (14% for the latter)
improved build, coatings and handling (finally ditching the unpopular push-pull zoom control)
minimum focal distance reduced from 1.8m to 1m
IS upgrade from 2-stops to 4-stops
The preorder price in the UK is £2000, which is 60% higher than the street price of the existing model. In the US, the launch price of $2200 is only 30% higher than the existing model. I'd love to hear how Canon justify that one, since it takes all local factors out of the equation. I would recommend waiting for the price to drop to a more reasonable level before even considering this lens. Remember, the more you buy overpriced products, the more you and everyone else will have to pay for all new products in the future. In the meantime, you could pick up a Canon 400mm f/5.6 prime lens for less than half the price and put your (four-figure) savings towards something more useful.
Having said that, the 400mm maximum focal length of this image-stabilised lens and its relatively affordable price tag (remember the 200-400mm zoom costs nearly £9000!) make this a very significant announcement for bird photographers. The existing 100-400mm has been around since 1998 and has been the lens chosen by the majority of birders upgrading from entry level zooms. Unfortunately, the lens achieved notoriety for having hugely variable quality between copies. The lucky people who got hold of a good copy swore by them, but most owners remained frustrated until finally trading in for a sharper lens. Over the last ten years, I've had dozens of owners write to me asking how they can get better image quality and my advice has always been to try the Canon 400mm f/5.6 prime lens instead. Invariably, the feedback from people who tried this alternative has been positive. The sacrifice of the IS facility when switching to the prime can be countered by better support and there's no substitute for raw image quality. Also, the perceived advantage of being able to zoom out from 400mm is a fallacy for (non-Florida-based) bird photographers. If you need shorter focal lengths than 400mm for general photography, get a 70-200 or 70-300mm zoom to complement your bird lens - don't compromise your primary tool.
So, will I change the recommendation I've given to all new bird photographers for years and advise them to go with the new 100-400mm zoom instead of the 400mm prime? Well, anyone who knows me will know that I would never do that based on paper specs or Internet chatter. Only concrete evidence would change my recommendation. In particular, some of the most important attributes of lenses, such as AF speed and bokeh, can never be assessed on paper. What I would say, though, is that Canon's recent longer lenses have had excellent optical and build quality and greatly improved image stabilisation, as well as working very well with the Series III teleconverters. I am therefore very keen to see how this new lens shapes up.
[As an aside, and following my complimentary comments about Canon's recent long lenses (plus a recent email I received that started with the words "Obviously, you're paid by Canon, but..."), I'd just like to clarify the basis of my equipment recommendations. I have never received any form of payment from any camera equipment manufacturer or seller. I recommend mostly Canon products but that is based on my personal conclusion about which system is best for bird photography. If you read my monthly updates below, you will see I am frequently critical of Canon and their products.]
After last month's excitement, it's no surprise that there were no further product announcements this month.
The main development has been that the new Canon 7D Mk II body is now shipping, although UK stocks are still low. Early feedback from new owners seems to be positive, especially in the critically important areas of image quality and AF capability. Handling of noise in high-ISO images seems to be much better than the original 7D and the AF speed and accuracy are reported to be in the same league as the more expensive 5D Mk III and 1D X models. Sample images from capable bird photographers certainly look promising, although they lack the 'look' of full-frame images and early comparison shots don't show as much of a resolution advantage as may be expected.
Pricewise, the original 7D body has dropped by a further 13% as final stocks are cleared. Unfortunately, last month's reductions in the prices of the 70D, 6D and 5D Mk III bodies have now been reversed, so it looks as though that was a temporary offer. Finally, the preorder price of the Sigma 150-600mm Sport zoom has dropped 6% to £1500, bringing it closer to the grouping of bird photography lenses around the £1000-£1200 level. No further details of the Contemporary version of this lens have yet appeared, but most people think it will be priced to compete with the £950 Tamron equivalent.
Just as I was starting to think I'd never say this again, this has been a bumper month for announcements of new equipment relevant to bird photographers, with Canon and Sigma taking the opportunity of the Photokina trade fair to launch new products.
One of the most anticipated upgrades in DSLR history has been the replacement of the Canon 7D body. The Canon 7D Mk II is now launched and available to pre-order at £1600, which is actually £100 cheaper than the original 7D launch price back in 2009. Back then, the price dropped by £400 after only a couple of months, so anyone thinking about a 7D Mk II purchase may be better to think in terms of a Christmas present rather than a pre-order.
So, the big question is whether it's been worth the five year wait. I have to say that, on paper, there's little to suggest it has. Bird photographers who buy DSLRs with APS-C size sensors are interested in reach and speed. The headline specification changes in these areas are a megapixel increase from 18 to 20, a frames-per-second increase from 8 to 10, and a buffer depth increase from 25 to 31 RAWs. Is that really all we can expect in five years? When the original 7D was launched, most people would have confidently predicted that these measures would roughly double over a 5-year horizon. At this rate, Canon will take 25 years to reach the 30 megapixel level with an APS-C sized sensor and 10 years to get to the level Nikon reached over two years ago. Hugely disappointing.
Of course, there have been other spec changes, such as a 65-point AF system (with centre-point AF at f/8) and a higher maximum ISO setting, but we will have to wait for field tests to see whether these deliver significantly better 'keeper rates' and image quality than the outgoing model. If they do, then this will be a capable camera that will satisfy the masses of enthusiast bird photographers who want the features of the latest pro bodies but with more reach and a more affordable price tag.
As mentioned in the September update, Sigma has now launched its response to the £950 Tamron 150-600mm f/5-6.3 zoom, which has been so popular worldwide that Tamron have been unable to keep up with demand. In fact, Sigma has long dominated the telephoto zoom market and has a wide range of current models including the 50-500mm, 150-500mm and 300-800mm zooms. Not surprisingly, then, its response to the Tamron model has been decisive, with not one but two lenses having exactly the same basic specs (full-frame, image stabilised zooms with the same focal length and maximum aperture range). The full names of the new lenses are the Sigma 150-600mm f/5-6.3 DG OS HSM Contemporary and the 150-600mm f/5-6.3 DG OS HSM Sport. The Sport version is aimed at professional use and is bigger and heavier than the Contemporary model. It can now be pre-ordered at the launch price of £1600: the price of the Contemporary model has not yet been announced.
The Contemporary model is almost exactly the same size as the Tamron and, although not yet announced, it is expected to weigh around the same (approx. 2kg) and to be priced competitively. The Sport model is around 20% bigger and weighs almost 3kg, as well as having a 70% higher price tag than the Tamron. Despite its higher price, though, if the Sport model proves to have significantly better image quality and focus speed, it may prove to be the lens many bird photographers have been waiting for. The Tamron zoom created huge excitement but, ultimately, its performance at the 600mm end in terms of both image quality and AF capability leaves a lot to be desired. Many photographers would happily have paid a premium for extra performance: there is still a huge gulf between the £1000-ish enthusiast lenses and the £4000+ pro lenses. We will have to see whether the Sigma Sport model can start to plug that gap. I have to admit to a long-term frustration that no-one has produced a 600mm f/5.6 IS prime lens to a price point around the £2000-£2500 level. I can see why Canon wouldn't do this, because it would undercut sales of its megabucks pro models, but this seems to be an easy win for the likes of Sigma and Tamron. Unfortunately, though, they remain obsessed with wide-range zooms (4x in the case of the new models), which make it impossible to hit that sweet spot of reach/quality/speed/size/price. For now, though, anything that brings 600mm reach and decent quality to a wider range of photographers has to be big news.
Sometimes, significance comes not from a single new product, but from a combination of developments. Although I haven't been overly enthusiastic about the above Canon and Sigma announcements, let me present a more positive scenario...
Bird photographers desperately need as much reach as they can get. A Canon 5D Mk III and 600mm lens with 1.4x extender is now a common, capable set-up. Unfortunately, it costs nearly £12,000. A Canon 7D plus zoom lens up to 500mm or 600mm would have a similar number of pixels-per-bird at only £2000, but obviously with reduced image quality. However, put together the improvements in the 7D Mk II and the Sigma 150-600mm Sport and the gap closes. Now consider that, whereas teleconverters were not a realistic option for the cheaper setup in the past due to poor image quality and the loss of autofocus, the improved AF (with f/8 shooting) of the 7D Mk II together with the improved quality of the Sigma zoom and the new high-end Sigma teleconverters that have been launched alongside it (sorry, I didn't mention those), and the competition starts to look quite different. This is all subject to field testing of course, but we can be optimistic for now.
For bird photographers who can't afford or justify the ludicrous pricetags of a pro setup (and, yes, having lenses that cost more than cars is ludicrous), this is a very interesting time.
There are also some interesting developments for bird photographers whose primary interest is in having small, light equipment. For a number of years, I've been recommending the Canon 400mm f/5.6 lens as a great lens for bird photography enthusiasts. This sharp, fast-focusing lens coupled with a high-resolution body like the 7D, has enabled many photographers to build an excellent collection of bird images without the cost, size or weight of the 'big white' superteles. Some have tried using this lens with a 1.4x teleconverter but, on all but pro bodies, this has led to loss of autofocus ability. The ability of the 7D Mk II to AF at f/8 means this combination can be used whilst retaining AF, providing a small and light set-up with plenty of reach.
For those who want a light-ish telephoto, there is also another new option: Canon announced at Photokina an upgrade to its 400mm f/4 IS DO lens, which can be preordered for £7000!. This lens is shorter and fatter than the £1000 400mm f/5.6, but weighs nearly twice as much as the latter, meaning it's nowhere near as portable or manouverable. In fact, it's only slightly lighter than the similarly-sized 300mm f/2.8 II, which is an excellent lens with a price tag 30% less. For the same price as the new 400mm f/4 DO IS II, you could alternatively buy the truly excellent 500mm f/4 II. So, you may be asking, why would anyone buy this new DO (diffractive optics) lens? Well, I've asked the same question about the original version of this lens for years, because I just don't understand why anyone would, not least because its image quality was distinctly average. Canon don't even use the 'L' quality designation for this lens. According to Canon, the new version uses a different design to overcome the optical limitations of the original, including putting the DO element at the rear of the lens instead of the front. For me, though, even if this redesign delivers excellent performance, I would find it very difficult to recommend over the alternatives mentioned above.
Finally, as if the excitement of all these product launches is not enough, there have been some decent reductions on the Canon 5D Mk III, 6D and 70D bodies, their prices dropping 4%, 5% and 9%, respectively. The most modest of these - 4% off a 5D Mk III - may not seem significant, but this excellent body has barely dropped in price for almost two years now, so this may signify the beginning of its wind down.
After the excitement of Canon's lens price drops last month, I am pleased to see that the lenses in question have remained at the lower prices and there are no reports of the reductions being for a limited time.
This month, there have also been price drops of the Canon 1200D and 6D bodies (10% and 6%, respectively) as these settle towards their 'mid-life plateau' levels. For the 7D body, there has also been an 11% drop this month, but that is for a different reason: this is the end-of-life clearance price in preparation for the replacement model expected to be launched at the 16-21 September Photokina trade fair. There has been huge speculation about the specs of this new model and about what lens announcements may or may not accompany its launch. I will not comment on any of this unless or until it has been announced by Canon.
Also at Photokina, Sigma is expected to announce a new 150-600mm f/5-6.3 OS zoom, which would appear to compete with the Tamron equivalent. However, pre-release details seem to suggest this will be a bigger, heavier, more pro-specced and, of course, more expensive version than the Tamron zoom. In any case, it's interesting that the existing Sigma 150-500mm zoom dropped 4% in price this month and has a UK cashback offer taking that reduction to 11%. Let's see what further announcements are made.
This could well be a very interesting few weeks, so I'll be on standby to perform a mid-month update to this page if reliable announcements are made.
As I came to write this month's update, having been aware that the last month had seen no significant product announcements, I expected there to be little to comment on. I then started my usual check on equipment prices, starting off by adding new camera body prices to my tracking spreadsheet, only to note that they were all exactly the same as last month's prices. Next came my checks on the prices of independent lenses from Sigma and Tamron. Again, all the same as last month. All that remained was to check Canon lens prices and, given how rarely those change these days, I started to wonder what on earth I was going to be able to write about.
On checking the Canon 'bird lens' prices, though, I was utterly shocked to see the biggest swathe of price cuts I can remember! A couple of the older lenses - the 100-400mm and 800mm f/5.6 - had dropped by only 1%, but all the other Canon lenses I track had dropped by 4% to 14%! In order of increasing percentage reductions, the full list is: 400mm f/2.8 II (4%), 500mm f/4 II (5%), 300mm f/4 (6%), 300mm f/2.8 II (7%), 400mm f/5.6 (11%), 600mm f/4 II (11%) and 200-400mm (14%). Even the 1.4x and 2x Series III extenders (teleconverters) had dropped by 12%.
I was so shocked, in fact, that I checked whether these reductions were across all major UK retailers (they are) and even telephoned some of them to ask for more details, especially whether this was a 'limited time offer'. The new prices have obviously come from Canon but, other than that, the retailers I spoke to had little information about the changes, although they did say that no time limits had been specified.
In any case, this is excellent news for anyone who has been saving up for a lens upgrade. Enjoy!
As we've come to expect, there have been no new product announcements this month for bird photographers using Canon bodies. However, speculation of an imminent replacement of the ancient 7D body is now building and a 13% price drop on this model in a month when all my other tracked equipment prices remained static adds weight to this.
I've mentioned on several occasions that I believe Canon generally leads its arch-rival Nikon in bird photography equipment, especially in the all-important supertelephoto lens area. However, in one area Canon has seriously fallen behind Nikon, namely the option of high-megapixel camera bodies. Over two years ago, Nikon launched the 36-megapixel D800 to meet this demand for full-frame shooters and, this month, they have launched an upgraded model, the D810. Canon's highest-megapixel FF body is the 5D Mk III, with only 22 MP and the £4800 flagship 1D X has only 18 MP.
In the crop body market, Canon's highest pixel density is provided by the new 20 MP 70D body, but this is beaten by Nikon's 24 MP models such as the D3300 and D7100.
At this point, all serious photographers will jump in and say that higher megapixels means lower image quality and the best bird images come from these large-pixel FF bodies. This is absolutely true, but these bodies cater for a specific type of bird photography in which the birds are large and/or close. Typically, these bodies will be paired with a huge and expensive supertele lens such as a 600mm f/4 and shot from a static position in a hide or other 'managed setup'. For every bird photographer who works in this way, there are dozens more who photograph in a roaming style or who shoot rarities, and hence are permanently dealing with images in which the bird is very small in the frame. For such shooters, crop sensors can give much better results simply because they normally have higher pixel densities and so capture more 'pixels per bird'. You can see these values in the following table which shows how many pixels you'd capture per bird for every 1000 delivered by Nikon's smallest pixel pitch models.
Camera |
Pixel Pitch |
Megapixels |
Format |
Relative Pixels per Bird |
|
|
|
|
|
|
|
Nikon D3300 / D7100 |
3.9 |
24 |
APS-C |
1000 |
|
Canon 70D |
4.1 |
20 |
APS-C |
900 |
|
Canon 7D |
4.3 |
18 |
APS-C |
820 |
|
Nikon D810 |
4.8 |
36 |
FF |
660 |
|
Canon 1D Mk IV |
5.6 |
16 |
APS-H |
480 |
|
Canon 5D Mk III |
6.25 |
22 |
FF |
390 |
|
Canon 6D |
6.5 |
20 |
FF |
360 |
|
Canon 1D X |
6.9 |
18 |
FF |
320 |
|
Nikon D4s |
7.3 |
16 |
FF |
290 |
|
Canon 1D Mk III |
7.4 |
10 |
APS-H |
280 |
Again, serious photographers would correctly point out that real-world resolution differences would be smaller due to a variety of limiting factors such as lens quality, sensor quality, equipment/subject movement, air quality, etc., but imagine this scenario: you have a small/distant bird and two photographers, one using a £4800 Canon 1D X and one using a £300 Nikon D3300 that gives three times as many pixels per bird. Who do you think is going to get the clearest image? Now let's say the 1D X shooter has a £10,000 600mm f/4 II lens with a 2x converter on a top-quality (£2000) tripod, but the D3300 shooter has only a sub-£1000 Tamron or Sigma zoom lens. That would probably even up the odds, but then imagine the bird is highly mobile, moving from bush to bush so mobility becomes the dominant factor in who gets the best shot. Rarity images posted to birding websites show this is very often those with high megapixel crop bodies, especially if they have halfway decent lenses.
Enthusiast bird photography is a large market that camera manufacturers have not fully satisfied. The 7D was a leader in this area when it was released almost five years ago, but has now been left behind. It will be interesting to see if the '7D Mk II' returns Canon to pole position when it eventually hits the streets - or should I say the field?
No new product announcements again this month, but at least there have been a few price changes to note.
First, at the budget end of the camera body range, the Canon 1200D and 100D bodies have dropped by 7% and 6%. For the 100D, this takes the price down to two-thirds of its launch price, so most of its expected fall-off has now happened. For the 1200D, though, this is the first move from its inflated launch price, so a further 30% drop would be expected before this model is replaced.
On the lens front, a really welcome price drop of 4% on the Canon 500mm f/4 II is the first significant drop for this lens since just after its launch a year and a half ago. Other drops of 1% to 2% in the Canon 600mm f/4 II, 400mm f/2.8 II and 800mm f/5.6 add up to a broad fall in Canon supertele lens prices. These are not big drops but, given the lack of any reductions at this end of the lens market in the last year, they will build hopes of further reductions in the coming months. Despite these encouraging signs, my advice remains to go ahead with any planned purchases in this sector as further reductions are likely to be small and gradual.
A final reduction was a 2% drop for the Canon 100-400mm zoom. There has once again been speculation recently about the imminent replacement of this aged model. The replacement model is likely to be better, but at a huge price premium, so don't get too excited at this stage.
Given the lack of much of substance to report in new equipment, this month I finally got around to updating my Buying Guide for Used DSLRs above. This showed some huge changes since my last update two years ago and I will comment fully on these changes next month. For now, the take-away message is clear: don't buy a brand new camera body without giving serious consideration to the used models you could buy for the same money.
Again no new product announcements or price changes this month.
Last month, I took the opportunity of a news lull to review the accumulated changes of the past year. This month, to mark my first whole decade as a digital bird photographer, I'll take a look at what's changed in the last ten years in the equipment field.
In 2004, as now, the leading camera systems for bird photography were those of Canon and Nikon. These systems were - and still are - almost inseparable for general photography, but with Nikon having the edge for wide-angle shooters and Canon having the edge for long telephoto users. Back then, for example, both Canon and Nikon had 500mm and 600mm superteles, but the Canon versions had Image Stabilisation (IS), where the Nikon ones did not. Nikon added Vibration Reduction to their superteles in 2007 (8 years after Canon) but, today, the latest versions of these lenses from Canon are still the best that money can buy. The point of this round-up, though, is not to compare one brand with another: it is to compare the equipment of a decade ago with that available today.
I will stick with lenses for now, because these are, in my opinion, more important than camera bodies. Staying with the leading-edge superteles, Nikon and Canon made only one upgrade to their 500mm and 600mm lenses in the last decade, Nikon's in 2007 and Canon's in 2012. The new Canon lenses are sharper, lighter and have better IS, plus greatly improved performance when used with the latest extenders (teleconverters). 800mm lenses were also introduced by Canon in 2008 and Nikon in 2013. There have therefore been significant improvements to professional bird photography lenses, but what about at the £1000-or-so level? Well, my opinion is that, throughout the last decade, the best available bird photography lens in this price range has been the Canon 400mm f/5.6 that was introduced in 1993 and which still doesn't have an equivalent in the Nikon range. In this period, new stabilised zoom lenses were introduced by independent lens manufacturers (Sigma 150-500mm in 2008, Sigma 50-500mm in 2010 and Tamron 150-600mm in 2014), but these still don't topple the Canon 400mm prime in my view.
Moving on to camera bodies, the Canon range at the start of the decade comprised the 300D and 10D models (6 megapixels, 7 AF points, 2.5/3 frames per second) and the professional 1D Mk II and 1Ds models (8/11 MP, 45 AF points and 8.5/3 FPS). The Nikon range comprised the D70 model that was my first DSLR (6 MP, 5 AF points, 3 FPS) and the professional D1X and D2H models (3/4 MP, 5/11 AF points and 4.5/8 FPS). All models from both ranges had maximum ISO settings of around ISO1600. All models had APS-C sized crop sensors, except the two Canon pro bodies, which had APS-H and Full Frame sensors).
Today, the Canon line-up comprises five APS-C models, the 100D, 1200D, 700D, 70D and 7D (18-20 MP, 9-19 AF points and 3-8 FPS) and three Full Frame models, the 6D 5D Mk III and 1D X (19-23 MP, 11-61 AF points and 5-14 FPS). The APS-H (1.3x) crop sensor has been abandoned. The most recent Nikon bodies include the APS-C sized D3300, D5300 and D7100 models (25 MP, 11-51 AF points and 5-6 FPS) and the Full Frame D610, D800, D4s and DF models (16-36 MP, 39-51 AF points and 4-11 FPS). Almost all models from both ranges have maximum unboosted ISO settings of ISO6400-25,600.
In summary, then, megapixel counts have gone up from 3-11 MP ten years ago to 18-36 now; AF points have gone up from 5-11 to 9-61; frame rates have gone up from 2.5-8.5 to 3-14 FPS; and maximum sensitivity settings have gone up from 1600 to 51,200. On average, this means that megapixel counts and AF points have roughly quadrupled, frame rates have increased by a half and maximum ISO settings have increased 16-fold (take this last measure with a pinch of salt, because it reflects marketing hype as much as genuine high-ISO image quality improvement). There has also been a shift towards more Full Frame sensors.
Whichever measure you take, therefore, the technological innovation of the two camera giants (and the competition between them) have resulted in some major benefits being delivered to bird photographers and, of course, to photographers in general. The capabilities of low-end DSLRs now exceed those of cutting-edge pro bodies from ten years ago, bringing excellent bird imaging capability to the masses. Many professional photographers hate this fact and it is understandable given the flooding of the market with high quality bird images that can be bought for peanuts or even used for free. The pro bird photographers of today, though, have had to employ considerable creativity to remain in business and, as a result, the standard of bird images has been pushed ever higher.
A decade ago, debates were raging about whether digital photography was better than film and the arguments in its favour were more about immediacy, convenience and cost than about image quality. Today, ten years after film photography pretty much reached its limit, digital photography has taken imaging capability far beyond anything seen in the film era. Challenging branches of photography - such as bird photography - can now be enjoyed by anyone. I believe that's something to be celebrated!
The last month has been the quietest ever, with no new product announcements relevant to bird photographers and no changes in the prices of the 30-or-so cameras and lenses I track.
It's therefore a good opportunity to take stock of what's happened over the last year or, actually, the eleven months since I last did an annual round-up last May.
Starting as usual with the 'deaths and births', we lost the 1100D, 600D, 650D and 60D and gained the 70D. Yes, that's it. When I did my review last May, it included six new Canon DSLR models and yet this year we have only one. Even the ancient 7D didn't get an upgrade. The DSLRs that had been recently introduced last time - the 100D, 700D and 6D - had the expected price falls of 23%, 12% and 14% respectively. The 70D also fell by 20% from its launch price, but the remaining models - the 7D, 5D Mk III and 1D X - have remained at almost exactly the same price for the whole year.
With the clear out of old models, the range of new Canon DSLRs for those interested in bird photography is now very clear: budget 1200D and 100D models around the £400 level (not great for bird photography and definitely poorer value than used bodies from higher model ranges); the £500 700D and £900 70D bodies (not cheap but decent, especially the 70D); the £1000 7D and £1400 6D (a clear choice between reach/speed and image quality); and finally the £2300 5D Mk III and £4800 1D X (great bird photography cameras with the latter giving a performance and build quality edge at a huge price premium).
On the lens front, the much talked about Canon 200-400mm zoom with built-in 1.4x extender came out just after my last round-up, at the astronomical price of £12,000. It has since dropped by 14%, but is still well over the £10,000 mark. I would not like to mention this lens without my usual warning that this lens is not optimal for bird photography. If you are a bird photographer and are considering this lens, get the latest 600mm or 500mm lens instead: your longest lens should always be a prime. If you think you need 'the flexibility of a zoom', you are almost certainly wrong but, even if you're right, you should get this flexibility by having a mid-range zoom alongside a long prime. If you own the Canon 200-400mm zoom, you are not a bird photographer: at best, you are a general wildlife photographer or other non-wildlife photographer; at worst, you're the type of person who must have the most expensive lens in the line-up, just for the sake of it. Sorry for my frustration with these 'all the gear, but no idea' types, but their ravings are persuading some aspiring bird photographers to waste their savings on a jack-of-all-trades lens.
The only other new lens on the bird photography scene this year has been the Tamron 150-600mm zoom. To recommend this lens would seem to be a contradiction of my last paragraph. However, its launch into the sub-£1000 sector makes this a completely different comparison. Yes, this lens is also a jack-of-all-trades lens, but it sits at a price point at which there are no prime alternatives and the only real competitors are the inferior Sigma 150-500mm and 50-500mm zooms. There are undoubtedly issues with this lens when used at its full 600mm setting, but anyone with the self-discipline never to exceed the 500mm setting would, I'm sure, be delighted with its 'bang per buck'. If it wouldn't impact resale values, I'd suggest simply fixing the lens at the 500mm setting using superglue! For me, though, the big question has been whether to change the advice I've been giving for years and recommend the new Tamron over the Canon 400mm f/5.6 prime. From looking at huge numbers of reviews and sample images, I've finally reached the conclusion that, given the choice, I'd take the Canon prime instead. True, it costs almost 20% more than the Tamron, so it's not at the same price point, but I'd buy a used copy or grey import or sell something or just save up longer to get the Canon prime every time. Even with considerably less reach and a lack of image stabilisation, I'm confident that I could create a much better portfolio of bird images with the Canon prime than the Tammy zoom, due to the sharpness, maneuverability and AF speed of this mini-marvel. I still get emails almost every week from people thanking me for pointing them in the direction of this lens and raving about its impact on their bird photography. Maybe if Tamron or Sigma made a 500mm f/5.6 VC/OS prime they may be able to topple this unique lens but, otherwise, my advice stands firm.
Looking more generally at lens prices, many people hoped some of the key lenses would drop in price this year but, unfortunately, the opposite has happened in almost every case. The Canon 300mm f/4, 300mm f/2.8 II, 100-400mm zoom, 400mm f/5.6, 400mm f/4 and 800mm f/5.6 have gone up by 6%, 4%, 9%, 9%, 8% and 5% respectively (all much more than inflation). The Series II 400mm f/2.8 and 500mm f/4 stayed about the same and, thankfully, the 600mm f/4 dropped 3%. For the next year, the conclusion has to be that there's no point waiting for further lens price reductions: just go ahead and buy the best you can afford.
The real opportunity in the equipment area this year is the availability of used gear at unprecedented price/performance points. A Canon 1D MkIV body for £1700, 5D Mk II for £1000 or 50D for £300 are real bargains, whilst a Series I 500mm f/4 IS for £3000 makes top-notch bird photography accessible to more people than ever before.
In summary, after the bar-raising launches of top-end bodies and lenses the previous year, albeit at a price, the last year has given bird photographers nothing new of use and nothing in the way of cost savings on new gear. Once again, the comforting conclusion is that the emotional energies of bird photographers are better spent on the search for the best images of the best birds, not the best gear with which to capture them.
Despite eager anticipation of new Canon DSLRs, including the long-overdue 7D Mark II, Canon haven't launched any new models for nine months now. The only exception has been the announcement this month of a new 1200D at the entry level, which can now be pre-ordered for £350, almost 50% more than the current street price of the outgoing 1100D model. At least in this case, the megapixel count has increased from 12 to 18, giving at least something of value to bird photographers amongst the inevitable video feature enhancements. At present, though, one of the last remaining 600D bodies (that can still be picked up for the same price as a 1200D pre-order) would be better value.
Pricewise, a 2% increase in the Canon 6D body and a 3% increase in the Sigma 150-500mm lens are the only significant changes.
Hopefully next month will see the launch of something of note.
In the complete absence of any other product news relevant to bird photographers, all attention continues to focus on the Tamron 150-600mm zoom, which is now available in the UK at only £950.
Numerous reviews of this lens are now posted on the Web and these include many sample images of birds. However, I have yet to see bird images taken by a bird photographer - professional or amateur - so it is too early to reach solid conclusions. The reviews identify some minor shortcomings with the autofocus and image stabilisation abilities, plus a fall-off of sharpness and AF speed at the 600mm end but, on the whole, both optical and mechanical performance appear to be very good. Actually, any photographers who can discipline themselves to shoot with this lens at 500mm would almost certainly find it even better (equivalent to resisting adding a teleconverter).
Again, in a quality/performance comparison with the Canon megabucks superteles, the Tamron will always lose out. In terms of value for money, though, the comparison is reversed: the Tamron delivers the reach of the big guns with most of the image quality at a tenth of the price. Tamron could easily have launched this lens at double the price. By pitching below the £1000 mark, though, they have set this segment of the market alight.
In other price news, there have been small (1-2%) reductions in the prices of the Canon 6D body, 100-400mm and 600mm f/4 lenses, plus the 1.4x and 2x extenders, and a 6% drop in the price of the Canon 200-400mm zoom. A 4% rise for the Sigma 150-500mm zoom further seals its fate.
To Tamron's credit, their new 150-600mm f/5-6.3 zoom lens went on sale in Japan in mid-December, only a few weeks after the product was announced. US shipping starts mid-January and UK shipping shouldn't be too far behind. This lens is a replacement for Tamron's £870 200-500mm f/5-6.3 zoom and, in the US, costs around 13% more than the outgoing model. That would suggest UK pricing just around the £1000 mark. Given the increased zoom range and the addition of vibration control (image stabilisation), the launch price seems reasonable and may well fall in any case.
The outgoing 200-500mm model is not one I've ever recommended, as it costs more than the Sigma 150-500mm and lacks image stabilisation. The new model will certainly shake up this part of the market. Interestingly, the only significant price changes this month in the products I track have been 7% and 3% reductions in the Sigma 150-500mm and Canon 100-400mm zooms! That said, I would not recommend any product until it has been proven in the field and the jury is certainly still out on this one.
In the past, a lens of this specification would have been relatively useless for bird photography for various reasons. Firstly, an aperture of f/6.3 at the long end would have meant shutter speeds so long that both subject movement and equipment movement would be excessive. Second, autofocus systems would have been hopeless in the low transmitted light levels. Looking forward, though, developments such as image stabilisation, improved AF systems and, especially, better high-ISO performance of DSLRs all make such a design much more usable. The fact that this is a full-frame lens design also means it can be expected to perform well in the centre part of the frame used by crop-sensor cameras.
I don't see this type of lens as an alternative to the Canon superteles for professional bird photographers but, for enthusiast photographers, it could provide unprecedented reach.
On 7 November, Tamron announced the development of a new 150-600mm f/5-6.3 zoom with Vibration Control. See here for details. No delivery date or price has yet been announced, but this will be followed with interest by those who can't afford or justify the megabucks superteles.
As the Christmas shopping season gets into full flow, there is still no sign of the general price reductions we normally see at this time of year. The 100D and 600D both dropped by 5%, but that's expected for models at either end of their lifespans. The 6D also dropped 3%, finally bringing it down to a reasonable level (23% below its launch price). Lens prices were static, with the Sigma 150-500mm increasing by 3% and the Canon 200-400mm zoom reducing by 8% being the only movements. The latter is significant, since it is the first fall from its astronomical £12,000 launch price.
There was one major price change this month, as the new 70D body dropped 17% to £880 (£200 down from its launch price). As mentioned last month, there is very little to choose between the 70D and the 7D but, with this price drop, the choice becomes a lot clearer. I now have no reservations in recommending the 70D for those looking to significantly upgrade their entry-level DSLRs.
A year or two ago, the Canon DSLR product range was confused and over-crowded, but this has now resolved nicely. The 1100D, 700D, 70D and 7D crop bodies at the £240, £490, £880 and £1030 price points make sense and the long-anticipated 7D Mk II coming in at a higher price point will make this even more rational. The £400 100D with its price premium for compactness sits alongside this crop body range sensibly. The full-frame 6D, 5D Mk III and 1D X at £1400, £2300 and £4800 also provide a clear choice at prices that are now justifiable by market demand. As regular readers of my equipment updates will know, I'm not reticent in criticising Canon if I think they've got it wrong but, right now, I'm happy to congratulate them on a very well designed product range.
All that's missing now are high-megapixel bodies to meet the demands of reach-hungry sectors such as enthusiast bird photography and the range will be complete.
As expected, no announcements of note this month.
As predicted last month, the price of the new 70D body has now started its fall from its £1079 launch price, falling by 3% this month. The anomalous rise in the 1100D body price has also been corrected by an 8% fall this month. Unsurprisingly, the venerable 7D body also saw a slight price drop of 4%.
Anyone coming to the Canon DSLR range for the first time will wonder why there are two bodies - the 70D and 7D - at almost exactly the same price. When they realise one of these is four years old - an aeon in consumer electronics terms - they will almost certainly opt for the shiny new model on the assumption that everything has been improved. If that doesn't convince them, the increase in megapixel count from 18 to 20 will be the clincher. In practice, though, there are almost no differences between the two models as far as bird photography is concerned, either in image quality or performance. Once again, this shows that DSLR development is focused on improving other areas such as video or static-subject shooting. There has never been a Canon camera more optimised for enthusiast-level bird photography than the 7D. Hopefully, the long-overdue 7D Mk II will take this optimisation to the next level; the 70D certainly doesn't.
In contrast to the above camera body price drops, there have been no significant price drops for bird photography lenses this month and some Canon lenses have gone up significantly: 300mm f/4 up 5%, 400mm f/5.6 up 7%, 100-400mm zoom up 11% and 1.4x/2x extenders up 5%. All bad news, but especially for the 400mm f/5.6 which I strongly recommend. If you're thinking about buying bird photography gear for Christmas, I'd probably wait to see whether next month brings the traditional seasonal price reductions.
Another quiet month for equipment announcements, with nothing of note for bird photographers. Even the rumours websites are suggesting there may not be any further significant announcements this year.
There have been a few price changes, but mostly just by one or two percent, such as the expected 2% reductions in the new-ish Canon 700D and 6D models as they continue to drop from their launch prices. The Canon 100D dropped 5% for the same reason, but the 70D still refuses to budge from its £1100 opening price, despite now being readily available. I expect some movement on this next month. In the meantime, prospective purchasers should think about whether to grab one of the outgoing 60D bodies, the last few of which can now be picked up for less than £600. The £500 price saving would be better added to your lens fund unless you already have a lens at least as good as the Canon 400mm f/5.6.
Speaking of lenses, this month also saw the Canon 100-400mm and Sigma 150-500mm zooms drop by 6% and 3% respectively. Neither of these lenses is as sharp or fast as the Canon 400mm f/5.6, though.
Finally, an anomaly this month is the rise in the price of the Canon 1100D body by 13%.
Another quiet month for equipment announcements, with nothing of note for bird photographers.
The 70D body is now in stock at some retailers. Although a solid upgrade over the 60D, it is still at its launch price of almost £1100. The 60D, which was launched at almost £1000, plateaued at £600, so I would expect the 'target price' of the 70D to be around £700, making it 60% overpriced at present.
On the price front, the new Canon 100D and 700D bodies dropped by 2% and 3% respectively, as expected. The 700D still costs 30% more than the outgoing 600D for no benefit to bird photographers, so is still one to avoid.
Worse news is a pair of price increases on lenses, Canon 100-400mm zoom and 300mm f/2.8 II prime going up 7% and 5% respectively. For bird photographers, the first of these is not much of an issue because it makes a poor value-for-money purchase even poorer, but the return of the 300mm almost to its pre-order price from two years ago is terrible news for those who were hoping this lens would drop to a more affordable level. In truth, the quality of this lens either alone or with the latest 1.4x or 2x extenders is such that many bird photographers are using it as an alternative to the longer focal length superteles, enjoying the size, weight and cost savings it brings. When higher-megapixel Canon bodies eventually arrive, this will be an even more attractive option for all but the most committed bird photographers. £5000 may prove to be a sustainable price point for this lens, so don't hesitate if you've identified this as your ideal lens, especially since resale values on lenses are hugely better than those on bodies (I could still sell my Canon 500mm and 300mm lenses for pretty much what I paid for them 7 and 2 years ago, but my camera bodies are now all but worthless).
Since the announcement of the new Canon 70D body on 1 July, no new product news has broken in the equipment types I monitor.
Price-wise, there have been 5-6% increases in the price of the Canon 7D body and 400mm f/4 lens, but 5-8% reductions in the Canon 1100D, 100D, 700D and 6D bodies. The 1100D is now down to around half its original price and, at just over £200, proves that DSLR ownership is possible for most budding photographers. The recently-launched 100D, 700D and 6D bodies have already dropped 20% and are starting to get into the sensible zone (although they will all surely drop further by the end of this year).
Definitely a quiet month!
For bird photography, the most significant equipment announcement this month is the Canon 70D camera. In comparison to the 'badge upgrade' of the 700D, the enhancements incorporate into the 70D seem huge. The headline improvement is the new 'dual pixel CMOS autofocus' system, which improves AF performance when shooting in Live View mode. Don't get too carried away, though: this has limited application for bird photography. The new model also brings back some of the features that had been removed from the 60D such as autofocus microadjustment and throws in some usability improvements such as WiFi connectivity that are nice-to-haves, even though they don't improve image quality.
Importantly, though, there has been a return to the solid incremental improvements that had been a feature of xxD model evolution until the retrograde step taken by the 60D. The sensor now promises a megapixel increase from 18 to 20 without a loss of image quality, whilst the shooting rate increases from 5.3 to 7 frames per second. More significantly, the 19-point AF system of the 7D now replaces the 9-point system used on its predecessors. This (customisable) AF system may not compare to the latest pro system used on the 1D X and 5D Mk III, but it has satisfied countless 7D users for several years now and is certainly good enough for all but the most extreme bird photography situations.
The 70D should therefore prove to be a significant advance for enthusiast bird photographers when it hits the streets in the next month or two. As always, the launch price is ridiculously hiked - in this case to 80% higher than the street price of the outgoing model and to higher than its 7D 'big brother', but, assuming this comes down to something sensible in the coming months, this would make a highly desirable Christmas present.
Price changes this month have been 7%, 2%, 8% and 3% drops for the Canon 1100D, 700D, 100D and 6D bodies, and 2% and 5% rises for the Canon 400mm and 800 f/5.6 lenses. The new 200mm-400mm zoom is now available to purchase for those who wish to do so.
After more than two years since Canon first said they would develop a 200-400mm zoom with built-in 1.4x teleconverter, they have now finally launched the finished product and are starting the first trickle of deliveries. The lens, the full name of which is the 'Canon EF 200-400mm f/4L IS USM Extender 1.4x', has a launch price of £12,000!
If you're thinking of buying one of these lenses, you will probably have convinced yourself that the flexibility of being able to zoom from 200-560mm with a single lens will give you an advantage over the fixed focal length alternatives, such as the 500mm and 600mm f/4 superteles (the latest Series II versions of which cost £7700 and £10,600, respectively). If you're a general wildlife photographer who shoots as many mammals as birds, you may be right but, in my opinion, if you consider yourself primarily a wild bird photographer, you would be very wrong! Trust me, you would be using the longest focal length available to you for 99.99% of your shots and, even if you think you'll have an advantage for the remaining 0.01% of shots, you could normally gain the same advantage by stepping back a few paces. Occasionally, this won't be an option, but you're then down to 0.0001% of shots. On the flip side, the greater reach, quality and speed of the primes would be an advantage in almost all bird shooting situations.
The new zoom is 13% heavier than the 500mm prime and almost as heavy as the 600mm prime. It is even heavier than the 500mm prime with a 1.4x extender attached, despite giving only 560mm reach compared with the 700mm of the latter. It also costs £4000 more! That price difference would almost buy you a 1D X body or a 300mm f/2.8 II lens or a dream trip to photograph birds anywhere in the world.
I'm convinced that bird photographers who own prime superteles would wish they had the 200-400mm zoom only once in a blue moon, and equally convinced that 200-400mm zoom owners would wish for a prime supertele just about every time they pointed their camera at a bird.
If you're a bird photographer with a five-figure lens fund burning in a hole in your pocket, buy the excellent 600mm f/4 II prime instead. If that's too big for you, go for the 500mm (or the 300mm f/2.8) and put the money you saved to good use. Just don't be tempted to make an expensive mistake.
On the prices front this month, there has been something of a polarisation, with top-end gear going up and budget gear going down. The new Canon Series II superteles have all increased in price (1-3%) and the Canon 6D body has also gone up 7%, whilst the Canon 1100D, 600D, 700D and 100D bodies dropped 3%, 3%, 5% and 9%, respectively.
The new Canon 100D camera body announced last month is already in stock, but still at the launch price. The new (depending on your definition of 'new') 700D is also in stock with a 6% drop from the launch price. It's incredible how quickly things can move at the budget end of the range compared to the snail's pace of the high-end gear. (Actually, even snails can travel a long way in two years!)
The only other significant price changes this month were 3% reductions in the Canon 7D and 6D bodies and a 2% increase in the 5D Mk III body. There are also some Canon cashback deals available until the end of May/August that mean there are further savings on almost all their camera bodies. All lens prices are the same this month for the gear I track.
Updated firmware is now available for the Canon 5D Mk III body meaning that both it and the 1D X can now autofocus at f/8 (e.g. using a 600mm f/4 lens with a 2x extender). This AF is limited, but at least it's now (belatedly) possible.
As you can see, little has happened this month, so I thought I'd have a quick look at what's happened over the last year. In fact, I've looked at the past 15 months, because I last did a full-year round-up last February.
Starting with the 'deaths and births', we lost the 550D, 5D Mk II, 1D Mk IV and 1Ds Mk III bodies and gained the 650D, 700D, 100D, 6D, 5D Mk III and 1D X. The prices of the 600D, 650D, 60D and 5D Mk III dropped by a quarter during the period, mostly reflecting corrections from the hiked launch prices. The long-in-the-tooth 7D dropped only 6% and the venerable 5D Mk II had dropped only 1% until a last-minute clearance saw 20% reductions during the last few weeks of its life (a real bargain for those who took the opportunity). At the top end, the 1D X dropped only 8% from its launch price (the old 'reassuringly expensive' advertising slogan springs to mind).
On the lens front, the 500mm and 600mm Series II superteles finally started to ship in late 2012, but supplies are still patchy and the prices haven't yet dropped by much (9% and 5%, respectively). The other Canon lenses I track dropped by 5% to 8%, which is welcome. The Sigma lenses I track, on the other hand, stayed at exactly the same prices for the whole 15-month period, other than the 50-500mm zoom, which dropped 9%.
What's most interesting is what didn't materialise through this period. New versions of the 7D body and the 400mm f/5.6 and 100-400mm lenses had been rumoured, but didn't appear. A new Canon 200-400mm zoom lens with built-in 1.4x extender had also been expected, but hasn't even been officially announced yet, even though samples have been out in the field for many months.
In the same period, Nikon have continued to gain ground, especially with their new high-megapixel bodies. Through much of the period, Canon was simply unable to supply any 500mm or 600mm lenses, whilst Nikon stocked equivalent models. Even now that these Canon superteles can be purchased, they are still much more expensive than the Nikon equivalents. In the bird photography world, Canon has now lost much of its advantage over Nikon. Although I have no plans to switch to Nikon gear, I may start including information about Nikon products in future website articles.
Ultimately, though, where money is no object, Canon have still proved that they can deliver what pros need most. The combination of the superb 600mm f/4 II lens and 1D X body really has pushed the boundaries of equipment capability. With this combo, you can still get AF and very good image quality even with 2x extenders, giving a 1200mm f/8 equivalent. In the generally low light levels of the UK, f/8 would normally be too small an aperture to get action-stopping shutter speeds, especially for fast-moving birds with such a high-magnification lens. With the low digital noise of the 1D X, though, it's possible to just bump the ISO up to 10,000 or more and still freeze any subject or equipment motion, whilst retaining excellent image quality. This really is a game-changer in bird photography. Where extreme magnification is not needed, the sharpness of the new Series II superteles without extenders has proved as impressive as Canon's original claims. Finally, top-quality autofocus on the new 1D X and 5D Mk III bodies, together with the flexibility and 'look' of full-frame sensors completes the picture.
Little of this has yet rippled down to the budget or mid-range products, but the top-end gear really has advanced the state of the art over the last 15 months. The challenge, as always, is for bird photographers to make the most of equipment advances and do what only they can do: deliver beautiful portraits, revealing behavioural records and stunning action shots of our amazing avian subjects!
After the anticipation of a 60D replacement in March, what actually happened was that Canon launched two different DSLRs: a 700D to replace the 650D and a new 100D which Canon claim is the smallest and lightest DSLR in the world. Let's look at the Canon 100D first. I can understand Canon launching this model because, for general photography, many people find DSLRs too big and heavy and the alternative options of bridge cameras and compact systems cameras fail to deliver DSLR-level performance (e.g. in autofocus capability). For bird photography, though, there is no advantage to having a 30% weight/size saving in the camera body because all suitable lenses make this saving insignificant and you're just left with a fiddly, unbalanced combination.
Moving on to the Canon 700D, which is the latest model in a range that has been the entry point for most serious bird photographers since DSLRs began. Under the right circumstances, xxxD bodies can produce images every bit as good as megabucks pro bodies, which is why I still recommend the 600D as an ideal started body for people wishing to take up bird photography. Where the pro bodies reflect 'state of the art' in DSLR advancement, the xxxD series reflect the 'state of the market' for everyday DSLR users. For this reason, new bodies in this series are important and highly anticipated. They will never be ground-breaking, but are expected to provide significant incremental improvements. So how does the 700D stack up against this expectation? Well, what can I say? The only differences from the old model are an 'improved finish', an ability to preview 'creative filters' (gimmicky effects unbecoming of any DSLR in my view) and - wait for it - a mode dial that now turns 360 degrees! This must be a contender for the most disappointing new product release in the history of photography. If you're the type of person who feels the need to have the latest model, you may like to consider this: the pre-order price for the 700D is £620, whilst the almost-identical 600D can be bought new for £390. That's 60% more to change the badge from a 6 to a 7! Looked at another way, you could go two model ranges up and buy a new 60D for less money (£610) or go for a used body three or four model ranges up. Unless you have a lens at least as good as the Canon 400mm f/5.6, an even better option would be to stick with the 600D and put the extra £230 into your lens upgrade fund. For developing bird photographers, it's all about buying smarter!
In other news this month, there have been more price reductions than recent months (and no price increases), so all good news there. The 1100D, 600D, 60D and 6D bodies have dropped 2%, 8%, 2% and 3%, respectively, and the 300mm f/2.8 II and 400mm f/4 lenses have dropped 2% and 4%.
Another quiet month as far as equipment announcements are concerned. There is speculation that a replacement for the Canon 60D body will be announced later this month, with a 7D replacement later this year. It is expected that both will move 'up-market' to broaden the spread of the model range. The 3% fall in the price of the 60D body whilst all other Canon bodies stayed at exactly the same price this month in interesting. To many, the 60D was a disappointing step in the evolution of the xxD body series. It will be interesting to see what Canon comes up with as a replacement.
The only other price reduction this month was a 2% drop for the 400mm f/4 DO lens. This lens uses a Diffractive Optical element that allows the size and weight of the lens to be greatly reduced. In practice, though, I've never seen a great image taken using one of these lenses and, at £5200, that's not what you'd expect. If lens size and weight are a big issue for you, I would recommend the 300mm f/2.8 Series II instead of this lens. Canon has said it will develop more DO lenses in the future. Let's hope they're better than this one.
Speaking of 300mm lenses, both the Canon f/4 and f/2.8 II versions have seen 2% price rises this month, whilst the 1.4x and 2x extenders have gone up 8%. All unwelcome hikes!
No major announcements this month on the equipment front for the items I track. Of interest, although I don't generally track Nikon gear, is their announcement of an 800mm f/5.6 lens, which seems pretty much identical in spec to the Canon equivalent launched five years ago. This is about par for the course for Nikon, who took 8 years to add image stabilisation to their 500mm and 600mm lenses after this was added to the Canon versions. On the other hand, Nikon have taken the lead in launching a high-megapixel (36MP) full-frame body, the lack of which continues to frustrate many Canon enthusiasts. A price comparison is also interesting, with the pre-order price of the new Nikon 800mm an astronomical £15,600, compared to £9700 for the Canon version. Again, to be fair to Nikon, their 500mm and 600mm lenses cost roughly £6000 and £7000, compared to Canon's new versions costing £8000 and £11,000. In truth, taking the Canon and Nikon systems as a whole, there is not all that much to choose between them. In practice, 'operator capability' will certainly be a bigger factor than equipment capability.
On a completely separate theme, this month I noted an interesting development in an area I've predicted for many years will become of major importance to bird photography, namely the extraction of high-quality still images from video footage. The reason this will eventually become so important is that it will remove one of the most difficult-to-acquire skill of bird photographers, namely timing. It will be possible to just leave the camera to run during capture and then just extract the frames later that correspond to the peak of the action or the best poses. I don't normally mention the Canon 1D C body, which is essentially a 1D X with '4K' video recording capability added (pre-order price £10,000!). However, seeing some of the stills captured from its footage finally shows the feasibility of this technique.
After a few months of price reductions across the board, there have been some increases this month, with the Canon 1100D and 600D bodies going up 3% and the 1D X and 5D Mk III going up 2% and 1%, respectively. Disappointingly, the Canon 300mm f/2.8 II lens also went up 3%, taking it back up to the £5000 level. As a slight consolation, the other Series II telephotos (400mm, 500mm and 600mm) all dropped 1%.
Once again, this has been a good month for price reductions, with most of the Canon camera bodies and lenses I track seeing reductions. At the lower end, the 600D and 60D dropped 4% and 6%, respectively. In the mid-range the new 6D dropped 11% (at which it is still overpriced), whilst the 5D Mk II dropped 17% as Canon finally discontinued it. The 5D Mk II has probably been the most ground-breaking DSLR ever and will be remembered with fondness. At under £1300 while stocks last, this is an incredible bargain. At the top end, the 1D X dropped 4%, taking it below 90% of its launch price, a welcome step on its way to a reasonable level. The 1D X is winning favour for its excellent high-ISO noise performance, which opens up new photographic possibilities, but its limited resolution continues to cause frustration and means many photographers are holding on for Canon's 'big-megapixel' model(s) expected later this year.
On the lens front there have been further 2-3% reductions in the Canon 400mm f/2.8, 500mm f/4 and 600mm f/4 Series II superteles, keeping them on track to achieve more sensible prices later in the year. There was also a 3% drop for the Sigma 150-500mm zoom, but this is still not down to its former price point. Finally, the Canon 1.4x and 2x Series III extenders (teleconverters) also dropped 3% to reach two-thirds of their launch price, which is a realistic price (even though it is nearly double the price of their Series II equivalents three years ago).
Amazingly, only just over a month after its announcement, Canon's 6D body is already in stock. The variation in Canon's new product lead times is baffling: a product announced today could become available any time from 2012 to 2014. Anyway, if you're interested in the advantages of full-frame cameras, I would seriously consider a 5D Mk II at £1500 whilst it is still available. If (and only if) you're into more action-oriented bird photography, it could be worth paying the extra £800 to get a 5D Mk III for its improved autofocus, but don't convince yourself that the image quality will be noticeably better than its predecessor. Price-wise, at least the 5D Mk III is now in sensible territory, unlike the £5000 1D X, from which I've yet to see an image that couldn't have been taken with older/cheaper cameras. Sensible territory for the 1D X would be well under £4000, whilst the new 6D would be under £1300.
My main prediction for 2013 is that we will see both full-frame and crop bodies with much higher pixel densities than the current range of 20-ish megapixel FF bodies. These will obviously have poorer noise performance than the current FFs, but their apparent reach will prove irresistible to most bird photographers.
Looking at price movements this month, there is plenty of good news, with a number of further reductions - and no increases - across the items I track. The Canon 1100D, 600D, 60D, 5D Mk III and 1D X bodies are all down 3-4%, whilst the Canon 100-400mm, 300mm f/2.8 II and 500mm f/4 II lenses are down 2-3%. The last of these, the 500mm f/4 II, has now dropped below the £8000 threshold, giving encouragement that it has started its journey to its target price of, hopefully, around £6000.
This month, Canon has finally responded to the widespread (and justified) criticism that its new flagship DSLR, the 1D X, was unable to autofocus at apertures below f/5.6. Earlier 1D series models could autofocus at f/8, albeit with reduced speed and flexibility. Now, a firmware update can be downloaded that will allow the 1D X to AF at f/8 enabling, for example, the 500mm and 600mm f/4 superteles to be used with a 2x teleconverter. A similar firmware upgrade for the 5D Mk III will be available from next April.
Further price reductions in the last month include: the 1100D, 600D, 650D, 5D Mk III and 1D X bodies down 2%, 7%, 7%, 9% and 2%, respectively; the Sigma 50-500mm and Canon 300mm f/2.8 II lenses down 9% and 2%, respectively. Unfortunately, the Sigma 150-500mm zoom went back up 3%, taking it back to its end-of-2011 price.
To me, the most notable price reductions are the Canon 5D Mk III body and the 300mm f/2.8 II lens. The first of these had a £3000 launch price which has now reduced by 20% to £2400 (in just four months!). The second, despite a launch price of £7500, has now dropped by a third to £5000. I predict further price reductions in these products, but at least they have now move out of the ridiculous zone. Hopefully, once stocks of the 500mm and 600mm f/4 II lenses become generally available, they will also dip below the ridiculous.
As a final note for this month, I see the 5D Mk II is now starting to be removed from dealers' lists, so don't hesitate to snap one up at the bargain £1500 price point before they disappear.
On 17 September, Canon launched the new Canon 6D body, a 20-megapixel full-frame DSLR with a launch price of £1800 and availability expected around the end of the year. Initial impression is that Canon have effectively taken the 5D series up a level with the launch of the 5D Mk III, but introduced a new 'entry' level with the 6D. The 6D is therefore in some ways a downgrade compared with the 5D Mk II in the same way as the 60D was a downgrade compared with the 50D. Spec-wise, the 6D seems to have no advantages over the 5D Mk II for bird photography. In particular, its autofocus system seems very basic and it has even fewer megapixels to play with than the four-year-old 5D Mk II. I have yet to see a bird photographer who has showed any further interest in the 6D once they've read the spec list. For now, therefore, I would definitely recommend grabbing a 5D Mk II while stocks last, rather than paying an extra £300 and waiting months for a camera that will give you nothing extra.
As with other recent camera launches, initial comparisons and judgments will always be made based on the launch price. Since these can be inflated by up to 30% or more, it's easy to be overly harsh on the cameras. For example, if the 6D were to be evaluated at £1200 - a price point £300 below the 5D Mk II rather than £300 above it - it would undoubtedly be seen in a more favourable light. On the other hand, if Canon wanted to avoid their new products receiving lukewarm responses, they could rack back on their launch price inflation. They can't have it both ways.
After a year and a half's wait, I've finally seen small stocks of the Canon Series II 500mm and 600mm f/4 lenses appearing in the UK. Hopefully prices will soon start to drop to something more sensible (it's good to see that the other Series II superteles - the 300mm and 400mm f/2.8 lenses - have dropped by a further 2-3% this month).
Following last month's record number of price reductions in the equipment I track, there have been several further reductions this month: the Canon 600D, 650D, 60D and 7D bodies have dropped 3%, 6%, 4% and 2% respectively, and the Canon 400mm f/5.6 and Sigma 50-500mm lenses have dropped 3% and 8%. Time to start Christmas shopping?
After many months of waiting, the Canon 1D X and 5D Mk III bodies are now generally available. Were they worth the wait? From a bird photography viewpoint, I'm far from convinced, especially since the excellent 1D Mk IV body is no longer available and the 5D Mk II body will soon go the same way. Photographers are now having to pay 50% more for only minor improvements and, in some respects, are getting less than they got before. Not surprisingly, apart from the usual Canon 'fanboys', the response from leading bird photographers has been decidedly lukewarm. Maybe if the prices drop by, say 25%, people will start to focus more on the improvements.
There have been a number of price reductions this month: the Canon 650D, 5D Mk II and 5D Mk III bodies are down 12%, 6% and 4%, respectively; the Canon 300mm f/4, 300mm f/2.8 II, 600mm f/4 II and 800mm f/5.6 lenses are down 5%, 4%, 2% and 3%; the Canon 1.4x III and 2x III extenders are both down 7%; the Sigma 50-500mm and 150-500mm zooms are down 4% and 7%. For the equipment I track, this is the largest number of significant price reductions I've seen in a single month for two years, so that's got to be good news!
This month, Canon has finally announced its long-awaited entry into the 'mirrorless camera' market in the form of the 'EOS M' model, which is due to be available from October. Most major camera brands now have similar 'Compact System Camera' (CSC) ranges that sit between DSLRs and traditional fixed-lens digital cameras. The EOS M has an 18-megapixel APS-C sized sensor and can use any Canon EF or EF-S lens through the use of an adapter. It would therefore give similar results to a DSLR from the 'xxxD' model range, but with around half the size and weight. So does that make them of interest to bird photographers? In a word, 'no'. For bird photography, the great majority of the size and weight is in the lens, not the body, so the miniaturisation has no benefit. Worse, with an entry price of £770, you're actually paying a premium for the miniaturisation as well. For that price, a new 60D or a used 7D would be a much better bet. Over the next year, I'm sure I'll see plenty of bird images from EOS M cameras that are just as good as those taken on DSLRs (unlike images from smaller-sensor compact digital cameras), but that's not the point: I would still use a toaster to make toast even if someone proved they could make it with a cigarette lighter.
More significant than the EOS M launch, then, is the first drop in price of the Canon 5D Mk III body from £3000 to just under £2800. This is still a premium price for this camera body, but at least it gives hope that we may see it dropping to something more reasonable over the coming months. Sadly, the 1D Mk IV has now started to be removed from stock lists, leaving the 50% more expensive (and not yet generally available) 1D X as the only option for action-oriented pros.
All other prices and availabilities are almost exactly the same as last month.
Globally, tiny quantities of 1D X bodies and Series II 500mm and 600mm lenses are finally becoming available, but I haven't yet heard of any reaching UK bird photographers. Initial reviews of these items are suggesting the improvements are relatively small considering the long waits and huge price hikes. The main benefits seem to be the improved IS and reduced weight of the new lenses, especially the 600mm. In my first 'blog' entry below (16 months ago!), I made the following comment about the 'forthcoming' superteles: "It remains to be seen whether there are any worthwhile improvements in image quality or AF performance". Early reviews seem to be suggesting that improvements in these areas are slight at best, but the jury is still out.
In contrast to the production delays of the expensive products, Canon seem to be able to ship budget gear straight after launch, despite the much greater product volumes involved. The 650D was only launched in mid-June, but is already generally in stock!
As expected, the arrival of the £700 650D has meant stocks of the 550D are now dwindling, leaving the £500 600D as the main option for bird photographers looking for new started gear. New cameras in this class tend to have only very minor improvements, but greatly inflated launch prices. I can't think of any reason why someone would pay £700 for a 650D when the same money would buy you a good used 7D, a current model from two classes up! In the early days of digital, rapid technical advances and scarce availability made used DSLRs an unattractive proposition. That's no longer true, though: the day of the used DSLR has definitely arrived.
It's finally possible to get hold of a 5D Mk III, although still at the launch price of £3000. Independent testing (see, for example, the DxOMark scores) shows sensor performance improvements of around half an F-stop through the normal ISO sensitivity range, despite Canon's headline claim of a 2-stop improvement. They also show that dynamic range (the ability to retain detail from bright highlights to dark shadows) hasn't improved at all through the normal ISO range. Given the extra three years' development time, this is not impressive, especially taking account the price hike.
It's still likely to be some time before you'd get your hands on a 1D X or a Series II 500mm or 600mm lens.
As predicted, Canon have now launched the successor to the £530 600D, in the form of the £700 650D. So what do you get for the 30% price increase over the current model? Well, for the bird photographer (as opposed to home video-maker), the answer is virtually nothing. All the headline specs are the same, except for a continuous shooting speed increase from 3.7 to 5fps. An articulated touch screen will make no difference whatsoever to your ability to take bird photos.
General prices are the same as last month except for a 10% increase in the price of the Sigma 150-500mm lens and small changes in the prices of the 1100D, 60D and 1D Mk IV bodies (-5%, -3% and +3%, respectively).
A month after initial trickles of the new Canon 5D Mk III, stocks are still not generally available. I suspect this will have given many prospective purchasers time to reconsider grabbing the outgoing 5D Mk II whilst they're still available (or two, in fact, for the price of a new Mk III), or waiting a little longer to see if Canon bows to the market demand for a higher-megapixel model.
There are also still no stocks of the 1D X body or the Series II 500mm or 600mm lenses worldwide. Canon's ability to delay products it has already launched is becoming quite impressive! If they launched 'my ideal product' today, I'd go ahead and buy what was available now rather than pay a huge pre-order price, then wait an indeterminate number of months for a product that still had teething problems. Maybe that's what they want!
The biggest price changes this month have been a 14% increase for the Sigma 50-500mm zoom (avoid) and 8% increases for the Canon 1.4x and 2x extenders. There has also been a 3% rise for the 1D Mk IV body as stocks ramp down and a 3% drop in the 5D Mk II (after last month's 10% rise). Finally, there has been a 2% rise in the price of the Canon 100-400mm zoom, taking this lens back to its all-time highest price - even more reason to go for the 400mm f/5.6 prime instead.
One last thing: I don't normally plug my services through my Equipment News blog, but I'm pretty fired up by the initial response to the launch of my new Helpline, which makes it possible for me to give advice and training to people anywhere in the world by telephone, or online via Skype. As far as I'm aware, I'm the only bird photographer offering this service. For more details, click here.
Compared to Canon's long lead times between products being announced and finally becoming available, it's good to see that 5D Mk III bodies are already starting to ship in some countries. UK photographers who don't mind paying the full £3000 launch price should be in with a good chance of getting their hands on one during April. In a sinister move, I've heard Canon are controlling the price at which this camera can be sold, meaning we may not see the price of this (or other new products) falling as quickly as for past products. On the plus side, early reviews seem to confirm that this camera is as good as expected. I have to say, though, that it's not twice as good as the camera it replaces, despite being twice the price, so bagging a 5D Mk II while they're still available may be a good move. This may be the reason 5D Mk II's have gone up in price by 10% this month.
The only other significant price change this month has been a 2% rise for the Canon 800mm f/5.6, taking the price up to £10,000! If I had that much to spend on a supertele, I'd be waiting for the new Series II 600mm f/4 instead.
All other prices and availabilities are as last month.
A final point of interest is the expected launch of a new Canon 100-400mm IS II zoom within the next year, to replace both the existing 100-400mm IS zoom and the 400mm f/5.6 prime. The first of these is 'good, but not great' optically, whilst the second is sharp and fast-focusing, but with no IS. The latter is a well-loved lens for flight shooting and provides an upgrade path that's missing from the Nikon range, namely a sharp, fast 400mm lens for around £1000. My concern is that, even if the new zoom is equally sharp and fast, it is likely to cost over £2000. If it's confirmed later this year that the prime will be discontinued, it may be worth getting hold of one before stocks disappear.
The big news this month is the long-awaited launch of the Canon 5D Mk III. Full specs can be found here. The biggest change compared to its predecessor is the inclusion of the 61-point autofocus system developed for the 1D X, which should address what has, up to now, been the biggest weakness of the 5D model range for bird photography. Disappointingly for me, Canon has chosen to make only a tiny increase in the megapixel count from 21.1 to 22.3, but this is not surprising because it is driven by the need to optimise for video shooting (I can't help hearing the old Buggles song with the lyrics "Video killed the DSLR"). Anyway, that aside, I'm sure the 5D Mk III will be a superb piece of kit and, as a fan of its predecessor, I can't wait to get my hands on one (though not at its inflated preorder price). The other big spec change is an increase in the shooting rate from 3.9 to 6 frames per second. I'm not a fan of machine-gun shooting, but this will help for action situations such as flight shots. The thing I've always loved about the 5D Mk II is the rendition of colours and tones and this will hopefully be further improved in the new model, plus even better noise performance. I'll add further thoughts shortly but the bottom line is that this should be a great camera. I want one!
The other camera body launch expected imminently is the replacement for the 600D, which may explain this month's 5% price reduction in the 550D, which will surely then be discontinued. The only other significant price changes this month have been 3% reductions in the Canon 1100D body, the Sigma 150-500mm lens and the Canon 1.4x and 2x Series III extenders.
There have been reports that several already-launched products will start to ship in the next two or three months, including the 1D X body and the Series II 500mm and 600mm f/4 lenses. Don't hold your breath, though! At least the Series II 300mm and 400mm f/2.8 lenses seem to have finally become fully available, more than a year after their launch.
Further reductions on Sigma zoom lenses (8% off the 50-500mm and 3% off the 150-500mm) take the prices of these lenses back to where they were a year ago. Sigma's price hike last May obviously didn't wash with the market.
Some Canon items have seen unwelcome 3%-5% rises, namely the 550D, 60D and 5D MkII bodies, the 300mm f/4 and 100-400mm lenses and the 1.4x and 2x extenders.
This is the 12th of my monthly Equipment News updates, so I thought it would be good to look at what's happened over the last year. In that time, small amounts of stocks of the Series II 300mm and 400mm f/2.8 lenses have trickled into the UK and the prices of these lenses have dropped by 20% and 10%, respectively. The accompanying Series III extenders have dropped by 17%. The two new budget DSLRs, the 1100D and 600D have become available and their inflated launch prices have dropped by 26% and 21%, whilst the older 550D has dropped by 7%. At the top end, the outgoing 1Ds Mk III has gone up 8%. On the lens front, there are still no delivery dates for the Series II 500mm and 600mm superteles, despite stocks of the Series I models being long gone. The Sigma 500mm and 800mm lenses rose in price by 11%, perhaps capitalising on Canon's lack of ability to stock competing products. On the horizon, we have a new pro body to look forward to - the 1D X - but this doesn't seem to offer much more bang for its many more bucks, and we still haven't seen much more of the Canon 200-400mm with built-in extender. All other equipment prices are the same to within 5%.
Perhaps the most striking thing, then, is that very little has changed in 12 months! In some ways this is disappointing, but in other ways reassuring. Despite a lot of marketing and rumour-mill noise, new products come along only rarely and, when they do, the improvements are only marginal. This suits the market leaders, especially since people will pay inflated pre-order and post-launch prices for all new products, so it will never change. The encouraging thing is that any investment in equipment, especially in lenses, will give lasting value and won't suddenly be invalidated by an unexpected new product. It also means that bird photographers can gradually build up to high-quality gear, getting decent resale prices for their existing equipment and, most importantly, concentrate on bird photography itself after each upgrade. Obsession with equipment is probably the biggest factor that holds back the quality of photographers' results. Give a pro a Canon 400mm f/5.6 and a cheap used camera body and they'll show you results that are 90% the same as the most expensive gear in the world. It's all about the image!!!
Following last month's price reductions on Canon equipment, there have been further 4% reductions on the 7D and 5D Mk II bodies and the 300mm f/4 lens (although the 100-400mm zoom has gone up 9% after last month's 11% drop).
Also, for the first time in many months, there have been a couple of reductions in Sigma lens prices, with the 50-500mm and 150-500mm zooms dropping by 6% and 9%, respectively. I still wouldn't touch the first of these, but the second is now an even better stepping stone on the way to a sharp prime lens such as the £1100 Canon 400mm f/5.6.
There are rumours of new image-stabilised versions of Sigma's 300mm and 500mm lenses in 2012, as well as the much anticipated 7D Mk II and 5D Mk III. If you're interested in following rumours such as these, the best source is CanonRumors.com, which provides daily updates on all upcoming gear relevant to Canon shooters. The main thing to be aware of if you use this site is that all rumours are given a credibility rating from CR0 (pure speculation) to CR3 (fact). All articles rated lower than CR2 can be safely ignored.
Happy shooting in 2012!
Canon equipment costing up to around £1200 has seen some welcome pre-Christmas reductions, including 3% off the 600D, 60D and 7D, 4% off the 550D and 6% off the 1100D. As well as these reductions on camera bodies, there has been an 11% reduction in the price of the 100-400mm zoom lens (not that I'd recommend that lens though) and a 3% drop in the price of the Series III 1.4x and 2x extenders. On top of all this, Canon is offering a limited time cashback refund of £40 on the 550D and £50 on the 600D. Unfortunately, there are no reductions on more expensive gear, but all reductions are good for consumers.
Equipment availability is almost exactly the same as last month, with a trickle of stock on the new Series II 300mm and 400mm f/2.8 lenses and no sign of the new Series II 500mm and 600mm f/4 lenses. In fact, the original target shipping dates for these last two lenses were for this month, but Canon have now said this will not happen until well into 2012, and have refused to give alternative dates. This is not a good time for people looking to upgrade to supertelephoto lenses!
Equipment prices and availabilities almost exactly the same as last month.
The big news is Canon's announcement of the long-rumoured replacement for the existing 1D Mk IV and 1Ds Mk III camera bodies (see full details here). The new Canon 1D X professional body (pre-order price £5300) is due to be available from next March (think May or June for the first UK stocks). The 1D X is a full-frame camera, and apparently marks the end of the 1.3x crop factor APS-H sensor format. It has major enhancements to its AF system (though still unproven) and Canon's fastest-ever shooting rate (12fps), BUT it produces only 18-megapixel images! Although this will keep high-ISO noise very low and allow for improved dynamic range (both very important), it simply will not have the resolution/reach desired by most bird photographers.
Just when we thought high pixel densities might allow us to carry 300mm lenses instead of the 'big guns', this represents a backward step. In a further cruel twist, even if you're looking to regain reach by attaching the new Series III extenders to a Series II supertele lens, Canon has disabled AF function below F/5.6! One of the big advantages of the 1D series professional cameras over the 'prosumer' models was always the ability to AF at f/8, enabling a 2x extender to be fitted to the 500mm or 600mm f/4 lenses (and a 1.4x extender to be fitted to the 800mm f/5.6). This move takes away that advantage at a stroke.
Whilst the 1D X will be the perfect body for some photographers (e.g. sports shooters), it still represents a frustrating departure for bird photographers. It's like building a supercar and then fitting a 1-litre engine to make sure it never misbehaves.
Watch out for the rush on 1D Mk IV's and roll on the 5D Mk III or 7D Mk II...
There have been further significant reductions in Canon camera body prices this month, with the 1100D down 8%, 550D down 6%, 600D down 8%, 60D down 3%, 5D MkII down 9% and 1D MkIV down 5%. Lens prices have been static apart from the pre-order price of the new 500mm f/4, which has dropped by 5%. The new series III 1.4x and 2x teleconverters have also dropped by 7%.
Overall, a very welcome set of reductions making this a good time for a camera upgrade.
The other big news is that, a full year after they were announced, the new Series II Canon 300mm f/2.8 and 400mm f/2.8 lenses are now shipping! Only a few more months to wait for the even more interesting 500mm and 600mm models...
The last month has seen no new relevant equipment announcements and no change to the availability of the new Canon supertelephoto lenses. After last month's price increases by Canon and Sigma, some of the items affected have had their prices reduced again, namely the Canon 1100D, 5D MkII and 7D bodies (down 5%, 3% and 4%, respectively) and the Canon 100-400mm zoom (down 3%). The large price rises by Sigma are still in place.
At least there was some positive news this month!
The last month has seen no new relevant equipment announcements and no change to the availability of the new Canon supertelephoto lenses. Also, there have been price increases of 2%-5% on all Canon camera bodies, plus the 100-400mm and 400mm f/4 lenses. Worse still, the prices of the Sigma 500mm f/4.5 and 800mm f/5.6 lenses have gone up by 7% and 11% respectively, taking them even further into the 'poor value for money' category.
Hopefully I'll have some more positive news next month!
The last month has been very quiet, with no new relevant equipment announcements and static prices on most camera bodies and lenses.
The retailers I use for benchmarking - Warehouse Express and Mifsuds - have the same prices as last month to within 1%, except for the following: 1100D and 600D bodies down 2% and 4% respectively; 1D Mk IV body up 3%; 300mm f/4 lens up 2% and the Series III 1.4x and 2x teleconverters down 2%. Significantly, these retailers are no longer listing the Series I 300mm f/2.8 or 500mm f/4 lenses, or the Series II 2x teleconverter, confirming that stocks of the superseded models are just about gone, even though their replacements may not be available for several months.
Incidentally, if you want to take a broader view of prices and availability, you may be interested in the Camera Price Buster website, which does an excellent job of aggregating information from major retailers. Of particular interest are the price history graphs, which can give you a good indication of when product prices have stabilised after their inflated launch prices. Looking at the history for the 7D, for example, shows that waiting only two months after launch would have saved you £500, whereas the benefits of waiting longer than two months would have been minimal, and prices are now actually climbing.
Canon announced that, following production delays due to the Japanese earthquake, the new 300mm f/2.8 and 400mm f/2.8 lenses should start to become available from the end of August, with the new 500mm and 600mm available by the end of December. Obviously, a lot of these lenses will have been pre-ordered, so you'd be lucky to get hold of any of these lenses for some time after those dates. Anyone who is kicking themselves for not having pre-ordered can take consolation from the fact that, after a further 9% reduction this month, the pre-order price of the 400mm f/2.8 II has now fallen by £2500! I would expect it to fall by the same amount again over the coming months, so there's a heavy price to pay for getting in early.
As advised over the recent months, there's also a heavy price to pay for the as-yet-unproven improvements in the Series II superteles. Time is running out to pick up a bargain Series I lens before they've all been snapped up. I've now taken my own advice on this and picked up a used 300mm f/2.8 for only half the price of the new version.
Also on the supertele front, the price of the Sigma 500mm f/4.5 has dropped by 7% after last month's 12% rise, whilst the Sigma 800mm f/5.6 and Canon 800mm f/5.6 lenses have both gone up by 2%.
Unusually, prices on all other lenses and camera bodies were completely static (all within 1% of last month's prices).
Stock levels and prices are the same as reported in April, with the following exceptions. As predicted last month, stocks of the outgoing Canon supertelephotos are dwindling and prices rising (the 300mm f/2.8 rose by a further 5% this month). The new 1100D and 600D bodies have fallen in price by 15% and 5% respectively this month, whilst the 60D has remained unchanged. This has slightly spread out the prices of the low-end models to something a little more sensible, especially since the older 1000D and 500D models are now disappearing. Prices of the high-end models - the 7D, 5D MkII and 1D MkIV - have all increased by 3% this month, presumably due to the increase in VAT rate.
On the lens front, there have been some significant price hikes in the Sigma lenses, with the 500mm, 50-500mm, and 150-500mm lenses going up by 12%, 10% and 6%, respectively. This makes Sigma lenses less competitive in comparison with Canon lenses, which have mostly held their prices this month.
The only other significant change this month is an 18% reduction in the pre-order price of the new 300mm f/2.8 Series II lens, which offers some hope that the prices of the new lenses will eventually drop to something less astronomical.
Stock levels and prices are the same as reported in March, with the following exceptions. As predicted last month, stocks of the outgoing Canon 500mm f/4 are dwindling and prices rising (by 6% this month). The same trend has continued for the 300mm f/2.8, which has gone up another 3% this month. The new 1100D and 600D bodies are now in stock, with prices around the same as the pre-order prices. The 600D has actually dropped by 4% and the 60D has increased by 4% this month but, even so, there's only just over £100 price difference between these current models. Canon are crowding the market with new consumer DSLRs that add little to their predecessors, making used 'quality' DSLRs such as the 40D, 50D or 1D Mk IIN more and more attractive. Partly to blame is the current obsession with DSLR video features, which are used to justify price hikes without giving any benefit whatsoever to stills photographers.
Although not yet proven in the field, I still think the raft of next-generation Canon supertelephotos due out over the coming months, together with the Series III extenders, are going to be real game-changers (for those who can afford them). To me, the most exciting options are the new 300mm f/2.8 and 600mm f/4 which - with and without their matched extenders - will provide an unprecedented set of shooting capabilities.
On the flip side, many people are getting excited about another new Canon lens that I didn't even bother to mention last month, the Canon 200-400mm f4 zoom with built-in 1.4x extender. Ignoring the 'built-in extender' gimmick, this is just a copy of the equivalent Nikon lens that's been around for nearly a decade. The latter is good for 'big stuff' such as mammals/people, but has never been able to compete with the similarly-priced prime superteles as a bird photography lens. Why have a 560mm f/5.6 lens that suffers the twin image quality degradation of zoom design and extender use when you can have a perfectly optimised 500mm f/4?
The only other significant price change this month has been a increase in the cost of the Sigma 150-500mm lens to £800. Although only a 4% rise, this takes the price of this 'so-so' lens even closer to that of the ultra-sharp Canon 400mm f/5.6. I know which I'd go for, and I've noticed a lot of people are finally noticing this overlooked Canon lens.
Still no stocks of the new Canon 300mm or 400mm f/2.8 Series II lenses, and the high pre-order prices have remained static this month.
The Series III Canon 1.4x and 2x extenders have finally become available to buy, although stocks are limited. The price of these extenders has dropped a further 4% to £480, but they are still 80% more expensive than the Series II models, so I would expect further price reductions once stocks become widely available. Early testing of these extenders suggests that, on existing Canon lenses, they give very little improvement in image quality or AF performance, especially on the 1.4x extender. Most of the benefits of the Series III extenders are expected to come from their use with the new Series II telephotos, so we'll have to wait for the verdict on those.
The big news this month has been the announcement of specifications for the new Series II Canon 500mm and 600mm f/4 lenses, plus the first pre-order prices. Taking the 500mm lens first, this is the same size as the existing lens, but with an 18% reduction in weight. In practice, this will make very little difference, especially since the 18% saving becomes only a 13% saving by the time you've attached a 1D Mk IV body. It remains to be seen whether there are any worthwhile improvements in image quality or AF performance. Pre-order price is £9000, which is 70% more than the existing model.
The 600mm is also the same size as the existing lens, but with a 27% weight reduction, taking it down to the same weight as the existing 500mm lens. This is very significant, because the majority of serious bird photographers regard the current 500mm and 600mm lenses as being either side of the weight limit for sustained hand-held shooting. This weight reduction therefore makes the new 600mm hand-holdable for the first time. It is also 13% lighter than the Canon 800mm f5.6 and, with a 1.4x extender, you get an 840mm f/5.6 lens that's still lighter than the 800mm f/5.6. The downside is the enormous pre-order price of £11,300!
Both the 500mm and 600mm lenses gain a new 4-stop image stabilisation system and get an 18% reduction in minimum focus distance. They will certainly be superb bird photography lenses, but they won't be available until summer and their prices are likely to remain inflated for at least a year after that. With diminishing stocks of the outgoing Series I lenses, I would currently recommend you grab an existing 500mm f/4 while you can, then trade up in a couple of years' time if you think you'll benefit from the improvements. Unless, of course, money's no object, in which case get your deposit down on a Series II 600mm to get one of the first off the production line in the summer.
Incidentally, following last month's 5% rise in the price of the Canon 300mm f/2.8, this month has seen the same rise in the price of the 400mm f/2.8. These lenses are both being replaced by Series II lenses imminently, each costing £3000 more than the outgoing model, so the price increases on the old versions reflect diminishing stocks. Again, grab an existing 300mm f/2.8 if you want a lens of this type without having to pay the earth.
On the camera body front, there have been no major changes this month. Pre-order prices of the newly-announced 1100D and 600D bodies have remained static at £420 and £680, respectively. Even with the post-launch drop of £100 expected in the first month or two, these represent poor value for money and an outgoing or used body is likely to be better value (see below for my new section on buying used DSLRs). Similarly, reductions of around 5% on the 550D and 60D bodies still don't make these good value for money.
To briefly summarise my equipment recommendations and preferred products:
Good starter kit is a Canon 80D body (£980) or 800D body (£580), plus Canon 400mm f/5.6 lens (£1200). Good alternatives would be used 60D, 70D or 7D bodies (see my guide to buying used DSLRs above). Even better would be a used Canon 7D Mk II, 5D Mk II or 1D Mk IV body.
If these are over your budget, look for used equipment on eBay, e.g. Canon 400D body with 70-300mm lens (from £150 in total).
If that's still over your budget, practice with anything you can get your hands on (e.g. any compact digital camera), shooting through your spotting scope if you have one.
An excellent upgrade from the ideal starter body is the Canon 7D Mk II (£1350).
The Canon 5D Mk IV (£2800) and 1D X Mk II (£5000) are great all-round camera bodies, but are expensive and have only moderate resolution/reach. Good alternatives would be used 5D Mk III, 1D Mk IV or 1D X bodies.
The £2350 Canon 5DS and £2600 5DS R bodies have 50 MP full frame sensors giving reach on a par with crop sensor models, albeit with only moderate frame rates.
A good lens upgrade would be a Canon 300mm f/2.8 IS Series II lens (£5600), with 1.4x and 2x extenders (£400 each). The old Series I version of this lens, which is almost as good, can be found used at less than half the price of its replacement.
Even better are the Canon 500mm f/4 IS Series II and 600mm f/4 IS Series III lenses (£8200 and £13,000, respectively), which I regard as the best all-round current lenses for bird photography, albeit very expensive. You can still get the outgoing Canon 600mm f/4 Series II at £9800, which is a relative bargain compared to the new Series III model. The Sigma 500mm f/4 (£5000) gives comparable performance to the Canon equivalent at a much reduced price. Alternatively, if you can get hold of a used Canon 500mm f/4 IS lens (around £3000), you would be getting the best possible value for money.
The Canon 800mm f/5.6 IS lens (£12,000) is also excellent as a specialised long-distance lens, but is not as versatile as the 500mm. It is therefore best used as an additional lens for serious photographers who already have a 500mm prime lens. The 500mm, 600mm or 800mm primes are much better options than the Canon 200-400mm 1.4x zoom, which I don't regard as a bird photography lens.
You've probably realised by now that bird photography can be an expensive activity.
On the plus side, though:
it is possible to start small and build up if you get hooked
DSLR cameras can also be used to take great general photos, such as family portraits and holiday shots
you may already have a suitable computer and printer and, if you don't, buying these will enable you to use them for other purposes
if you build up a good collection of images, you can start to publish and sell them, which can give you a real buzz; if you reach a certain level, your hobby will pay for itself and can even give you an income
wherever you take your bird photography, you will almost certainly get a huge amount of enjoyment and satisfaction from it.
Whatever camera gear you can get your hands on, give it a go! You'll never know how much fun it can be until you try it.
If you're interested in getting some assistance with your bird photography, contact me. I'd be happy to give advice or to sign you up for one of my Bird Photography Workshops.