Should you place a bird in the centre of your picture, or off to one side? What if it's facing you, or flying? What if it has a reflection, or if there are multiple birds in the shot? In this tutorial, we'll look at how getting these choices right can give your images a much more pleasing and professional look.
Basic composition The positioning of the bird within the frame has a huge impact on whether the image 'works'.
I included a high-level discussion of image composition in Tutorial 2: Getting Started. Composition is a broad subject and, in this article, I'm specifically looking at an aspect of composition called 'subject placement'. This may seem like a narrow topic for a whole tutorial, but it is a topic that causes a lot of difficulties for new bird photographers, who often take photos that could have been vastly improved by a one-degree rotation of the camera during capture or a one-centimetre shift of the crop box during editing.
I see many pictures published on the Web where it's obvious that a lot of time and effort has gone in to getting a shot: sometimes the photographer will have travelled hundreds of miles to catch up with a particular bird and then spent hours capturing and processing images, but will end up with a final image that doesn't do justice to their efforts.
The main problems are:
Cutting off random body parts, such as the feet or tail
Not giving the bird enough space in the image
Always placing the bird dead-centre in the image, or with its eye where the centre AF point would be
Not making the bird big enough in the frame, for example by getting closer, zooming in or cropping tightly
Sometimes this can't be helped but, where it can, following some simple guidelines can help you get the most out of your shots and move your photography to the next level. The good thing is, you can even revisit some of your existing shots and crop them differently to get better results without having to leave the comfort of your home.
Before I present any guidelines, though, I don't want you to think that these are rules that should always be followed. Bird photography should be a creative activity in which you develop your own style and, when called for, deliberately do things that would break any conceivable guideline. My guidelines should merely be taken as a way of helping a bird photography beginner to develop a greater awareness of the overall composition of their images.
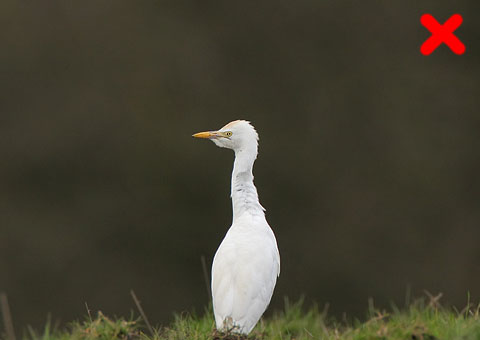
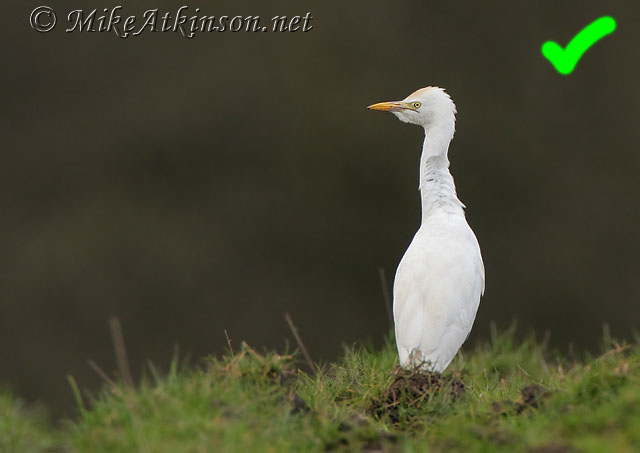
First of all, how big should the bird be in the frame? In general, in a landscape-format shot, the horizontal distance occupied by the bird should normally be around 35-85% of the image width. Any smaller than this, and the bird will look 'lost'; any bigger and it will look 'cramped'. For portrait-format shots, use the same proportion relative to the image height.

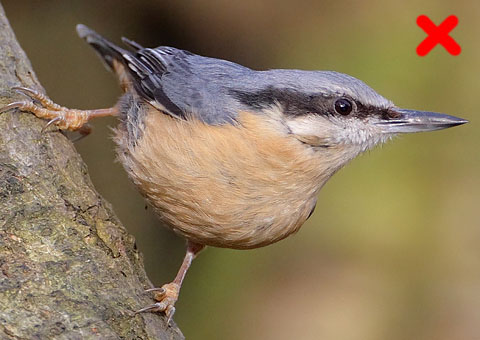
Subject size Too small in the frame and the bird looks lost; too large and it looks cramped.
This doesn't mean you shouldn't zoom in so that only part of the bird is included, but there are only certain combinations that work, the classic ones being the head-only or head-and-shoulders portrait. Normally, including most, but not all, of a bird just looks wrong.

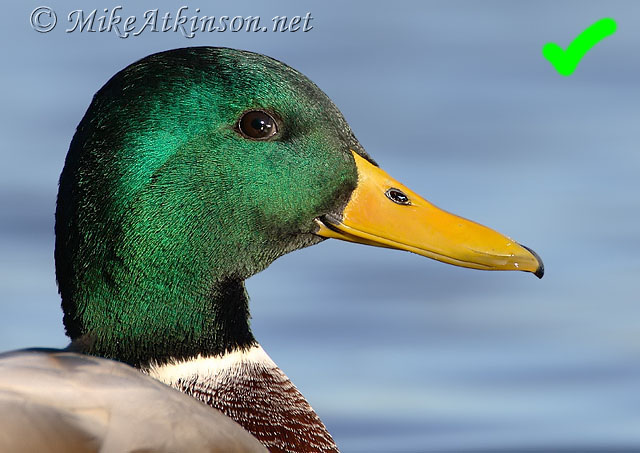
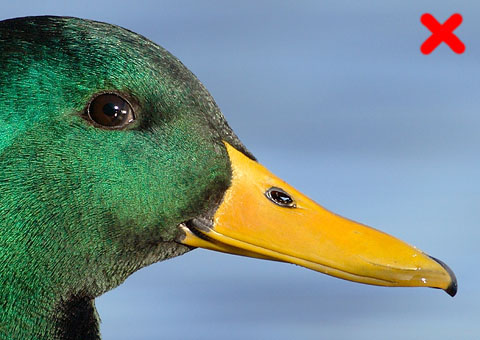
Subject size for close-ups Only certain 'crops' look right.
Once you have the right subject size, the position should be determined primarily by the concept of 'space', making use of the 'rule of thirds' as appropriate.
In most bird photos, if the bird does not have enough space above and below it in the frame, and also either side of it, it appears cramped. Beyond this, though, to get a natural appearance and a pleasing composition, the bird needs to have space to 'look into' or 'move into'. In other words, if the bird is facing to the right, there should be a bigger gap to the right of the bird than to the left, i.e. a bigger space 'in front' of the bird.
Space to look into or move into Allow more space in front of the bird than behind.
For some shots, this extra space in front can be exaggerated to good effect, giving a composition that creates real impact.
With head and shoulders shots, the same effect can be achieved by placing the back of the bird's head close to one frame edge and leaving some space in front of the bill at the opposite edge.
Space for close-ups The same principle applies.
If the bird is facing straight towards the camera, whether it's a whole body shot or a head-and-shoulders shot, a central composition works best.
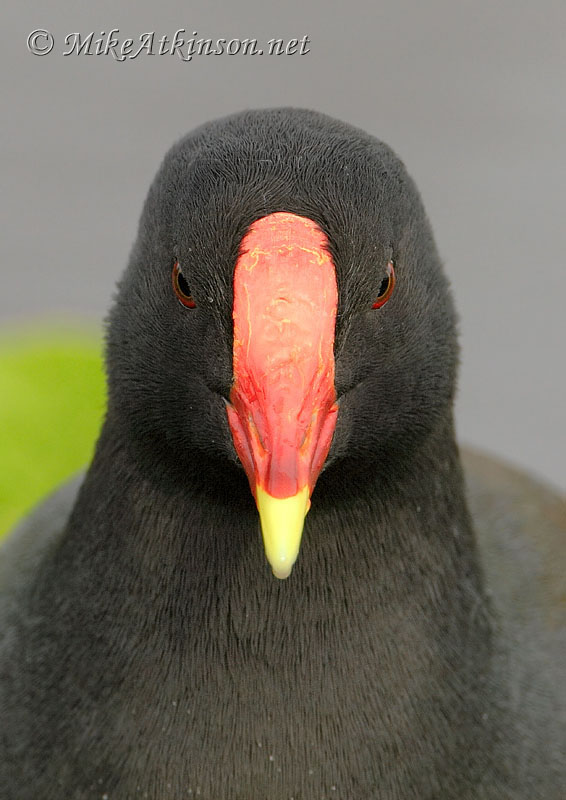
Head-on shots Central placement is best.
Another situation is where the bird's body is facing towards one edge of the frame, but its head is facing towards the opposite edge. In this case, you can also use a central composition, with equal space either side of the bird (this still allows the bird to look into the frame).
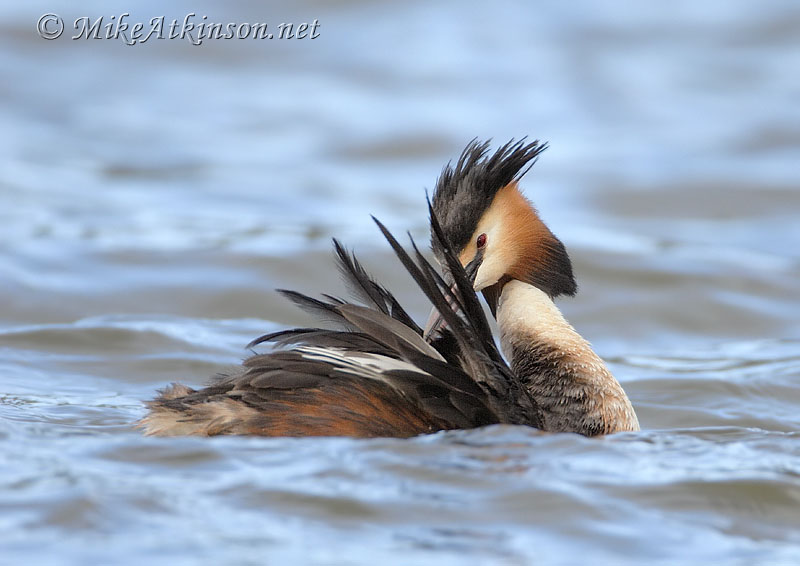
Head and body facing in opposite directions Centring the whole bird still normally gives the best result.
As for vertical spacing, this often works best with the space above and below the bird being quite evenly distributed.
Where the bird's reflection is clearly visible, such as when a wader is standing in still water or a duck is sitting on a calm pond, the bird-and-reflection combination should be treated as a single subject and spaced accordingly, again leaving a gap at the top and bottom that is equal or nearly equal.
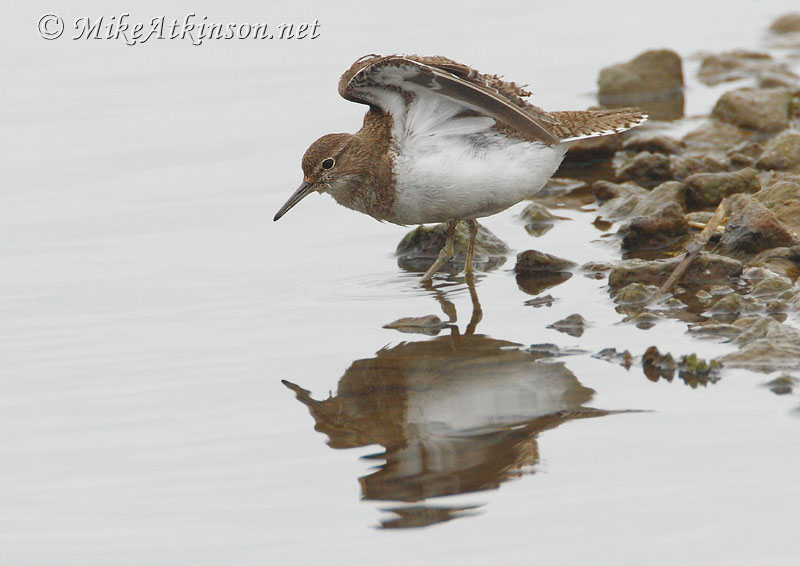
Reflections Treat the bird and reflection as a single unit.
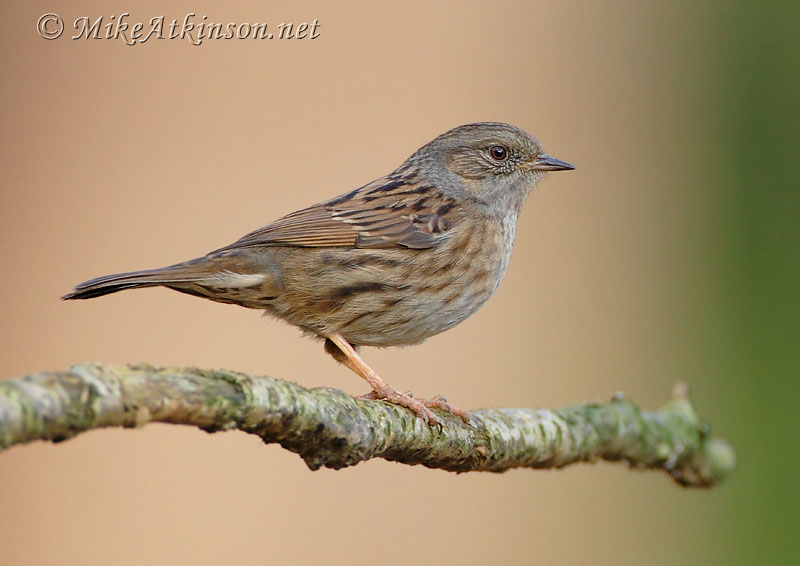
The smaller the bird is in the frame, the more it should be moved away from the vertical centre-line. For example, a small bird sitting on a fence post will look better positioned above the centre-line, so that it gives the appearance of being better 'supported'.
Perhaps surprisingly, these same guidelines can be also be used for flight shots. Give the bird extra space to 'fly into' and centre vertically or, especially if the bird is small in the frame, allow more space below if possible, to give emphasis to the fact that it is high above the ground.
Flight shots Give the bird space to fly into.
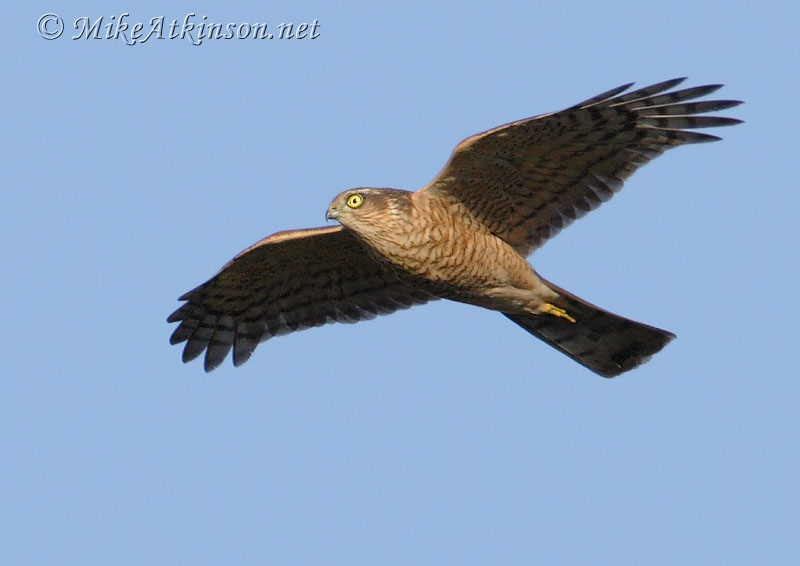
If the bird is flying 'upwards' in the frame, i.e. if you've captured it as was about to fly overhead, the same principle of 'flying into space' applies, but this time you would centre the bird horizontally and give it more space above than below.
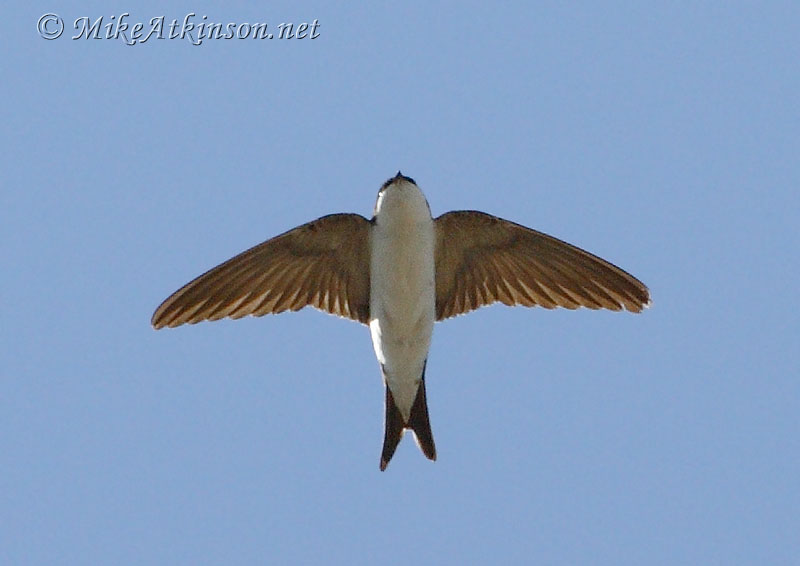
Bird flying 'upwards' With flight shots at almost any angle, you can still give the bird space to fly into.
An additional type of shot that can work well for flying birds is to include the whole body, but crop off some of the wings (typically about half of the wings). This allows for a more close-up image, especially for birds with relatively long wings.
Again, these can be treated in pretty much the same way. If there are two or more birds facing the same way, position the group as a whole such that they are centred vertically and have space to look into, moving off-centre for groups that are small in the frame. If they are facing opposite ways, centre the group in the frame, moving off-centre vertically for groups that are small in the frame.
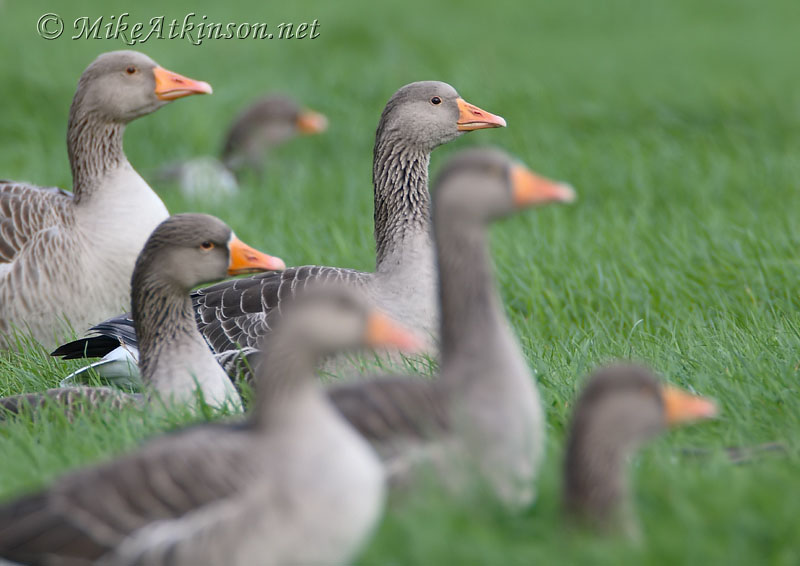
Multiple birds facing same way Allow space in front, as for single birds.

Multiple birds facing different ways Centre the pair or group of birds.
Imagine a set of lines dividing your image into three, both horizontally and vertically. You would have four points in the image where these lines intersected. For centuries, artists have recognized that placing the focal point of a picture at one of these intersection points creates a more powerful composition. Also, positioning strong lines within the image (such as a horizon or church spire) along one of these imaginary thirds also gives a more natural appearance to the image.
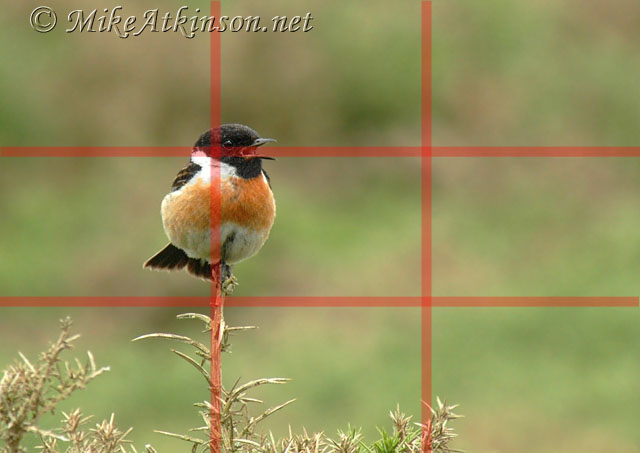
Rule of Thirds Wherever possible, make use of the horizontal/vertical lines and their intersection points.
In several places above, I made reference to moving things off-centre. The rule of thirds can be used to decide how far off-centre to make them. In the extreme case of a single bird that, for some reason, justifies being very small in the frame, you can simply position it at one of the intersections. A bird flying horizontally across the frame could be aligned along the upper imaginary horizontal or, if its wings are captured at the top of their sweep, the body could be aligned along the lower horizontal third-line.
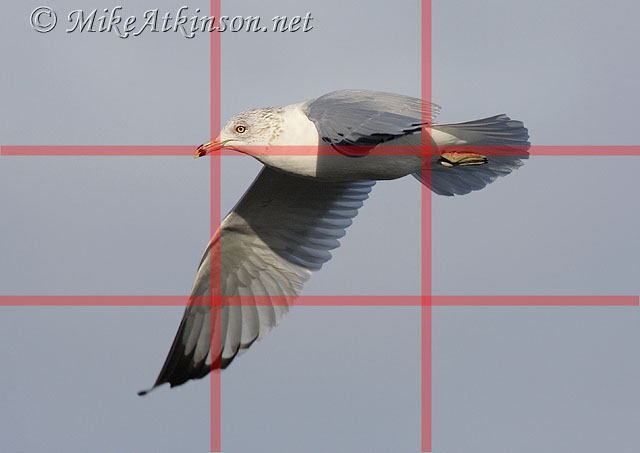
Rule of Thirds for flight shots It can still normally be applied.
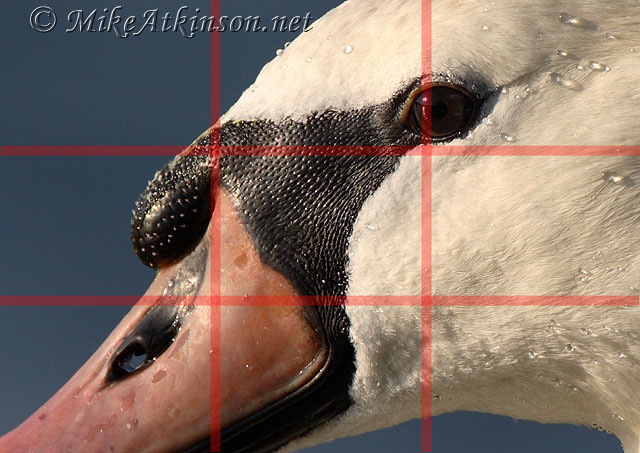
What I try to do is to picture the imaginary grid every time I crop an image, and then look to see whether I can make use of the lines or intersection points. Ideally, I look for an opportunity to place the bird's eye (the ultimate focal point in bird photography) at one of the intersection points. If this doesn't seem possible, I will often change my crop size - making the bird bigger or smaller in the frame - to see if that then makes it possible. However, I don't regard this as a fixed rule, so if it doesn't come naturally, I will quite happily ignore it.
Rule of Thirds can't always be applied Feel free to ignore it in some circumstances: this image breaks all the 'rules', but I still like it both as a composition and as a study in texture.
Ultimately, if the image looks right, it is right, although it's surprising how often the images that do look right make use of the rule of thirds in some way.
To try to condense all of this information for ease of reference, I have summarized the above guidelines, plus one or two extra ones, in the table below.
In all cases, the guidelines relate to birds or groups of birds that are relatively large in the frame. Smaller subjects should be moved off-centre and the rule of thirds should be used wherever possible.
Direction faced |
Body angle |
Horizontal position |
Vertical position |
||
Perched single bird - whole bird: |
|||||
Head & body facing same side |
Vertical |
Body centred on a 'third line', with more space in front |
Equal space above & below bird |
||
|
Horiz/diagonal |
Body centred on a 'third line', with more space in front, or further forward as required to avoid cropping tail |
Equal space above & below bird |
||
Head & body facing different sides |
Any |
Equal space to left & right of bird |
Equal space above & below bird |
||
Head facing forwards |
Vertical |
Equal space to left & right of bird |
Equal space above & below bird |
||
|
Horiz/diagonal |
Slightly more space at head end of bird |
Equal space above & below bird |
||
Perched single bird - whole bird with clear reflection: |
|||||
Any |
Any |
Same as for whole bird above |
Equal space above & below bird-and-reflection combination |
||
Perched single bird - head-only or head-and-shoulders: |
|||||
Sideways |
Any |
Back of head as close as possible to edge of frame, with more space in front of bill |
Top of head close to top of frame |
||
Forwards |
Any |
Equal space to left & right of head |
Top of head close to top of frame |
||
Flying single bird - whole bird: |
|||||
Sideways |
Any |
Whole bird centred on a 'third line', with more space in front, or further forward as required to avoid cropping tail |
Equal space above & below whole bird, or slightly more space below than above |
||
Forwards |
Any |
Equal space to left & right of whole bird |
Slightly more space below than above |
||
Upwards (overhead) |
Any |
Equal space to left & right of whole bird |
Slightly more space above than below |
||
Flying single bird - head, body and part of wings: |
|||||
Sideways |
Any |
More space in front of head-and-body than behind |
Slightly more space below than above |
||
Forwards |
Any |
Equal space to left & right of head-and-body |
Slightly more space below than above |
||
Flying single bird - head-only or head-and-shoulders: |
|||||
Sideways |
Any |
Part of wing included at 'back of frame', with space in front of bill |
Top of head close to top of frame |
||
Forwards |
Any |
Equal space to left & right of head |
Slightly more space below than above |
||
Multiple birds: |
|||||
All facing same way |
Any |
Same as for single bird facing that way |
Same as for single bird |
||
Facing different ways |
Any |
Equal space to left & right of group |
Same as for single bird |
||
If you're interested in getting some assistance with your bird photography, contact me. I'd be happy to give advice or to sign you up for one of my Bird Photography Workshops.